Transform your cooking experience with a human-centered layout approach that reduces unnecessary movement, supports diverse needs, and adapts gracefully to how you truly live.
The kitchen work triangle—the spatial relationship between your sink, stove, and refrigerator—represents a foundational principle of thoughtful design validated through decades of ergonomic observation and real-world use. In today’s era of open-concept living, multi-functional spaces, and varied household dynamics, many wonder: Does this concept still hold value? This guide moves beyond rigid rules to offer a nuanced, adaptable framework for optimizing kitchen workflow. We’ll explore the historical context, decode modern applications across every layout type, address overlooked friction points, and provide practical methods to personalize spatial relationships for your habits, physical considerations, and lifestyle. Whether renovating, building anew, or reorganizing what you have, you’ll gain actionable insights to create a kitchen that feels intuitive, reduces daily strain, and invites engagement.
Introduction: Why Workflow Matters More Than You Think
Imagine preparing dinner after a long day. You retrieve vegetables from the refrigerator, carry them to the sink to wash, return to a counter to chop, then move to the stove to cook. Repeat this sequence nightly. Over time, inefficient movement accumulates into unnecessary physical effort and mental friction that subtly diminishes the pleasure of cooking. Workflow optimization isn’t merely about aesthetics or resale value—it’s about preserving your energy, time, and connection to a space used daily by you and your household.
First documented through efficiency studies at the University of Illinois School of Architecture in the 1940s and later referenced by the National Kitchen & Bath Association (NKBA) as a guiding consideration in kitchen design, the work triangle emerged from careful observation of human movement patterns. Researchers tracked task sequences, measured travel distances, and noted points of disruption across numerous kitchen configurations. Their findings consistently indicated that minimizing unnecessary travel between core work centers correlated with reduced fatigue and greater user satisfaction. While contemporary kitchens have evolved—with islands, secondary appliances, and fluid living areas challenging traditional footprints—the underlying human factors remain constant. Our bodies move through space with predictable rhythms; cognitive load increases with disorganization; the need for intuitive flow endures. This guide honors the triangle’s enduring insight while thoughtfully expanding it to meet diverse 21st-century realities. We’ll explore why certain spatial relationships support ease, how to adapt principles to your unique constraints, and where flexibility serves you better than rigid adherence.
The Evolution and Science of the Kitchen Work Triangle
Origins in Efficiency Research: From Wartime Kitchens to Suburban Homes
The work triangle concept arose from practical necessity, not abstract theory. During the mid-20th century housing boom, researchers at the University of Illinois’ Small Homes Council conducted detailed observations of homemakers preparing identical meals across varied kitchen layouts. They documented steps taken, time spent moving between stations, and moments of workflow interruption. Kitchens where the sink, stove, and refrigerator formed a compact, unobstructed relationship consistently demonstrated reduced movement and smoother task completion compared to scattered or linear arrangements.
This research informed postwar residential design, making efficient kitchen layouts accessible across new housing developments. By the 1960s, the NKBA began referencing measurable parameters for spatial relationships, clearance zones, and traffic flow. These references reflected aggregated observations on human reach, comfortable walking distances, and cognitive processing during multi-step tasks. Understanding this history is essential: the triangle was never intended as an inflexible aesthetic rule but as a human factors insight born from empirical observation. Dismissing it as “outdated” overlooks the timeless biomechanics it addresses—much like disregarding ergonomic seating principles because office environments have changed.
Why Spatial Relationships Work: Ergonomics, Cognitive Load, and Behavioral Flow
At its core, intentional kitchen layout leverages three interconnected principles that remain deeply relevant:
1. Biomechanical Efficiency: Human movement follows predictable patterns. Reaching, bending, twisting, and walking all consume physical energy. Ergonomic research confirms that minimizing unnecessary motion reduces muscle fatigue and long-term strain on joints. When core work centers form a compact, unobstructed relationship (with total perimeter typically between 12 and 26 feet in standard layouts), the cook avoids excessive walking, awkward reaches, or repetitive pivoting. Consider the physics: carrying a pot of water from sink to stove requires stability. A short, direct path reduces spill risk and physical strain. Similarly, retrieving ingredients and moving directly to prep space preserves food safety and workflow rhythm.
2. Cognitive Load Reduction: Cooking involves simultaneous mental tasks: following recipes, timing components, monitoring heat, managing ingredients. Each pause to locate a tool, navigate an obstacle, or backtrack disrupts working memory—a phenomenon psychologists term “task-switching penalty.” A thoughtfully arranged layout fosters procedural fluency: spatial relationships become intuitive, allowing movement to occur with minimal conscious effort. This frees mental bandwidth for creativity and presence. When your knife block resides near the sink and primary prep area, the sequence flows without constant navigation decisions.
3. Behavioral Flow State: Research on “flow”—a state of focused, satisfying engagement—shows that optimal experiences occur when distractions are minimized and challenges align with capability. A kitchen that disrupts movement (e.g., a refrigerator door blocking the path to the sink, narrow aisles forcing detours) creates micro-frustrations that prevent immersion. Conversely, a layout that minimizes friction supports rhythmic, rewarding activity. User experience observations in both professional and home kitchens note that intuitive spatial relationships correlate with higher reported satisfaction and reduced stress during meal preparation. When movement feels effortless, cooking shifts from obligation toward meaningful ritual.
Understanding NKBA References: Context Over Compliance
The NKBA has historically referenced the following spatial considerations for the core work centers:
– Each leg typically falls between 4 and 9 feet
– Total perimeter often ranges between 12 and 26 feet
– Clearance aisles generally allow at least 42 inches (48+ inches for multiple users)
– Major traffic paths ideally avoid cutting directly through the core work zone
These references emerged from aggregated observational data on comfortable movement and functional clearance. The 4-foot minimum helps prevent cramped interaction; the 9-foot maximum discourages excessive walking. However, critical context is often overlooked: these have always been presented as flexible guidelines, not building codes. They represent a useful starting point for standard single-user kitchens—not an inflexible mandate for every scenario. The NKBA itself acknowledges in contemporary resources that evolving lifestyles (multiple cooks, accessibility needs, open-plan living) require thoughtful adaptation. Blind adherence to measurements while ignoring traffic patterns, storage placement, or individual user needs misses the deeper purpose: creating a kitchen that works for the people using it daily. The enduring value lies not in geometric perfection but in understanding the human-centered reasoning behind spatial considerations—a foundation we’ll build upon throughout this guide.
The Modern Workflow Framework: A Layered Approach
Traditional discussions often treat the work triangle as a static shape. This oversimplification explains why many modern kitchens feel inefficient despite “checking the triangle box.” True workflow optimization requires a dynamic, layered framework that acknowledges how kitchens actually function today. We introduce the Three-Layer Workflow System: a holistic model that expands the classic concept into a responsive ecosystem supporting diverse activities, users, and contexts.
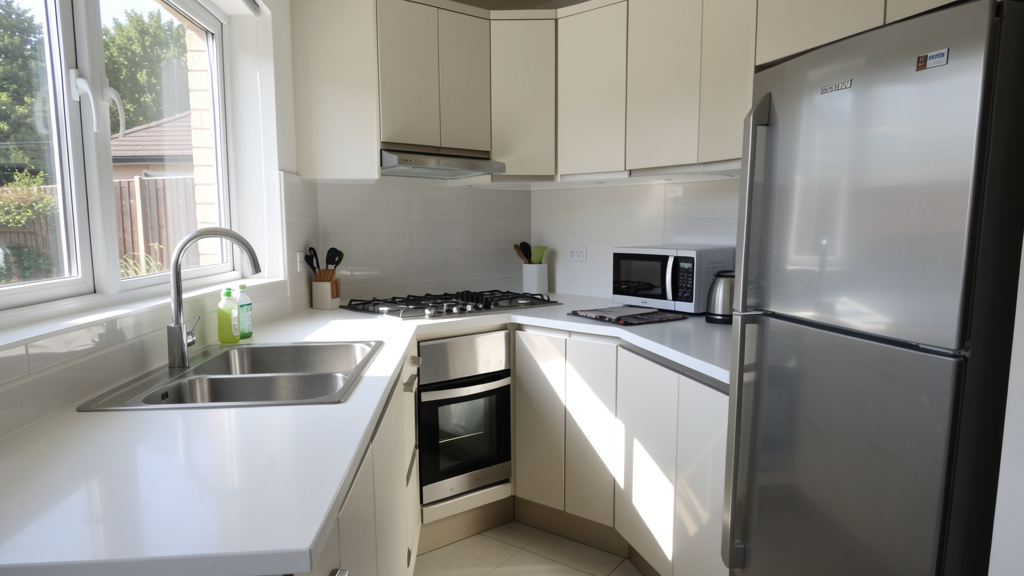
Layer 1: The Core Relationship (Sink, Stove, Refrigerator) – The Foundational Anchor
This layer preserves the timeless insight of the original concept while reframing it with precision. The three points represent functional work centers, not just appliances:
-
The Cold Storage Center: Primarily the refrigerator, but may include freezer drawers, pantry access points, or beverage stations. Critical nuance: In kitchens with multiple refrigeration units, identify which serves as the primary ingredient source for most meals. That becomes your anchor point.
-
The Cleanup Center: Centered on the main sink, integrally including dishwasher placement, compost access, trash/recycling stations, and nearby drying space. Why this matters: If the dishwasher is installed far from the sink, loading/unloading creates disruptive cross-traffic. Positioning it adjacent to the sink—ideally within the same cabinet run—creates a seamless “wash-load-dry” micro-loop that prevents workflow fragmentation.
-
The Cooking Center: Focused on the cooktop or range, accounting for oven location (wall oven vs. integrated), microwave placement, and nearby landing space for hot cookware. Critical insight: The “stove” point encompasses where cooked food transitions to serving. Therefore, adequate clear counter space on at least one side of the cooktop is essential for safely setting down pots. Without it, efficiency collapses at a critical moment.
Measuring with Purpose: Move beyond straight-line tape measures. Map the actual workflow path:
1. Stand at the refrigerator handle. Walk naturally to the sink (where you’d wash produce). Note the path.
2. From the sink, walk to the cooktop (where washed items move for cooking).
3. Measure the walking path, not just appliance centers. Does it weave around an island leg? Detour around furniture? This reveals true travel distance.
4. Check clearance: Can refrigerator and dishwasher doors open fully without blocking pathways or adjacent work areas? These “door swing conflicts” silently undermine efficiency more than perimeter measurements alone.
The Guiding Principle: The purpose of spatial relationships between core work centers isn’t geometric perfection—it’s minimizing disruptive motion while preserving safe, intuitive movement for all users.
Layer 2: Secondary Work Zones – Expanding the Ecosystem
Modern kitchens often require more than three work centers. Ignoring secondary zones forces users to contort the core relationship, creating friction. Layer 2 integrates these thoughtfully:
-
The Primary Prep Zone: Ideally positioned between Cold Storage and Cleanup centers. Ingredients move logically: fridge → prep → sink (for washing mid-prep) → cooktop. In an L-shaped kitchen, this often means dedicating the longest counter run adjacent to the sink. In island kitchens, the island countertop may serve this role—but only if positioned within easy reach of both sink and stove. Practical Tip: Designate a specific counter section (perhaps with a subtle edge detail or consistent tool placement) as your “prep home base” to build intuitive habits.
-
The Baking Zone: For frequent bakers, cluster oven, mixer storage, baking sheets, and dry ingredients in one area—often near a secondary sink or prep space away from main cooking traffic. This prevents cross-contamination of ingredients and avoids competing for counter space during high-volume cooking periods.
-
The Beverage/Entertaining Zone: In open-plan homes, position a secondary mini-fridge, glassware storage, ice maker, or coffee station near the transition to dining/living areas. This allows guests to access drinks without entering the active cooking zone, preserving the cook’s focus and safety. Even a narrow cabinet with a pull-out tray for wine glasses beside the refrigerator functions as a micro-zone.
-
The Cleanup Extension Zone: Include dedicated spots for post-meal tasks: compost bin under the sink, drawer for cleaning tools near the dishwasher, open shelving for frequently used dishes above the dishwasher for effortless unloading. When these elements are scattered, cleanup becomes fragmented.
Creating Zone Harmony: Zones should complement, not compete. In a U-shaped kitchen, place the baking zone on the arm opposite the main cooking center. In a galley kitchen, use the wall opposite the sink/stove for the beverage zone. The goal: enable multiple activities simultaneously without path crossing. Imagine one person prepping salad at the island (Prep Zone) while another loads the dishwasher (Cleanup Extension)—without congestion.
Layer 3: Flow Integration – The Human Element
This layer addresses what pure geometry overlooks: people moving through space. Flow Integration has three critical components:
Traffic Patterns: Map all entry/exit points to the kitchen (doorways, openings to living areas, hallway access). Draw imaginary lines showing typical paths. A helpful guideline: Major traffic paths should avoid cutting directly through the core work zone. If your kitchen opens into a high-traffic hallway, position cabinetry or pantry units to gently guide foot traffic around the perimeter. In open-plan homes, area rugs, changes in flooring, or strategic furniture placement can visually define the kitchen boundary and discourage shortcut walking through active work areas.
Multi-User Dynamics: Design for the maximum number of simultaneous users. For two cooks:
– Aim for 48+ inches of clearance between opposing counters (60+ inches supports more comfortable collaboration)
– Create two distinct workflow loops where possible: e.g., User A uses sink→island prep→stove; User B uses secondary sink→counter prep→wall oven
– Avoid “choke points” like narrow passages between island and counter
For households with children or users with varying mobility, incorporate “observation zones”—a small clear area near the cooking center where a child can safely sit to help (with supervision) or where someone can participate without obstructing movement.
Temporal Flow: Kitchens serve different purposes at different times. Morning routines (coffee, breakfast) differ from dinner preparation. Weekend baking differs from quick weekday cleanup. Seasonal variations matter too: holiday cooking often involves multiple dishes and helpers. During planning:
– Identify your top 3 daily routines. Sketch the movement path for each.
– Note conflicts: Does retrieving coffee mugs require walking through the dinner prep zone? Does school lunch packing compete with breakfast cleanup?
– Solution: Dedicate micro-zones for recurring routines. A “morning station” with coffee maker, mugs, and toaster on a dedicated counter section prevents morning activity from disrupting evening workflow.
This Three-Layer Framework transforms spatial planning from a static rule into a dynamic system. It acknowledges that efficiency isn’t just about appliance placement—it’s about designing thoughtful relationships between spaces, tools, and people. In the following sections, we’ll apply this framework across real-world scenarios, demonstrating its adaptability.
Step-by-Step: Optimizing Your Kitchen Workflow
Optimization isn’t reserved for new construction. Whether sketching blueprints or adjusting cabinet contents tonight, this actionable process delivers meaningful improvements. Follow these steps sequentially—they build logically upon one another.
Step 1: Conduct a Workflow Audit (The “Shadow Study”)
Before moving anything, observe your kitchen in action. This is data collection, not judgment. For two to three typical meal preparations (breakfast, dinner), document:
– Movement Paths: Trace steps with arrows on a simple sketch. Where do you backtrack? Pause uncertainly? (“Went to fridge, realized needed knife, walked to drawer, returned to fridge”)
– Tool Retrieval: How often do you leave the immediate work area to fetch tools? (“Reached for cutting board—stored in pantry across room”)
– Bottlenecks: Moments of delay or frustration (“Waited to access sink while dishwasher was unloading”)
– Friction Points: Physical obstacles (a cabinet door blocking path), cognitive gaps (“Forgot where spice jars are stored”), or social conflicts (“Child’s homework on counter blocked prep space”)
Illustrative Example: A home cook noticed frequent detours during dinner prep. Her audit revealed the primary cutting board was stored in an upper cabinet above the dishwasher, forcing a detour after retrieving vegetables. Solution: She installed a slide-out cutting board organizer in the base cabinet under the prep counter adjacent to the sink. This adjustment streamlined movement and reduced unnecessary steps during each cooking session.
Why This Step Matters: Guessing where inefficiencies lie leads to wasted effort. Direct observation reveals actual pain points. A shadow study takes minimal time but prevents costly missteps later. It also personalizes the process—your workflow is unique to your habits, household size, and cooking style.
Common Pitfall to Avoid: Conducting the audit only when alone. If multiple people use the kitchen, observe interactions. Does another person instinctively reach for the same drawer? Does a child’s request interrupt flow? These social dynamics are critical data points.
Accessible Alternative: No time for multi-day tracking? Prepare one simple meal (e.g., scrambled eggs with toast) while consciously noting every movement, decision, and moment of friction. Write them down immediately after. While less comprehensive, it captures acute friction points.
Step 2: Map Your Existing Layout and Zones
Create a simple sketch of your kitchen (graph paper or free apps like SketchUp Free, Roomstyler). Mark:
– Locations of sink, stove, refrigerator (measure from approximate center of each)
– All doorways, windows, fixed obstacles (columns, radiators)
– Current storage locations for frequently used items (knives, pots, spices, dishes)
– Traffic flow lines (from Step 1 observations)
Now, overlay the Three-Layer Framework:
– Draw the Core Relationship (Layer 1) in one color
– Outline Secondary Zones (Layer 2) in another: Where should prep happen? Where is baking gear stored?
– Sketch Traffic Patterns (Layer 3) with arrows
Critical Analysis Questions:
– Does the Core Relationship perimeter fall within a functional range for your space? If under 12 ft, is movement cramped? If over 26 ft in a standard layout, where can you consolidate?
– Do Secondary Zones align with workflow? (e.g., Are knives stored near the prep zone, or buried in a distant drawer?)
– Do Traffic Patterns cut through the core work area? Are there “underutilized zones” (unused corners) that could host secondary functions?
– Where are the biggest gaps between current layout and ideal workflow?
Illustrative Example: A homeowner with a U-shaped kitchen had a technically balanced triangle on paper. But the map revealed the dishwasher was installed at the far end of the kitchen, opposite the sink. Every load required walking the entire perimeter. Worse, the main traffic path from living room to backyard cut directly through the work zone. Solution: Unable to move plumbing, he repurposed a seldom-used corner cabinet near the sink into a “dishwasher staging zone”—a pull-out tray for dirty dishes. This reduced cross-kitchen trips significantly. He also placed a small rug at the traffic entry point, visually signaling a transition zone.
Why This Step Matters: Visualization transforms abstract concepts into tangible opportunities. You’ll see spatial relationships invisible during daily use. This map becomes your optimization blueprint.
Common Pitfall to Avoid: Measuring only appliance centers. Measure usable counter space between stations. A 7-foot leg between sink and stove is ineffective if 3 feet is occupied by a fixed window or cabinet seam with no landing space.
Accessible Alternative: Use painter’s tape on the floor to outline zones and traffic paths. Walk through the taped layout while simulating tasks. Does the prep zone feel accessible? Does the traffic path feel intrusive? Physical simulation reveals issues sketches miss.
Step 3: Prioritize Interventions Using the Impact/Effort Lens
Not all optimizations require equal investment. Categorize potential changes thoughtfully:
| High Impact | Lower Impact | |
|---|---|---|
| Lower Effort | IMPLEMENT SOON – Reorganize cabinet contents by zone – Add drawer dividers – Relocate frequently used tools to point of use |
SCHEDULE LATER – Install under-cabinet lighting – Add a small shelf for frequently used spices |
| Higher Effort | PLAN STRATEGICALLY – Reposition appliances (during remodel) – Add island or peninsula |
EVALUATE CAREFULLY – Major structural changes for marginal gains |
High Impact/Lower Effort Opportunities (Consider This Week):
– Strategic Tool Placement: Store items at the point of use. Knives and cutting boards live in the drawer under the primary prep counter. Pots and lids reside in the cabinet beneath the stove. Dish towels hang on a hook next to the sink. This eliminates repeated retrieval trips.
– Clear Landing Zones: Ensure adequate clear counter space on at least one side of the cooktop and sink. Relocate decorative items, small appliances, or mail clutter immediately. This single act prevents unsafe compromises and streamlines workflow.
– Optimize Drawer Layout: Use adjustable dividers to create dedicated slots for utensils. Group items by function: cooking utensils near stove, prep tools near cutting zone, cleanup tools near sink. Subtle labeling (like washi tape) can aid household members.
Illustrative Example: After her audit, a cook realized her most-used spices were stored in a deep cabinet above the refrigerator—requiring a step stool and disrupting flow. High impact? Yes (retrieval happened frequently). Lower effort? Yes (took minutes). She installed a magnetic spice strip on the side of her range hood (within arm’s reach of the stove). Impact: Eliminated repeated detours during cooking. Effort: Minimal cost, no tools required.
Why This Step Matters: Prevents overwhelm. You’ll achieve quick wins that build momentum while strategically planning larger projects. It ensures effort aligns with meaningful results.
Common Pitfall to Avoid: Focusing only on appliance placement while ignoring storage. A well-measured spatial relationship is ineffective if your chef’s knife lives three cabinets away. Storage is workflow.
Accessible Alternative: Start with one “zone reset.” Choose your most frustrating work area (e.g., the sink zone). Empty adjacent cabinets/drawers. Clean surfaces. Reorganize contents using the “point of use” principle. Reassess after one week. Small, focused changes often yield disproportionate benefits.
Step 4: Redesign with the Three Layers in Mind (For Renovations or New Builds)
If planning structural changes, this is where the framework provides clarity. Collaborate with your designer or contractor using these layered prompts:
Layer 1 (Core Relationship) Questions:
– Can we position the sink to create balanced pathways between fridge and stove?
– Is the refrigerator door swing clear of traffic paths and adjacent cabinets?
– Does the cooktop have adequate landing space on the dominant hand side?
– Can the dishwasher be placed immediately adjacent to the sink (left or right based on dominant hand)?
Layer 2 (Secondary Zones) Questions:
– Where will the primary prep zone live? Is there sufficient continuous counter space (min. 36 inches)?
– Can we incorporate a secondary sink in the island for beverage prep or cleanup without fragmenting the core relationship?
– Is there a dedicated spot for the microwave that doesn’t compete with cooking landing space? (Consider microwave drawer below counter)
– Can pantry access be positioned near the refrigerator for seamless ingredient retrieval?
Layer 3 (Flow Integration) Questions:
– How many people typically use the kitchen simultaneously? Does clearance allow comfortable movement?
– Where do traffic paths enter? Can cabinetry or island orientation gently guide flow around the work zone?
– Are there “quiet zones” for tasks like coffee making that won’t disrupt active cooking?
– For accessibility: Are controls reachable from varied positions? Are there options for varied counter heights?
Illustrative Example: A family building a new home with an open-concept kitchen found their designer initially placed the refrigerator at the far end of a long island for visual balance. Using the Three-Layer Framework, they realized this created an excessively long pathway to the sink. They repositioned the fridge to the end of the perimeter counter adjacent to the island’s short side. Result: A more functional spatial relationship. The island now serves purely as prep/entertaining zone (Layer 2), with traffic flowing around it (Layer 3). The designer noted this layout also improved sightlines to the living area—a harmonious outcome.
Why This Step Matters: Prevents post-renovation regrets. Framing discussions around layers ensures all critical factors are addressed, not just appliance placement. Bring your workflow audit map to design meetings—it provides objective context.
Common Pitfall to Avoid: Prioritizing “kitchen as living room” aesthetics over function. An island with seating is valuable, but if it forces the cook to turn their back to family and blocks core pathways, it creates social and functional friction. Solution: Offset island seating so cooks face the room while maintaining clear movement paths.
Accessible Alternative (For Existing Layouts): If moving appliances isn’t feasible, optimize around constraints. Example: Fridge is too far from sink? Create a “mini-fridge zone” on the island for frequently used items (milk, butter, salad vegetables). This establishes a secondary cold storage point that shortens the effective pathway for common tasks.
Step 5: Test and Refine with Real-World Scenarios
Never finalize a layout based solely on blueprints. Simulate actual use:
– The Dinner Rush Drill: With helpers standing in key spots (sink, stove, island), practice moving through a typical meal sequence. Note collisions, awkward reaches, or blocked paths.
– Varied User Check: If any user has different physical considerations or handedness, verify landing space and tool placement support comfort. Temporarily swap placements to test.
– Accessibility Simulation: Sit in a chair and attempt common tasks (retrieve item from base cabinet, turn stove knob). Can it be done safely? Adjust heights or add pull-down solutions if needed.
– The “Guest in Kitchen” Scenario: Have someone unfamiliar with the layout attempt a simple task (make coffee, find a glass). Where do they hesitate? This reveals intuitive vs. confusing elements.
Refinement is Iterative: After implementation (whether reorganizing cabinets or post-remodel), revisit your shadow study after two weeks. What improved? What new friction emerged? Adjust accordingly. Workflow optimization is an ongoing practice, not a one-time event.
Why This Step Matters: Blueprints don’t capture human experience. Physical simulation catches most potential issues before they become permanent frustrations.
Common Pitfall to Avoid: Testing only during calm, solo cooking. Simulate peak moments—weekday dinner with children nearby, holiday cooking with multiple helpers. Design for the most demanding realistic use case.
Accessible Alternative: Use cardboard boxes to mock up new cabinet layouts or island placements. Walk through the mock-up repeatedly. This low-tech method effectively reveals spatial issues.
Adapting the Framework to Every Kitchen Layout
One-size-fits-all rules fail because kitchens come in diverse shapes and sizes. The Three-Layer Framework provides adaptable principles, not rigid prescriptions. Below are layout-specific strategies with practical adaptations.
Galley Kitchens: Maximizing Efficiency in Narrow Spaces
Layout Description: Two parallel counters facing each other, typically 3.5–6 feet apart. Common in apartments and older homes. Often perceived as limiting, but galley kitchens can be highly efficient when optimized—they naturally encourage compact workflow.
Core Relationship Strategy (Layer 1):
– Place refrigerator at one end on one wall.
– Position sink near the center of the opposite wall.
– Install stove at the opposite end from the refrigerator, creating a “zig-zag” path across the aisle.
– Critical Consideration: Aisle width should allow comfortable movement—typically 42–48 inches minimum. Less than 42 inches creates collision risk when opening appliance doors; more than 48 inches increases unnecessary walking. For multiple users, aim for 54+ inches where possible.
– Practical Tip: Slightly offset appliances (e.g., sink 6 inches closer to stove end) to prevent door swings from clashing in the narrow aisle.
Secondary Zones (Layer 2):
– Prep Zone: Dedicate the counter section between sink and stove on the sink wall. Install pull-out shelves or a slide-out cutting board here for maximum utility.
– Storage Strategy: Use vertical space fully. Install floor-to-ceiling cabinets on both walls. On the non-appliance wall, use space opposite the stove for deep pantry storage—items used during cooking (oils, spices) live here for easy reach.
– Traffic Solution: Since the galley aisle often serves as a traffic path, minimize obstructions. Avoid placing tables or chairs within the galley run. If dining is needed, extend the counter into a perpendicular peninsula at one end (creating an L-galley hybrid) with seating facing away from the workflow path.
Illustrative Adaptation: A homeowner’s 8×10 foot galley kitchen felt cramped with refrigerator and stove on the same wall, forcing constant backtracking to the sink. By swapping positions (fridge at north end, stove at south end, sink centered opposite), she created a balanced workflow with 45-inch aisle clearance. She added shallow open shelving above the sink for frequently used dishes—visible and accessible without opening cabinet doors. Result: Noticeably reduced steps per meal, and the open shelves made the space feel more open.
Common Pitfall to Avoid: Placing all three core points on the same wall. This creates a linear workflow requiring constant turning and backtracking. The parallel-wall arrangement is galley kitchens’ strength—use it intentionally.
Accessible Optimization: If moving appliances isn’t possible:
– Install a narrow rolling cart between counters for temporary prep space. Store against the wall when not in use.
– Use adhesive hooks inside cabinet doors for hanging measuring cups, oven mitts, or pot lids—freeing drawer space.
– Apply peel-and-stick countertop paper to refresh worn surfaces, creating a more intentional feel.
L-Shaped Kitchens: Creating a Natural Flow
Layout Description: Counters form a 90-degree angle along two adjacent walls. Extremely versatile, working well in small to medium spaces. The corner presents both opportunity and challenge.
Core Relationship Strategy (Layer 1):
– Place two points on the longer wall (e.g., sink and stove), and the third (refrigerator) on the shorter wall near the corner.
– Ideal Configuration: Refrigerator at the end of the short wall, sink centered on the long wall, stove at the far end of the long wall. This creates a relationship that “hugs” the corner efficiently.
– Critical Consideration: Ensure the corner itself doesn’t obstruct movement. Maintain clear space from the corner point outward along both walls. Avoid placing a tall cabinet directly in the corner where it blocks flow.
– Practical Tip: Install a corner storage solution (lazy Susan, pull-out carousel, or swing-out shelf) in the base cabinet at the corner. This transforms often-wasted space into highly accessible storage for pots, pans, or bulk items used near adjacent zones.
Secondary Zones (Layer 2):
– Prep Zone: The counter section between sink and stove on the long wall is prime real estate. Keep this area clear and dedicate adjacent drawers to prep tools.
– Corner Opportunity: Use the corner cabinet for items used in both adjacent zones (e.g., mixing bowls near sink/prep area; baking sheets near oven if stove is nearby).
– Traffic Flow: The open side of the “L” naturally accommodates traffic. Place a small table, banquette, or island here—but ensure it’s positioned at least 42 inches from the nearest counter edge to preserve clearance.
Illustrative Adaptation: A homeowner’s L-kitchen had the refrigerator tucked into the corner where walls met. Every time the fridge door opened, it blocked access to the adjacent counter. Relocating the refrigerator to the end of the short wall freed the corner for a pull-out spice rack and cookware storage. Sink centered on the long wall, stove at the opposite end. The new spatial relationship felt balanced. The corner cabinet now houses a lazy Susan with oils, vinegars, and frequently used sauces, accessible from both sink and stove positions.
Common Pitfall to Avoid: Wasting the corner with a standard fixed-shelf cabinet. This creates a “black hole” where items get lost. Invest in corner storage solutions—they significantly improve accessibility and workflow.
Accessible Optimization:
– Add under-cabinet task lighting along the entire long wall to eliminate shadows during prep.
– Install a fold-down table or drop-leaf shelf on the short wall for temporary extra counter space during big cooking projects.
– Use drawer organizers in corner-adjacent drawers to maximize small-item storage efficiency.
U-Shaped Kitchens: Balancing Accessibility and Space
Layout Description: Counters wrap around three walls, creating an enclosed, efficient workspace. Ideal for larger kitchens or dedicated cooks. Risk of feeling closed-in or creating inefficient long walks if not planned carefully.
Core Relationship Strategy (Layer 1):
– Place each point on a different wall. Classic arrangement: Refrigerator on left wall, sink on back wall, stove on right wall.
– Critical Consideration: Total perimeter should remain functional. With three walls, it’s easy to exceed comfortable walking distances. Keep appliances relatively close to the corner junctions. For example: Refrigerator 3 feet from left corner, sink centered (or slightly off-center) on back wall, stove 3 feet from right corner.
– Practical Tip: Position the sink slightly off-center on the back wall, closer to the stove wall. Why? Most prep happens near the sink, and cooking follows prep. This subtle shift shortens the most frequently traveled pathway.
Secondary Zones (Layer 2):
– Dual Prep Zones: Leverage abundant counter space. Designate the left counter run (near fridge) for “cold prep” (salads, sandwiches) and the right counter run (near stove) for “hot prep” (chopping ingredients destined for cooking). This allows two people to work simultaneously without crossing paths.
– Corner Strategy: Install quality corner solutions on both sides of the sink wall. Left corner: pull-out pantry for dry goods. Right corner: swing-out shelf for pots/pans near the stove.
– Traffic Management: The open front of the “U” is the traffic zone. If space allows (room depth >12 feet), place a narrow table or console here for dining/decor without impeding workflow. If space is tight (<11 feet depth), keep the area completely clear—use area rugs to define the boundary.
Illustrative Adaptation: A family’s U-kitchen felt spacious but inefficient. Refrigerator at far end of left wall, stove at far end of right wall, sink centered on back wall—creating an overly extended perimeter. They relocated the refrigerator closer to the left corner and the stove closer to the right corner. Perimeter became more functional. They added a second prep sink in the right counter run near the stove for easy cleanup of cooking tools, creating a dedicated “hot zone” workflow loop (stove → prep sink → landing space). The main sink remained the “cold zone” hub. This adaptation supported their habit of one parent cooking dinner while the other prepared salads.
Common Pitfall to Avoid: Placing the refrigerator and stove on the same wall with the sink opposite. This forces constant crossing of the kitchen’s center, disrupting flow and creating collision risks. Distribute points across all three walls where possible.
Accessible Optimization:
– Install rollout shelves in deep base cabinets along all three walls—doubles accessible storage without renovation.
– Add a pegboard on one wall section for hanging frequently used tools (utensils, pots, measuring cups). Keeps counters clear and tools visible.
– Use matching containers for pantry items stored on open shelves in the U’s interior—creates visual calm and makes inventory easy.
Kitchens with Islands: Integrating the Island Thoughtfully
Layout Description: A freestanding counter unit in the kitchen’s center, often with seating, storage, or appliances. Popular in open-plan homes but frequently misused as mere decoration, disrupting workflow.
Core Relationship Strategy (Layer 1):
– Critical Decision: Is the island part of the Core Relationship? Only if it houses one of the three primary work centers (sink, cooktop, or refrigerator). Avoid placing two core points on the island—that fragments the relationship and creates instability (e.g., cooktop on island requires complex utility lines; sink requires plumbing).
– Recommended Approaches:
– Island with Sink: Place refrigerator and stove on perimeter counters. Island sink becomes the Cleanup Center hub. Ensure adequate clearance (42+ inches) between island and all perimeter counters.
– Island with Cooktop: Place sink and refrigerator on perimeter. Crucial: Position cooktop on the island side facing the main kitchen traffic flow (not facing seating). This allows the cook to maintain sightlines and avoid turning back to family. Include adequate landing space on both sides of the cooktop on the island.
– Island as Prep Zone Only: Keep all three core points on perimeter counters. Island serves purely as Layer 2 Prep Zone. This is often the most efficient choice—preserves a tight, unobstructed perimeter relationship while adding valuable workspace.
– Practical Tip: If island has seating, orient it so seated people face away from the active cooking zone. This prevents backs from blocking the cook’s movement and reduces distraction.
Secondary Zones (Layer 2):
– Island as Multi-Zone Hub: Even without appliances, islands excel as secondary zones:
– Prep Zone: Dedicate the entire island top to chopping, rolling dough, etc. Store cutting boards, mixing bowls, and prep tools in island base cabinets.
– Beverage Zone: Install a small under-counter refrigerator, wine cooler, or dedicated glassware storage in the island end farthest from cooking activity.
– Cleanup Extension: Include a trash/recycling pull-out in the island for easy scrap disposal during prep.
– Perimeter Zones: Use perimeter counters for Core Relationship points and specialized zones (baking near wall oven, coffee station near dining area).
Illustrative Adaptation: A homeowner’s kitchen had a large island with seating on three sides and a cooktop centered on the front edge. During dinner prep, she constantly turned her back to her family, and guests’ chairs blocked access to cooktop controls. She relocated the cooktop to the perimeter wall and converted the island to a dedicated prep and social zone. She added a small prep sink at one end of the island (plumbed during renovation) for rinsing produce while facing the living room. The perimeter now houses a functional spatial relationship (fridge-sink-stove). Result: She maintains eye contact with family while prepping, the cooktop is safely accessible, and the prep sink handles light cleanup without disrupting the main sink’s use.
Common Pitfall to Avoid: Placing the island so it intersects the Core Relationship path. If the natural path from fridge to sink cuts directly through the island, you’ve created a barrier. Solution: Shift island position slightly or accept a slightly longer—but unobstructed—path around it. Unobstructed flow generally outweighs geometric perfection.
Accessible Optimization (For Existing Islands):
– Add slide-out trays or pull-out shelves inside island base cabinets for tool storage—maximizes often-wasted deep space.
– Install a paper towel holder, knife block, or utensil crock on the island edge facing the cook’s primary standing position—creates an instant prep toolkit.
– Use a decorative tray on the island to corral frequently used items (olive oil, salt, pepper, cutting board), keeping the surface organized and functional.
Open-Concept Kitchens: Managing Traffic and Connection
Layout Description: Kitchen flows uninterrupted into living/dining areas. Creates social connection but introduces workflow challenges: foot traffic, visual distractions, acoustic interference.
Core Relationship Strategy (Layer 1):
– Position the entire Core Relationship away from the main traffic corridor between living and dining areas. Use cabinetry, a partial wall, or island orientation to create a “buffer zone.”
– Critical Technique: Create a “work zone boundary.” Place the refrigerator and pantry at the kitchen’s “entrance” from the living area. This gently guides traffic around the active work zone rather than through it. Think of the fridge/pantry as a “gateway” defining the kitchen’s edge.
– Practical Tip: If possible, locate the sink so the user faces the living area. This reduces isolation while cooking and allows monitoring of children or guests—but only if traffic flow doesn’t cut directly behind the sink user. If traffic does cross behind, position sink against a wall with window for natural light and psychological comfort.
Secondary Zones (Layer 2):
– Social Buffer Zone: Dedicate the area closest to the living room transition as a low-activity zone. Place the coffee maker, toaster, or beverage center here. This gives guests a “landing spot” for self-service without entering the active cooking zone.
– Acoustic Consideration: Position noisy appliances (dishwasher, refrigerator compressor) away from seating areas in the living room. If unavoidable, add sound-absorbing materials: fabric-covered boards on walls, area rugs, upholstered bar stools.
– Visual Calm: Use closed cabinetry for most storage. Open shelving is beautiful but can increase visual clutter, raising cognitive load during cooking. Limit open shelves to one small section for frequently used, aesthetically pleasing items (pretty bowls, cookbooks).
Flow Integration (Layer 3):
– Traffic Path Mapping: Identify the most common path people take through the space (e.g., from front door to backyard). Use furniture placement (sofa orientation, console table) or area rugs to gently guide traffic around the kitchen work zone. A rug placed at the kitchen’s “entrance” signals transition.
– Multi-User Protocol: Establish gentle household norms: “When someone is actively cooking at the stove, please pause before walking behind them.” For families with young children, use a colorful floor decal to mark a “safe waiting spot” near the kitchen entrance where kids can stand to ask questions without entering the workflow zone.
– Sightline Strategy: Position the island or main prep area so the cook has sightlines to key areas (children’s play space, TV) without turning away from cooking tasks. This reduces anxiety and the need to constantly stop and check surroundings.
Illustrative Adaptation: A family’s open kitchen felt chaotic during gatherings. Guests congregated around the island, blocking access to the sink and stove. They implemented three changes: 1) Relocated the beverage refrigerator and glassware to a console table just outside the kitchen boundary in the living area; 2) Placed a large area rug under the living room seating group, visually separating it from the kitchen; 3) Added a small “message center” bulletin board on the wall near the kitchen entrance for notes/reminders, reducing interruptions during cooking. These low-cost changes redirected traffic flow and created psychological boundaries without physical walls.
Common Pitfall to Avoid: Designing the kitchen as an “entertainment stage” where the cook is always on display. While connection is valuable, constant observation can increase performance anxiety. Provide moments of visual privacy—like positioning the chopping zone against a wall with a window—where the cook can focus without feeling watched.
Accessible Optimization:
– Use tall potted plants in decorative pots to create soft, living barriers that guide traffic flow.
– Install dimmer switches on kitchen lights. Lowering brightness slightly during social gatherings signals “relaxed mode” versus “active cooking mode” (bright lights).
– Add a small chalkboard or whiteboard on the pantry door for family messages—reduces verbal interruptions during focused cooking tasks.
Small and Compact Kitchens: Creative Solutions for Limited Square Footage
Layout Description: Under 100 square feet, often found in apartments, condos, or older homes. Every inch counts; efficiency is essential. Thoughtful spatial relationships aren’t just helpful here—they’re critical for usability.
Core Relationship Strategy (Layer 1):
– Accept a more compact spatial relationship (10–18 feet total perimeter is often functional in tight spaces). Prioritize unobstructed paths over ideal measurements. A compact relationship with clear aisles beats a larger one blocked by furniture.
– Space-Saving Appliance Choices:
– Refrigerator: Counter-depth models (24 inches deep vs. standard 30+ inches) save critical inches of protrusion into the walkway.
– Stove: A 24-inch wide range may suffice in small kitchens where two burners are frequently used; the space savings are significant.
– Sink: A single-bowl undermount sink (20–22 inches wide) often provides more usable counter space on either side than a double bowl.
– Practical Tip: Place the refrigerator next to the sink, not opposite. This creates a compact “cold-to-clean” micro-zone. The stove can then be positioned within easy reach of this duo.
Secondary Zones (Layer 2):
– Vertical Storage is Essential: Install cabinets to the ceiling. Use top shelves for infrequently used items with a sturdy step stool. Label bins clearly.
– Multi-Functional Furniture: Choose a table that folds down to the wall when not in use, or a drop-leaf table that expands only when needed. Bar-height counters with fold-down stools save floor space.
– Appliance Garages: Build a dedicated cabinet section (with ventilation) to store small appliances (toaster, blender). Keeps counters clear for prep while keeping tools accessible. Install near the relevant zone (toaster near coffee station).
– Hidden Zones: Use the inside of cabinet doors for storage—adhesive hooks for measuring cups, magnetic strips for spice jars, over-door organizers for foil/plastic wrap.
Flow Integration (Layer 3):
– Clear the Floor: Avoid area rugs in the main workflow path—they create tripping hazards and visual clutter. If needed for warmth, use a small, non-slip mat only at the primary standing position (in front of sink or stove).
– Lighting Layers: In small spaces, shadows feel oppressive. Combine:
– Ambient: Recessed ceiling lights
– Task: Under-cabinet LED strips over all counters
– Accent: Pendant light over a small eating nook
– Mirror Trick: Strategically place a mirror on a wall opposite a window to reflect natural light and create illusion of depth. Avoid placing mirrors where they reflect cluttered counters.
Illustrative Adaptation: A homeowner’s 7×8 foot kitchen felt impossibly cramped. The standard refrigerator protruded into the narrow aisle, forcing squeezing past it to reach the sink. He replaced it with a counter-depth model, gaining critical clearance. He installed a single-bowl sink with adequate counter on each side (previously blocked by the fridge protrusion). He added pull-down shelves in the upper cabinet above the sink for daily dishes—accessible without a step stool. Finally, he mounted a magnetic knife strip on the backsplash between sink and stove, freeing drawer space. The spatial relationship became more compact, but the usable workflow improved dramatically because paths were clear and tools were instantly accessible.
Common Pitfall to Avoid: Trying to fit full-sized appliances and furniture meant for larger kitchens. Downsizing appliances isn’t “settling”—it’s intelligent space allocation. A slightly smaller fridge that allows comfortable movement is better than a larger one that makes the kitchen unusable.
Accessible Optimization:
– Install tension rods inside deep cabinets to create adjustable dividers for cutting boards or baking sheets.
– Use clear acrylic bins for pantry items stored on open shelves—maximizes vertical space and keeps contents visible.
– Apply removable wallpaper to the backsplash or one cabinet front for an instant style update that feels intentional, not cramped.
Special Considerations: Multiple Users, Accessibility, and Ergonomics
The classic spatial relationship model implicitly assumes a single user. Modern households benefit from inclusive design that accommodates diverse users, abilities, and collaboration styles. Ignoring these dimensions can create kitchens that exclude or frustrate. This section provides actionable adaptations grounded in universal design principles and ergonomic awareness.
Designing for Multiple Users: Creating Harmonious Collaboration
Cooking with others should feel collaborative, not congested. Multi-user efficiency requires intentional spatial choreography.
Spatial Considerations:
– Clearance: Aim for 48 inches between opposing counters for two users. 60 inches supports more comfortable collaboration. Less than 48 inches forces frequent “excuse me” maneuvers.
– Dual Work Loops: Create two distinct, non-competing workflow paths where possible:
– Primary Loop: For the main meal preparer (sink → primary prep → stove)
– Secondary Loop: For another user (secondary prep zone → serving area, or cleanup zone → dishwasher)
– Strategic Appliance Placement:
– Two sinks, if space allows: main sink for cooking cleanup, smaller prep sink in island for vegetable washing or beverage prep.
– Position dishwasher adjacent to both sink and serving area (e.g., at the corner where cleanup and dining zones meet).
– Consider a wall oven separate from the cooktop—allows one person to manage stovetop cooking while another handles baking without competing for the same appliance footprint.
Communication and Psychology:
– Sightlines Matter: Position work zones so users can make eye contact without turning away from tasks. An L-shaped layout with users on adjacent walls often works better than facing each other across an island (which can feel confrontational).
– Define Roles Implicitly: Use color-coded cutting boards (green for vegetables, red for meat) stored in designated zones to prevent cross-contamination and clarify workflow. Assign “zones of ownership” during meal prep: “You handle salad prep at the island; I’ll manage stove tasks.”
– Sound Management: In open kitchens, background noise from living areas can disrupt communication. Install sound-absorbing panels on the ceiling above the cooking zone or use fabric-covered boards on walls to reduce echo.
Illustrative Implementation: A household with two adults who cook together nightly redesigned with collaboration in mind. They installed a 36-inch wide island with a prep sink at one end (secondary loop for washing vegetables, filling pots) and kept the main sink, stove, and refrigerator on the perimeter forming the primary loop. The island’s long side faces the living room, allowing the prep cook to engage with family while working. Clearance between island and perimeter counter is 54 inches—ample for two people to move comfortably. They added a second knife block and utensil crock on the island, eliminating tool-sharing conflicts. Result: Cooking together became a connected, efficient ritual rather than a source of friction.
Common Mistake: Assuming “more counter space = better for multiple users.” Without defined zones and clear paths, extra space can become disorganized. Intentional zoning trumps sheer square footage.
Universal Design: Creating Kitchens Accessible to All
A truly optimized kitchen serves users of all ages, sizes, and physical abilities—today and in the future. Universal design benefits everyone (e.g., pull-out shelves help children reach snacks and adults with back pain avoid bending). These adaptations align with widely recognized accessibility guidelines.
Key Adaptations by Category:
| Category | Standard Approach | Universal Design Adaptation | Why It Matters |
|---|---|---|---|
| Countertops | Fixed height (36″) | Varied Heights: 32″ section for seated use, 36″ standard, 42″ for standing comfort | Accommodates wheelchairs, reduces back strain, allows children to participate |
| Cabinets | Fixed shelves, knobs | Pull-Down Shelves, D-Shaped Handles (easy grip with limited dexterity) | Brings contents to user; eliminates deep reaching or painful gripping |
| Appliances | Standard controls | Front-Control Ranges, Side-Swing Oven Doors, Counter-Height Water Dispensers | Prevents reaching over hot surfaces; reduces burn risk; accessible from varied positions |
| Clearances | 42″ aisles | Ample Turning Space in key zones (in front of sink, stove, refrigerator) | Allows wheelchair or walker maneuverability; provides space for caregivers |
| Lighting | Overhead only | Layered Lighting: Under-cabinet task lights, toe-kick lighting for low-light navigation | Reduces shadows on work surfaces; prevents trips; enhances safety |
| Flooring | Slippery tile | Non-Slip, Seamless Flooring (no thresholds between kitchen/living areas) | Prevents falls; allows smooth transition for mobility devices |
Implementation Strategy:
– Start with Core Work Centers: Ensure all three points are accessible. For the sink: consider a knee space (with insulated pipes) if appropriate. For the cooktop: use down-draft ventilation to avoid overhead obstructions; position controls on the front face.
– Storage Zones: Place most-used items within the “comfort reach zone” (between waist and shoulder height). Install pull-out solutions in deep cabinets to bring contents forward.
– Safety Features: Consider automatic shut-off valves for gas/water lines. Install motion-sensor lights under cabinets that activate when hands are full. Use contrasting colors between countertops and fronts of drawers/cabinets to aid users with low vision.
Illustrative Implementation: After a family member moved in following a health event, the household modified their kitchen incrementally. They installed pull-out shelf systems in base cabinets under the sink and stove, bringing pots, pans, and cleaning supplies within easy reach. They replaced cabinet knobs with D-shaped pulls. They added LED tape lighting under all upper cabinets and along the toe-kick baseboard. Most impactful: they created a 32-inch high counter section at the end of the island with a dedicated prep sink and knee space—allowing participation in meal prep comfortably. These changes transformed the kitchen into an inclusive space.
Common Mistake: Treating accessibility as an afterthought. Integrating universal principles during initial design is more cost-effective and aesthetically seamless than retrofitting later. Moreover, these features benefit everyone: pull-out shelves are convenient for all users; varied counter heights reduce fatigue during long cooking sessions.
Ergonomic Adjustments: Supporting Daily Comfort
Ergonomics optimizes the relationship between the user’s body and the workspace. Poor ergonomics lead to cumulative strain—lower back pain from bending, shoulder fatigue from reaching, wrist discomfort from awkward grips. Proactive ergonomic design is preventative care.
Personalized Considerations:
– Counter Height: Standard 36″ works for many, but ideal height varies. A general guideline: measure from floor to elbow while standing relaxed, then subtract 4–6 inches. For frequent bakers, consider a dedicated slightly higher counter section for rolling dough (reduces back bending).
– Reach Zones: Store daily-use items within easy reach (between waist and shoulder height). Reserve upper cabinets for infrequently used items. Use lazy Susans or pull-out shelves in deep cabinets to bring contents forward.
– Work Stance: Ensure adequate clear floor space in front of each work center for stable footing. Anti-fatigue mats (¾ inch thick, textured surface) at sink and stove positions reduce leg and back strain during prolonged standing.
Tool and Workflow Ergonomics:
– Knife Selection: Choose knives with handles that fit your hand comfortably. A properly weighted knife reduces wrist strain during chopping. Keep knives sharp—dull knives require more force and increase slip risk.
– Cutting Board Stability: Place a damp paper towel or non-slip mat under cutting boards to prevent sliding. This reduces grip tension in your non-cutting hand.
– Pot Handling: Store pots and pans near the stove with lids stored separately (nested lids are hard to separate with wet hands). Use pot holders with long handles to avoid reaching over hot surfaces.
– Posture Awareness: Design workflows that minimize twisting. If you’re right-handed, position the stove so the primary cooking surface is to your right, with landing space on the right side. This allows natural movement without torso rotation.
Illustrative Implementation: A home cook with recurring lower back discomfort transformed his kitchen ergonomics. He installed an adjustable-height countertop section at his primary prep zone—set higher for standing prep, lowered when he preferred to sit. He added a pull-out “prep station” drawer under the counter containing his cutting board, knives, and mixing bowls—all within easy reach without bending. He placed an anti-fatigue mat at his stove position and installed under-cabinet lighting to eliminate shadows. Within a short period, his reported discomfort during cooking noticeably decreased.
Common Mistake: Ignoring individual body differences. A “standard” kitchen forces users to adapt to the space. Ergonomic design adapts the space to the user. Take measurements of your own body and cooking habits—don’t assume industry standards fit you.
Accessible Ergonomic Upgrades:
– Replace cabinet knobs with ergonomic pulls (available at hardware stores).
– Add adhesive-backed non-slip shelf liners inside drawers to keep utensils from sliding.
– Use a sturdy step stool with handrails for safe access to high shelves—never stand on chairs.
– Install a swing-down shelf beside the refrigerator for temporarily setting grocery bags while unloading.
Common Mistakes and How to Avoid Them
Even well-intentioned kitchens fall prey to predictable workflow pitfalls. These errors often stem from prioritizing aesthetics over function, overlooking human factors, or applying rules without context. Below, we dissect critical mistakes with precise correction strategies. Each includes the why behind the error, real-world consequences, and actionable fixes—categorized by effort level.
Mistake 1: Ignoring Traffic Flow Through the Core Work Zone
The Error: Positioning the core work relationship directly in the path of high-traffic movement between other home areas (e.g., hallway to backyard, living room to dining room). Exceptionally common in open-concept layouts.
Why It Happens: Focus on appliance placement and cabinetry aesthetics while neglecting how people move through the entire space. Floor plans often lack traffic flow annotations.
Real Consequences:
– Safety Concern: A cook turning from the stove with a hot pan collides with someone walking through. Steam burns or spills become real risks.
– Workflow Disruption: Constantly pausing to let others pass breaks cooking rhythm, increases cognitive load (“Where was I in the recipe?”), and creates frustration.
– Social Friction: Cooks feel isolated or interrupted; family members feel hesitant to enter the kitchen, reducing intended connection.
How to Diagnose: Conduct a “traffic shadow study” for one day. Use colored tape on the floor: green for intended kitchen workflow paths, red for observed foot traffic from other areas. Where red crosses green within the core work zone, you have a conflict area.
Solutions by Effort Level:
– Lower Effort (Do Today): Place a distinctive area rug (different color/texture) at the kitchen’s main entrance point from high-traffic zones. This creates a visual “pause” cue. Add a small console table just outside the kitchen boundary with a bowl for keys/mail—this naturally slows traffic and redirects flow.
– Medium Effort (Weekend Project): Reposition frequently used items to create a “buffer zone.” Move the beverage refrigerator, coffee station, or snack pantry to the traffic entry side of the kitchen. This gives passersby a reason to stop before entering the active work zone, reducing through-traffic.
– Higher Effort (Renovation Planning): During design phase, position cabinetry or a partial peninsula to gently guide traffic around the work zone. Example: Extend the refrigerator cabinet slightly to create a “wing” that guides foot traffic along the kitchen perimeter. If adding an island, orient it parallel to the main traffic path rather than perpendicular.
Insight: Traffic flow isn’t about eliminating movement—it’s about managing it. The goal is to create intentional transition zones where social interaction can happen without disrupting core workflow. A well-placed bar-height counter with two stools at the kitchen’s edge serves as a natural “landing spot” for guests wanting to chat with the cook, keeping them out of the active work zone.
Mistake 2: Placing Work Centers Too Far Apart (or Too Close)
The Error: Creating pathways outside a functional range—either excessively long causing fatigue from walking, or dangerously short creating cramped, collision-prone movement.
Why It Happens:
– Too Far: Driven by desire for “spacious” aesthetics, accommodating large islands, or fitting appliances into existing constraints without workflow analysis.
– Too Close: Result of cramming standard appliances into small footprints without downsizing appliances or reconfiguring layout.
Real Consequences:
– Excessive Distance: Long pathways between work centers add unnecessary steps and time per meal preparation, contributing to fatigue over time.
– Insufficient Distance: Less than comfortable clearance between opposing counters (or appliance doors) creates “elbow conflict.” Opening the refrigerator door blocks access to the adjacent drawer. Trying to pull out the dishwasher while someone stands at the sink becomes impossible. This breeds daily frustration and safety risks.
– Psychological Impact: Both extremes increase cognitive load. Long distances require conscious navigation; cramped spaces create anxiety about bumping into objects or people.
How to Diagnose: Measure your existing pathways along the natural walking path, not straight-line distance. Time yourself walking from fridge to sink to stove during a typical task. Note physical sensations: Do you feel rushed? Do you have to squeeze past obstacles?
Solutions by Effort Level:
– Lower Effort (Do Today): For excessive distance: Create “waystations.” Place a small rolling cart between the refrigerator and prep zone stocked with frequently used items (oils, vinegar, cutting board). This effectively shortens the functional distance for common tasks. For insufficient distance: Audit door swings. Remove rarely used items from cabinets whose doors conflict. Install soft-close hinges to prevent doors from swinging wide unexpectedly.
– Medium Effort (Weekend Project): Reorganize storage to minimize travel within zones. If the spice rack is far from the stove, install a magnetic strip on the range hood. If pots are stored across the kitchen from the stove, dedicate the cabinet directly beneath the cooktop to pot storage. This reduces the effective distance even if appliance placement can’t change.
– Higher Effort (Renovation Planning): During layout design, use the “elbow room test”: Have two people stand at proposed appliance locations (sink and stove). Can they open all adjacent cabinet and appliance doors without bumping elbows? If not, adjust placement. For small kitchens, specify counter-depth refrigerators (24″ deep) and 24″ wide ranges to reclaim critical inches. In large kitchens, resist placing appliances at extreme room corners—pull them inward to create a tighter, more functional relationship.
Insight: The “ideal” measurement is personal. A tall person may prefer slightly longer pathways to avoid feeling cramped; someone with mobility considerations may prioritize shorter distances. Always test with your body and habits. During planning, use painter’s tape to outline appliance footprints on the floor and physically walk the paths.
Mistake 3: Overlooking the Dishwasher’s Role in Workflow
The Error: Treating the work relationship as exclusively sink-stove-refrigerator while ignoring the dishwasher’s critical role in the cleanup workflow. Similarly, overlooking secondary sinks that create new workflow nodes.
Why It Happens: Historical focus on the original three points. Many resources still present the relationship as a closed system. Dishwasher placement is often an afterthought during plumbing layout.
Real Consequences:
– Workflow Fragmentation: If the dishwasher is installed far from the sink, loading/unloading becomes a disruptive cross-kitchen trek. Dirty dishes pile up at the sink; clean dishes require multiple trips to storage.
– Work Zone Contamination: Placing the dishwasher within the core work path (e.g., between sink and stove) forces the cook to navigate around an open dishwasher door during active cooking—a major safety and efficiency hazard.
– Missed Opportunity: Ignoring a prep sink’s potential to create a dedicated secondary workflow loop (e.g., island prep sink for vegetable washing while main sink is occupied with pots).
How to Diagnose: Track your cleanup routine for three days. How many steps do you take between sink, dishwasher, and dish storage? Does an open dishwasher door ever block access to another work center? Sketch the “cleanup relationship” (sink-dishwasher-storage) alongside your cooking relationship.
Solutions by Effort Level:
– Lower Effort (Do Today): Create a “dish staging zone.” Place a small tray or caddy next to the sink for dirty dishes waiting to be loaded. This contains clutter and reduces trips. If dishwasher is distant, designate a specific cabinet near the dishwasher for storing clean dishes used most frequently (daily plates, glasses)—minimizing unload trips.
– Medium Effort (Weekend Project): Reorganize cabinet storage based on dishwasher location. Store all dishes, glasses, and utensils used daily in cabinets adjacent to the dishwasher. Reserve distant cabinets for special occasion items. Install a pull-out tray under the sink for sponges, brushes, and dish soap—keeping cleanup tools centralized.
– Higher Effort (Renovation Planning): Position the dishwasher immediately adjacent to the sink—ideally on the side corresponding to your dominant hand (right-handed users: dishwasher to the right of sink). This creates a seamless “wash-load” micro-loop. If adding an island with a prep sink, position it to serve a distinct purpose (beverage prep, vegetable washing) with its own dedicated storage nearby, forming a secondary cleanup node that complements rather than competes with the main relationship.
Insight: The dishwasher functions as a work center. Treat its placement with the same strategic importance as the stove. In multi-user households, consider two dishwashers: one integrated into the main cleanup zone, a smaller drawer-style unit in a secondary zone (like a butler’s pantry) for quick cleanup of coffee mugs or prep tools. This prevents bottlenecking during busy times.
Mistake 4: Misaligned Storage Placement Relative to Work Zones
The Error: Organizing storage by item type alone (all glasses together, all pots together) without considering where those items are used. This forces constant cross-kitchen retrieval trips that fragment workflow.
Why It Happens: Traditional cabinet organization advice emphasizes categorical grouping for “neatness.” Homeowners inherit layouts without reevaluating for their habits. During renovation, storage planning focuses on capacity (“How many cabinets can we fit?”) rather than workflow integration.
Real Consequences:
– Step Inflation: Retrieving a cutting board stored in a pantry across the kitchen adds unnecessary steps per cooking session. Over time, this accumulates to significant wasted time and energy.
– Counter Clutter: When tools aren’t stored near their point of use, people leave them on counters “for next time,” creating visual chaos and reducing usable workspace.
– Cognitive Drain: Remembering where items are stored consumes mental energy better spent on cooking. “Where did I put the whisk?” interrupts recipe focus.
How to Diagnose: Conduct a “tool retrieval audit.” During one meal prep session, note every time you leave your primary work area to fetch an item. Record the item, its storage location, and steps taken. Afterward, map these retrieval paths onto your kitchen sketch. Clusters of lines to distant cabinets reveal critical misalignments.
Solutions by Effort Level:
– Lower Effort (Do Today): Implement the “Point of Use” rule for top 10 most-used items. Identify your daily essentials (chef’s knife, cutting board, mixing bowls, spatula, measuring cups). Relocate them to the drawer or cabinet closest to where they’re used. Example: Knife block moves from center island to drawer under primary prep counter.
– Medium Effort (Weekend Project): Zone your storage intentionally:
– Cooking Zone (near stove): Pots, pans, lids, cooking utensils, oils, spices
– Cleanup Zone (near sink): Dish soap, sponges, trash bags, dish towels, glassware
– Cold Prep Zone (near fridge/prep area): Cutting boards, knives, mixing bowls, produce bins
– Baking Zone (near oven): Baking sheets, mixer, flour, sugar, rolling pin
Use drawer dividers and shelf organizers to maintain order within zones. Label zones subtly with washi tape or small icons if helpful for household members.
– Higher Effort (Renovation Planning): Design cabinetry with workflow zones in mind. Specify:
– Deep drawers (instead of lower cabinets) under prep counters for easy access to cutting boards and bowls
– Pull-out spice racks beside the stove
– Appliance garage with dedicated outlet near coffee maker location
– Vertical tray dividers in cabinets near the dishwasher for storing baking sheets and cutting boards on edge
Insight: Storage optimization is deeply personal. A baker needs flour and mixer accessible near the oven; a smoothie enthusiast needs blender and frozen fruit near the prep sink. Base your zones on your dominant cooking activities. Keep a “workflow journal” for one week noting which tools you use most frequently for your typical meals—let this data drive storage decisions.
Mistake 5: Prioritizing Aesthetics Without Testing Workflow
The Error: Finalizing designs based solely on visual renderings or trends (all-white cabinets, matching appliance fronts, symmetrical layouts) without physical simulation of movement and tasks.
Why It Happens: Emotional appeal of beautiful design visuals. Pressure to make quick decisions during renovation timelines. Lack of awareness about workflow testing methods. Trusting designers who focus primarily on aesthetics.
Real Consequences:
– Post-Installation Regret: Discovering that a visually striking full-height backsplash makes stove controls hard to see, or that a symmetrical cabinet layout places the spice rack on the opposite side of the kitchen from the stove. These aesthetic choices, while pleasing in renderings, create daily functional frustrations.
– Wasted Investment: Significant financial resources spent on a kitchen that feels inefficient or uncomfortable to use.
– Diminished Joy: A space that looks perfect but doesn’t support the rituals it’s meant to host, leading to avoidance or resentment.
How to Diagnose: Before finalizing any design, ask: “Have we physically simulated the key movements?” If the answer is no, pause. Review the plan while verbally walking through your top three daily routines. Sketch movement paths. Identify potential conflicts.
Solutions by Effort Level:
– Lower Effort (Do Today): For existing kitchens: Use painter’s tape on the floor to outline proposed changes (new island location, extended counter). Walk through common tasks. Does the flow feel intuitive? For planning stages: Insist on a workflow validation step with your designer. Review the plan while describing your typical meal prep sequence.
– Medium Effort (Weekend Project): Create a full-scale cardboard mock-up of critical elements (like an island height and footprint) to test sightlines, reach, and movement. Invite household members to participate in the simulation. Note where hesitation or awkwardness occurs.
– Higher Effort (Renovation Planning): During the design phase, allocate time specifically for workflow testing. Use 3D modeling software that allows virtual walkthroughs, or build a simple physical model. Prioritize functional feedback over purely visual appeal. Ask your designer: “How does this layout support the movement patterns we documented in our shadow study?”
Insight: Beauty and function are not opposites—they are partners. The most satisfying kitchens harmonize visual appeal with intuitive use. A layout that feels effortless to move through becomes beautiful through daily use. Testing isn’t about doubting design talent; it’s about ensuring the final space truly serves the people who will live in it. The small investment of time in simulation prevents years of subtle frustration.
Your Questions, Answered
Q: Is the kitchen work triangle still relevant in modern open-concept kitchens?
A: The specific geometric rule is less critical than the underlying principle: minimizing unnecessary movement between core work centers. In open kitchens, the focus shifts to creating a functional relationship between sink, stove, and refrigerator while managing traffic flow and integrating secondary zones. The Three-Layer Framework adapts this timeless insight to contemporary living.
Q: What is the ideal distance between the sink, stove, and refrigerator?
A: There is no single “ideal” measurement for every kitchen. NKBA references suggest each leg typically falls between 4 and 9 feet, with a total perimeter often between 12 and 26 feet in standard layouts. However, your specific space, body, and habits matter more than rigid numbers. Prioritize unobstructed pathways, adequate landing space, and logical flow over hitting exact measurements.
Q: How do I adapt the framework for a small galley kitchen?
A: Galley kitchens can be highly efficient. Place refrigerator at one end on one wall, stove at the opposite end on the other wall, and sink centered on the opposite wall to create a compact “zig-zag” path. Prioritize aisle width (42–48 inches minimum), use vertical storage fully, and consider a rolling cart for flexible prep space. Accept a smaller total perimeter (10–18 feet) if it keeps pathways clear.
Q: Can this approach accommodate two or more cooks?
A: Absolutely. For multiple users, prioritize wider clearances (48+ inches between counters, 60+ inches for serious collaboration), create two distinct workflow loops where possible (e.g., primary loop on perimeter, secondary prep loop at island), and position appliances to avoid competition (e.g., wall oven separate from cooktop). Define zones clearly and ensure sightlines support communication.
Q: What if my kitchen layout doesn’t allow for a traditional triangle?
A: Many modern kitchens don’t fit the classic shape—and that’s okay. Focus on the relationships between work centers rather than geometric perfection. Use the Three-Layer Framework: optimize the core relationship you can create, thoughtfully integrate secondary zones, and manage traffic flow. A functional L-shaped or linear workflow with clear zones often outperforms a forced “triangle” with poor flow.
Q: How important is dishwasher placement in the workflow?
A: Critically important. The dishwasher functions as a fourth work center in the cleanup sequence. Position it immediately adjacent to the sink (ideally on your dominant hand side) to create a seamless “wash-load” micro-loop. Avoid placing it within the core cooking pathway. If space allows, consider how a second dishwasher or drawer unit in a secondary zone could reduce bottlenecks.
Q: Are there accessibility considerations for kitchen workflow?
A: Yes. Universal design principles benefit everyone. Key adaptations include varied counter heights (32″ for seated use, 36″ standard), pull-out shelves and D-shaped handles for easier access, front-control appliances, ample clearance for maneuverability (60″ turning radius in key zones), layered lighting, and non-slip flooring. Integrate these thoughtfully during planning for the most seamless result.
Q: How can I optimize my existing kitchen without a remodel?
A: Start with a workflow audit (shadow study) to identify friction points. Then implement high-impact, low-effort changes: reorganize storage by “point of use” (knives near prep zone, pots under stove), clear landing zones beside sink and stove, add drawer dividers, and create micro-zones for recurring routines (morning coffee station). Use painter’s tape to test new layouts before committing.
Q: Does the work triangle concept address safety?
A: Indirectly, yes. Minimizing unnecessary movement reduces fatigue and distraction. Ensuring adequate landing space beside the cooktop prevents unsafe pot placement. Keeping traffic paths clear of the core work zone reduces collision risks with hot cookware. Thoughtful workflow design is a foundational element of kitchen safety.
Q: Should I prioritize the work triangle over aesthetics?
A: The goal is harmony, not sacrifice. A kitchen that feels intuitive and supports your daily rituals becomes more beautiful through use. Work with designers who value both form and function. Test aesthetic choices for workflow impact (e.g., “Does this island placement block the path from fridge to sink?”). The most enduring designs satisfy the eye and the