Unlock vibrant, resilient plants by understanding the hidden connections between light, water, and soil—and sidestep the pitfalls that leave leaves limp and spirits low.
Indoor plants transform sterile rooms into living sanctuaries, purify our air, and anchor us to nature’s rhythms amidst digital chaos. Yet for every lush monstera gracing a sunlit corner, countless others languish in forgotten corners—yellowing, drooping, or abandoned in frustration. The gap between struggle and success is often not simply a matter of luck, genetics, or having a so-called “green thumb.” It frequently stems from fragmented advice that overlooks how plant care elements interact. This guide consolidates scattered recommendations into the Triad Framework: a science-informed system revealing how light, water, and soil function as an interconnected ecosystem. You’ll move beyond rigid schedules toward intuitive, responsive care—learning to read subtle leaf language, diagnose root causes (not symptoms), and cultivate confidence with every watering can. Whether nurturing your first pothos or curating a diverse collection, this approach builds transferable skills to support any plant entering your home with clarity and compassion. Let’s grow together.
Introduction: Why Fragmented Advice Fails Plants—and People
Walk into any garden center, scroll social media, or browse popular blogs, and you’ll encounter well-intentioned but often incomplete directives: “Water every Tuesday,” “Place near a window,” “Mist daily for humidity.” These oversimplifications overlook botanical reality. Plants aren’t machines operating on timers; they’re dynamic organisms responding to interconnected environmental variables. A peace lily drooping after watering isn’t necessarily thirsty—it may be experiencing stress because low light slowed evaporation while dense soil retained moisture. A snake plant’s crispy brown tip isn’t always neglect; it could relate to water chemistry interacting with infrequent watering cycles.
This guide is built on a different foundation. Drawing from established horticultural science and observable patterns across diverse growing environments, we present a unified model where care decisions flow from understanding relationships, not isolated rules. When light intensity shifts with seasons, water needs adjust. When soil composition alters drainage, root oxygen availability shifts. When humidity drops during winter heating, transpiration rates change. Ignoring these connections can create cascading stress. The Triad Framework teaches you to see the web—not just the threads. You’ll learn to interpret yellow leaves not as a mystery but as contextual clues pointing toward system imbalances. This isn’t about memorizing care sheets for dozens of species; it’s about developing a transferable skill set that empowers you to nurture plants with growing confidence. Let’s begin where all plant life begins: with light.
The Triad Framework: Your Foundation for Confident Plant Parenting
Imagine baking bread without understanding how yeast, flour, and heat interact. Follow a recipe blindly while ignoring room temperature or altitude, and results may disappoint. Plant care operates on similar principles. Light, water, and soil are your core components. Their balance must be calibrated to your unique environment, plant biology, and seasonal shifts. The Triad Framework shifts your mindset from “What does this plant need?” to “How do these conditions interact for this plant right now?”—a subtle but transformative pivot.
- Light is the engine. It drives photosynthesis, which influences water consumption rates and affects soil drying speed.
- Water is the messenger. It transports nutrients but only functions effectively when soil structure permits oxygen exchange around roots.
- Soil is the regulator. It buffers moisture, anchors roots, hosts beneficial microbes, and mediates the light-water relationship.
Neglect one element, and the entire system may destabilize. Overwatering a low-light ZZ plant can lead to saturated soil, reduced oxygen, and potential root issues. Using dense, peat-heavy soil for a succulent in bright sun may slow drainage excessively. Placing a calathea in dry air with inconsistent watering can cause leaf edge crispness despite seemingly adequate light. This framework replaces anxiety with agency. Below, we explore each component with actionable depth, real-world examples, adaptable solutions, and recovery protocols. Remember: responsive observation matters far more than fixed schedules.
Step 1: Decoding Light – The Non-Negotiable Energy Source
Light isn’t merely “brightness.” It’s a complex interplay of spectrum, intensity, duration, and direction that fuels every biological process in your plant. Yet “bright indirect light” remains widely misunderstood. Let’s replace ambiguity with practical clarity.
Understanding Light Dimensions: Quality, Quantity, Duration
Quality (Spectrum): Sunlight delivers a full spectrum of wavelengths. Plants primarily utilize blue light (400–500nm) for compact, leafy growth and red light (600–700nm) for flowering and stem development. While artificial grow lights can replicate aspects of this spectrum, most homes rely on natural light filtered through glass. South-facing windows (Northern Hemisphere) typically provide the most intense, full-spectrum light year-round. East windows offer gentler morning rays; west windows deliver stronger afternoon sun; north windows yield low, diffuse light with minimal direct exposure. Critical nuance: Reverse all directional references for Southern Hemisphere growers. Standard glass filters UV rays but transmits visible light—though tinted or energy-efficient windows can reduce intensity significantly (by approximately 20–40% in some cases).
Quantity (Intensity): Light intensity diminishes rapidly with distance from the source. A spot 12 inches from a south window may receive strong light (suitable for fiddle leaf figs), while moving to 36 inches reduces intensity considerably (better for pothos). Cloud cover can halve intensity; sheer curtains may reduce it by 30–50%. Use the shadow test for immediate assessment: Hold your hand between the plant and light source. A sharp, well-defined shadow with crisp edges suggests bright light. A soft, blurry shadow with faint edges indicates medium light. No visible shadow suggests low light. For greater precision, an affordable light meter app (e.g., Photone) or physical meter can provide helpful baseline measurements—especially valuable for growers managing multiple plants.
Duration (Photoperiod): Most indoor plants thrive with 10–14 hours of light daily. Consistency often matters more than peak intensity. A plant receiving strong light for only 4 hours (e.g., a west window in deep winter) may struggle more than one in moderate light for 10 hours. Seasonal shifts dramatically alter duration and solar angle. In December (Northern Hemisphere), the sun sits low, casting light deeper into rooms but with reduced intensity. In June, higher angles create intense, direct beams near windows. Track your plant’s position monthly—what sustains growth in August may stress leaves in February. Rotate plants 90 degrees weekly for even growth, preventing pronounced leaning toward light sources.
Matching Plants to Light Realities: Beyond Marketing Labels
Plant tags often oversimplify. “Low light” on a ZZ plant label typically means survival in minimal light—not thriving. True low-light champions maintain slow growth in very low light conditions. Let’s clarify categories with observable indicators:
-
High Light (Direct sun 3+ hours OR very bright indirect):
Ideal Plants: Cacti, succulents, bird of paradise, citrus (acclimated specimens).
Signs of Success: Compact growth, vibrant color, steady new leaves.
Warning Signs: Brown, crispy patches on leaves (possible sun stress); bleached or pale foliage; soil drying very rapidly.
Example: A jade plant (Crassula ovata) in unfiltered south window light may develop red leaf margins (a stress response). Moving it slightly farther back or adding a sheer curtain often preserves green vigor while preventing damage. -
Medium Light (Bright but no direct sunbeam OR gentle morning/evening sun):
Ideal Plants: Monstera deliciosa, pothos, philodendron, rubber plant, spider plant.
Signs of Success: Steady leaf production, deep green color, moderate growth rate.
Warning Signs: Elongated stems with wide gaps between leaves (“legginess”); smaller new leaves; slowed growth.
Example: A monstera placed far from an east window may produce tiny leaves with no fenestrations. Moving it closer (within 2–3 feet) can encourage larger, split leaves over subsequent growth cycles. -
Low Light (No direct sun; north-facing windows; rooms with only artificial lighting):
Ideal Plants: ZZ plant (Zamioculcas zamiifolia), snake plant (Dracaena trifasciata), cast iron plant (Aspidistra elatior), Chinese evergreen (Aglaonema).
Signs of Success: Slow but consistent growth; leaves retain color without yellowing.
Critical Note: “Low light” does not mean “no light.” All plants require some photons for photosynthesis. A windowless bathroom with only brief artificial light will eventually challenge even resilient ZZ plants.
Adapting to Challenging Environments: Practical Solutions
- Apartment with Only North Windows? Focus on true low-light species (ZZ, snake plant, cast iron plant). Supplement with a full-spectrum LED grow light (e.g., 12W clip-on fixture). Position 6–12 inches above plants, run 12–14 hours daily. Choose fixtures with adjustable intensity. Budget Tip: Repurpose an old desk lamp with a daylight-spectrum LED bulb (5000K–6500K color temperature).
- Intense Southern Exposure? Filter harsh rays with UV-filtering sheer curtains (reduces intensity while maintaining spectrum). Rotate plants weekly. Monitor soil moisture closely—bright light accelerates drying. Place humidity-sensitive plants slightly farther back where light is bright but indirect.
- Seasonal Strategy: In fall/winter, move medium-light plants closer to windows (within 1–2 feet). Clean window glass inside and out—dust can reduce light transmission by a significant amount (up to approximately 30%). In spring/summer, provide shade for light-sensitive species using adjustable blinds. Track changes with monthly shadow tests.
- Office or Windowless Room? Low-light plants alone may struggle long-term without supplemental light. Combine a ZZ plant or snake plant with a small, discreet grow light (e.g., 6W USB-powered panel). Run during work hours. Even 8 hours of supplemental light can sustain slow growth. Avoid plants marketed solely for “low-light office decor”—they’re often stressed specimens with limited longevity.
The Fundamental Principle: Light intensity directly influences water consumption. A pothos in bright east window light may need water every 5 days; the same plant 6 feet back in medium light may need it every 12 days. Ignoring this relationship is a common contributor to moisture-related issues. Watering schedules are myths; light-responsive observation is truth.
Common Light Mistakes—and How to Reverse Them
-
Mistake: Assuming “indirect light” is uniform.
Why it happens: Marketing language lacks precision.
Fix: Perform shadow test monthly. Note seasonal shifts. Use light meter app for baseline measurements.
Recovery: If plant shows legginess, move incrementally closer to light source over 7–10 days (avoid shock). Prune elongated stems to encourage bushier growth from base. -
Mistake: Placing high-light plants in low light and overwatering to “compensate.”
Why it happens: Misinterpreting slow growth as thirst.
Fix: Accept environmental limits. Choose plants matching your space, or invest in supplemental lighting. Never water based solely on calendar.
Recovery: Pause watering until soil moisture aligns with current light level (use chopstick test). If roots appear healthy, relocate gradually to brighter spot. If root issues are suspected, assess carefully before repotting. -
Mistake: Overlooking artificial light as a viable solution.
Why it happens: Perception that grow lights are complex or expensive.
Fix: Start small. An affordable clip-on LED grow light can transform a dim corner. Full-spectrum LEDs (2700K–6500K) mimic daylight without excessive heat.
Pro Tip: For flowering plants (African violets, orchids), lights with balanced spectrum suffice for foliage; specialized “bloom” spectrums exist but aren’t essential for most home growers.
Light sets the pace for the entire Triad. With it understood, water management transforms from guesswork to intuitive response. Let’s explore the element most frequently misunderstood—and most critical to get right.
Step 2: Mastering Water – The Art of Responsive Hydration
Water sustains life, yet moisture-related issues are among the most common challenges in indoor plant care. Why? Because rigid rules (“water weekly”) ignore the dynamic relationship between light, soil, pot material, temperature, and plant physiology. The solution lies in adopting the Soil Moisture Continuum—a spectrum-based approach where watering is a response to current conditions, not a scheduled task.
The Soil Moisture Continuum: From Bone Dry to Waterlogged
Visualize soil moisture on a relative scale:
– Bone Dry: Soil pulls away from pot edges; feels dusty/crumbly; pot feels very light. Plants that prefer drying thoroughly between waterings: Cacti, succulents.
– Slightly Moist: Top 1–2 inches dry; deeper soil cool and faintly damp. Plants that prefer this zone: Snake plant, ZZ plant, pothos, rubber plant.
– Evenly Moist: Soil feels like a damp sponge—moist throughout but not soggy; no water squeezes out when gently pressed. Plants that prefer this: Peace lily, ferns, calatheas.
– Soggy/Waterlogged: Water pools on surface; soil feels muddy; pot feels heavy; possible sour odor. Condition to avoid for nearly all plants—can contribute to root stress within days.
Your goal isn’t to hit a calendar date but to maintain your plant’s ideal moisture zone relative to current light and temperature. A monstera in summer sun may cycle through moisture levels quickly; the same plant in winter low light may stay in the “slightly moist” zone for weeks. Context is everything.
How to Check Moisture Accurately: Four Tiered Methods
- Finger Test (Beginner): Insert index finger up to second knuckle. If dry at that depth, watering may be appropriate. Limitation: Subjective; difficult in deep pots or dense soil. Best for small pots (<6 inches).
- Wooden Chopstick/Skewer Test (Reliable): Insert plain wooden chopstick deep into soil (near root zone). Wait 10 seconds. Remove:
- Clean/dry = bone dry
- Light soil crumbs = slightly moist
- Dark stain/moist feel = evenly moist
- Wet/slick = soggy
Why it works: Wood absorbs moisture visibly. Reusable, inexpensive, and highly practical. - Moisture Meter (Precision Aid): Analog or digital probe inserted to root depth. Critical tips:
- Calibrate periodically: Test in water (should read “wet”), then air (should read “dry”).
- Insert at multiple points—moisture isn’t uniform.
- Best used alongside physical tests; inexpensive meters can vary in accuracy.
- Weight Test (Intuitive Skill): Lift pot immediately after thorough watering (note heavy weight). Lift again before next potential watering. When it feels significantly lighter (but not feather-light), it may be time. This builds subconscious skill over time. Pro Tip: Place pot on a digital kitchen scale; record “wet weight” and “dry weight” thresholds for consistency.
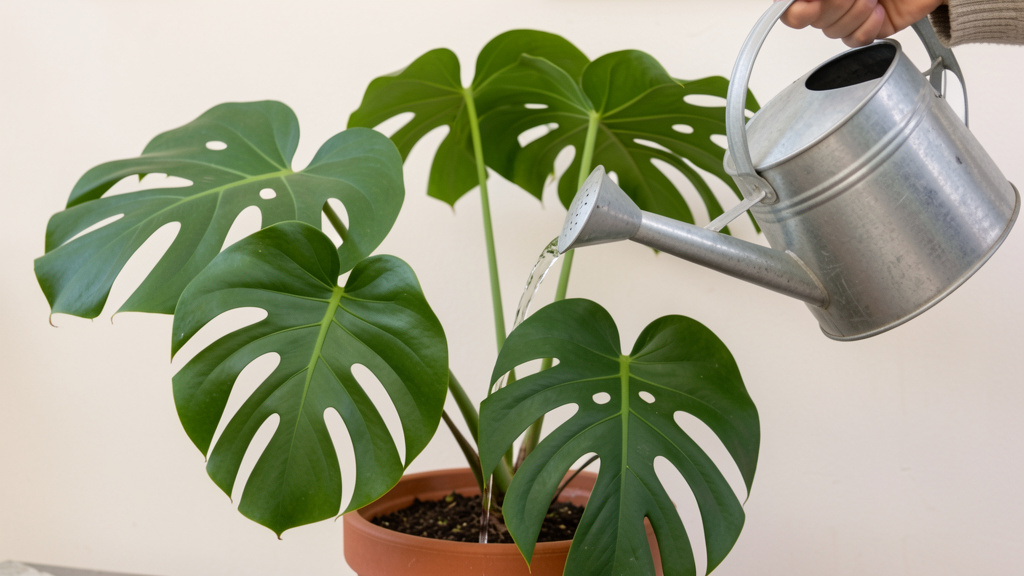
Watering Techniques: Method Shapes Outcome
- Top Watering (Standard): Pour room-temperature water slowly onto soil surface until it flows freely from drainage holes. Why it works: Helps flush excess minerals; ensures even saturation. Critical step: Discard all excess water from saucer within 15 minutes. Avoid letting plants sit in standing water.
- Bottom Watering (Ideal for Sensitive Plants): Place pot in tray with 1–2 inches of water. Let absorb through drainage holes for 20–40 minutes until top soil feels damp. Remove. Benefits: Prevents water spotting on calathea leaves; encourages roots to draw moisture evenly. Caution: Top-water occasionally to prevent mineral buildup at soil surface.
- Soak and Drain (For Hydrophobic Soil): If soil repels water (common in dried peat-heavy mixes), set pot in sink/tub with lukewarm water for 30–60 minutes. Let absorb until soil surface darkens. Drain thoroughly. Prevention: Adding perlite or bark to soil mixes helps maintain structure when dry.
- Ice Cubes (Generally Not Recommended): Sometimes suggested for orchids. Consideration: Cold water may stress tropical roots. Uneven melting causes inconsistent moisture. Most horticultural resources do not endorse this method for routine care.
Water Quality: The Invisible Variable
Tap water composition varies by region. Chlorine, fluoride, dissolved minerals (hard water), and pH can influence plant health over time.
– Chlorine: Volatile; evaporates if water sits uncovered for 24 hours. Fill watering can the night before use.
– Fluoride: Can affect sensitive plants (dracaenas, spider plants, peace lilies), potentially contributing to brown leaf tips. Options include distilled water, rainwater, or filtered water.
– Hard Water (High Minerals): May leave white crust on soil surface or pot rim. Solutions:
– Flush soil thoroughly every few months with distilled or rainwater (pour slowly until excess drains out).
– Use a water pitcher filter to reduce minerals.
– Occasionally add a small amount of white vinegar to water (1 tsp per gallon) to help dissolve deposits—test on one plant first.
– Softened Water: Generally avoid. High sodium content may affect soil structure and roots over time.
– Temperature: Use room-temperature water. Cold water may slow root activity—especially important for tropicals like calatheas or ferns.
Plant-Specific Watering Contexts: Observation is Key
- Succulents & Cacti: Water deeply only when soil is completely dry. Reduce frequency during cooler, darker months. Signs of Concern: Translucent, mushy leaves; darkened stem base. Recovery: Pause watering. Assess roots. If repotting is needed, use dry soil and wait before watering.
- Tropical Vines (Pothos, Philodendron, Monstera): Water when top 1–2 inches feel dry. Soil should not stay saturated. Sign of Thirst: Curling, drooping leaves that recover within hours of watering. Sign of Excess Moisture: Yellowing lower leaves; consistently wet soil.
- Moisture-Lovers (Ferns, Calatheas, Peace Lily): Maintain evenly moist soil. Never let dry completely. Peace lilies dramatically droop when thirsty but typically recover quickly—this is normal signaling for them. Critical Note: Calatheas in dry air + inconsistent watering often develop crispy edges. Pair consistent moisture with humidity support.
- Drought-Tolerant Champions (Snake Plant, ZZ Plant): Water when top 1–2 inches are dry. ZZ plants store water in rhizomes; snake plants in leaves. Overwatering is a greater risk than underwatering. Pro Tip: In low light during winter, watering intervals may extend to 3–4 weeks or longer.
Illustrative Scenario: A grower watered their snake plant on a fixed schedule without checking soil. After weeks, lower leaves yellowed. They discovered soil remained damp due to reduced winter light. Switching to the chopstick test (watering only when dry 1–2 inches down) allowed the plant to stabilize. Watering is a dialogue, not a monologue.
Seasonal Watering Awareness
Plants typically use less water in cooler, darker months. Reduce frequency in fall/winter—sometimes significantly. Increase in spring/summer as light intensifies. Always check moisture; never assume. Humidity fluctuations also affect transpiration: dry winter air may slightly increase water needs for some plants despite lower light, while humid summers may slow drying. Observe, don’t presume.
The Fundamental Principle: Watering is not an isolated act. It is best understood as a response to light intensity, soil composition, pot porosity, ambient temperature, and plant type. A snake plant in bright light with fast-draining soil in terracotta may need water monthly; the same plant in low light with dense soil in plastic may need it quarterly. Mastery lies in reading the system, not following a calendar.
Recovery Protocols: Addressing Moisture Imbalances
- Soil Consistently Soggy, Leaves Yellowing:
- Pause watering.
- Gently remove plant to inspect roots: healthy roots feel firm and appear white/tan; compromised roots may feel soft or appear dark.
- If roots appear mostly healthy: Rinse gently, trim affected sections with clean scissors, repot in fresh, well-aerated mix.
- If extensive root issues: Consider taking healthy stem/leaf cuttings for propagation.
- Place in bright, indirect light. Improve air circulation gently. Wait several days before light watering.
- Severely Dry Soil, Crispy Leaves:
- Submerge pot in lukewarm water (soak and drain method) for 30–45 minutes.
- Drain thoroughly.
- Trim dead/crispy foliage with clean scissors.
- Place in medium light (avoid intense sun initially).
- Water lightly when top inch feels dry. Recovery may take weeks—patience is key. New growth signals revival.
Water mastery flows naturally when soil is engineered thoughtfully. Let’s build the foundation that makes moisture management predictable and supportive.
Step 3: Engineering the Soil – The Living Foundation
Soil is not “dirt.” It’s a dynamic medium that regulates moisture, delivers oxygen to roots, anchors the plant, and supports microbial life. Many commercial “potting soils” are dense, peat-heavy blends designed for outdoor annuals in constant rainfall—not containerized plants with controlled watering. Customizing your soil mix can be one of the most impactful upgrades for plant health and resilience.
The Three Pillars of an Ideal Indoor Mix
Think of soil as a customizable recipe. Adjust ratios based on plant needs:
1. Base Component (Moisture Retention & Structure): Holds water and nutrients while providing bulk.
– Coco Coir: Renewable alternative to peat moss. Holds moisture well but rewets easily if dried. pH neutral (5.5–6.5). Resists compaction. Well-suited for: Most tropicals, moisture-loving plants. Note: Buy compressed bricks; expand with water.
– Peat Moss: Traditional base. Acidic (pH 3.5–4.5); can be difficult to rewet once dry; environmental considerations exist. Use sparingly—limit to 30% of mix if used.
– Compost: Adds nutrients and beneficial microbes. Must be well-aged and sterilized to avoid pests/weeds. Limit to 10–20% of total mix. Ideal for heavy feeders.
- Aeration Component (Oxygen Channels): Creates air pockets critical for root respiration.
- Perlite: Lightweight volcanic glass. Improves drainage and aeration. Floats to surface over time. pH neutral. Versatile additive.
- Pumice: Heavier volcanic rock. Doesn’t float; provides stable structure. Excellent for succulents/cacti. Longer-lasting but more expensive.
-
Orchid Bark (Fir Bark): Chunky pieces create large air channels. Essential for epiphytes (monstera, orchids, anthuriums) that naturally grow on trees. Use small (1/4″), medium (1/2″), or large (3/4″) grade based on pot size.
-
Support Components: Enhance soil health and longevity.
- Horticultural Charcoal: Absorbs impurities, helps prevent souring, inhibits mold/fungus. Adds minimal drainage but significantly improves soil freshness. Helpful for: Closed terrariums, humidity-loving plants.
- Coarse Sand: Use horticultural sand (sharp, gritty grains). Never use beach sand (fine, compacts) or play sand (contains salts). Best for cacti/succulents.
Custom Soil Mix Recipes: Precision for Plant Types
- All-Purpose Tropical Mix (Monstera, Pothos, Philodendron, Rubber Plant):
- 2 parts coco coir
- 1 part perlite
- 1 part small-to-medium orchid bark
-
Why it works: Coir retains moisture between waterings; perlite ensures oxygen reaches roots; bark mimics natural epiphytic environment. Resists compaction.
-
Succulent & Cactus Mix (Jade, Echeveria, Aloe, Cacti):
- 1 part coco coir or quality potting mix
- 2 parts perlite or pumice
- 1 part coarse horticultural sand
-
Why it works: Fast drainage supports plants adapted to arid conditions. Minimal organic matter mimics native habitats.
-
Aroid Mix (Calathea, Ferns, Anthurium, Peace Lily):
- 2 parts coco coir
- 1 part perlite
- 1 part small orchid bark
- Small handful horticultural charcoal per gallon of mix
-
Why it works: Charcoal helps maintain freshness in consistently moist conditions; extra coir supports even moisture; bark prevents compaction.
-
Budget-Friendly Upgrade (Using Store-Bought Mix):
- Buy organic potting mix labeled “indoor” or “container” (avoid “moisture control” additives—they contain water-retaining crystals that disrupt moisture sensing).
- Mix 2 parts store mix + 1 part perlite + handful orchid bark per gallon.
- Note: This approach often provides better value and performance than pre-made “premium” blends.
Repotting: Timing, Technique, and Considerations
Signs It May Be Time:
– Roots circling pot surface or emerging from drainage holes
– Soil dries unusually fast after watering (roots may have outgrown soil volume)
– Plant is top-heavy or lifts easily from pot
– Growth has slowed despite proper light/water (soil nutrients may be depleted)
– White crust on soil surface (mineral buildup)
Ideal Timing: Early spring (as days lengthen), when many plants enter active growth. Avoid repotting during winter dormancy or when plant shows signs of stress (pests, disease).
Step-by-Step Repotting Approach:
1. Water plant 24 hours prior to reduce root disturbance and ease removal.
2. Gently remove plant. Loosen root ball with fingers; untangle circling roots.
3. Trim any dead, soft, or darkened roots with clean scissors.
4. Select new pot only 1–2 inches larger in diameter than current pot. Too large may keep soil wet too long.
5. Add 1–2 inches of fresh mix to pot bottom. Position plant at same soil depth as before (burying stem deeper may invite issues).
6. Fill gaps with mix, pressing gently to eliminate large air pockets (avoid heavy compaction).
7. Water thoroughly until water runs clear from drainage holes.
8. Place in bright, indirect light (not direct sun) for 7–10 days to recover. Avoid fertilizing for several weeks.
Important Exception: Some plants thrive when slightly root-bound. Peace lilies may bloom more prolifically; spider plants produce more “pups”; African violets flower better. Only repot these if roots are severely congested or growth stalls completely.
Pot Selection: Material Influences Moisture
- Terracotta/Clay: Porous; wicks moisture from soil through evaporation. Well-suited for: Succulents, cacti, plants prone to moisture retention, humid climates. Consideration: Dries faster; requires more frequent watering; heavier.
- Ceramic/Glazed Pot: Non-porous; retains moisture longer. Well-suited for: Ferns, calatheas, peace lilies, dry climates. Non-negotiable: Must have drainage hole. Glazed interior prevents moisture absorption.
- Plastic: Lightweight, retains moisture well, affordable. Good for beginners, hanging baskets, or plants needing consistent moisture. Consideration: Can tip if top-heavy; may degrade in direct sun over time.
- Self-Watering Pots: Contain reservoir system. Use with awareness: Risk of prolonged moisture if not monitored. Best for growers experienced with moisture-loving plants. Generally avoid for succulents/cacti.
- Pot Shape Matters: Wide, shallow pots dry faster than tall, narrow pots (greater soil surface area exposed to air). Choose based on plant root structure—shallow-rooted ferns prefer wider pots; deep-rooted ficus need depth.
The Fundamental Principle: Soil actively regulates the relationship between water and roots. The right mix transforms watering from uncertainty into a predictable, responsive practice. Well-structured soil supports oxygen availability even when moist, creating conditions where roots can thrive.
Troubleshooting Soil & Pot Observations
-
Soil stays wet for days after watering?
Possible Causes: High organic matter content; insufficient aeration; pot too large; low light.
Considerations: Repot with added perlite/bark. Move to brighter location. Ensure pot has drainage hole. -
Soil dries too quickly?
Possible Causes: High perlite/sand ratio; terracotta pot; high light/heat.
Considerations: Increase coir ratio slightly. Switch to glazed ceramic or plastic pot. Add thin layer of sphagnum moss on soil surface to reduce evaporation. -
White crust on soil surface?
Possible Cause: Mineral buildup from water or fertilizer.
Considerations: Scrape off top ½ inch of soil. Flush soil thoroughly with distilled or rainwater. Repot if severe. Consider filtered water long-term. -
Fungus gnats appearing?
Possible Cause: Consistently moist soil surface; organic debris on top.
Considerations: Allow soil to dry deeper between waterings. Add ½-inch layer of coarse sand or fine gravel on soil surface. Place yellow sticky traps near soil. Apply Bacillus thuringiensis israelensis (BTI) drench (e.g., Mosquito Bits) if needed. -
Soil smells sour or foul?
Possible Cause: Anaerobic conditions from prolonged saturation.
Considerations: Repot into fresh, well-aerated mix. Trim affected roots. Discard old soil.
With light understood, water mastered, and soil engineered thoughtfully, you’ve built a resilient foundation. But plants exist within a broader environmental context—let’s explore the supporting elements that elevate good care to exceptional care.
Beyond the Triad: Humidity, Temperature, and Nutrition
While light, water, and soil form the indispensable core, three additional factors fine-tune plant vitality. Ignoring them rarely causes immediate failure, but optimizing them transforms struggling specimens into thriving ones. These elements interact subtly with the Triad—humidity affects transpiration rates, temperature influences metabolic activity, and nutrition supports growth initiated by light.
Humidity: The Invisible Necessity for Tropicals
Many popular indoor plants (monstera, calathea, ferns) originate from humid tropical regions. Average home humidity (30–50%) can create chronic low-grade stress for these species, manifesting as brown leaf tips, curling edges, slowed growth, or increased vulnerability to pests like spider mites (which thrive in dry air).
Measuring Humidity: An affordable hygrometer provides helpful readings. Place it near plant clusters—not near humidifiers or vents. Ideal range: 40–60% for most homes; 60%+ benefits humidity-loving species.
Humidity Solutions Tiered by Commitment Level:
– Level 1 (Passive & Free): Group plants together. Transpiration from multiple plants creates a localized humid microclimate (“plant gang” effect). Place on pebble trays: fill shallow tray with pebbles, add water to just below pebble tops, set pot on pebbles (roots must not touch water). As water evaporates, humidity rises around foliage. Refill tray as needed.
– Level 2 (Active & Targeted): Use a small cool-mist humidifier (1–2 gallon capacity). Position 3–4 feet from plant cluster. Run 4–6 hours daily, especially during winter heating or in air-conditioned rooms. Pro Tip: Place hygrometer nearby to monitor levels. Ideal for calatheas, ferns, nerve plants.
– Level 3 (Controlled Environment): For dedicated growers, create a dedicated plant shelf with enclosed sides/back and small humidifier. Or use a clear plastic humidity dome (for seedlings/cuttings) with ventilation holes. Caution: Poor airflow in enclosed spaces may encourage mold—always include gentle air circulation (small fan on low).
Critical Exceptions: Succulents, cacti, snake plants, and Mediterranean herbs (rosemary, lavender) prefer lower humidity (30–50%). Avoid misting these. Misting alone typically provides only a temporary and minimal increase in humidity (evaporates in minutes) while potentially creating conditions favorable for fungal leaf spots if leaves remain wet. Only mist if:
– Cleaning dust from smooth leaves (follow with gentle wipe)
– Moistening aerial roots on monstera or orchids
– Applying diluted neem oil spray for pests (not for humidity)
Temperature: Stability Supports Health
Most indoor plants thrive between 65–80°F (18–27°C). Consistency often matters more than hitting an exact number.
Critical Temperature Guidelines:
– Avoid Cold Drafts: Temperatures below 50°F (10°C) may cause cold stress in tropicals—symptoms include dark water-soaked spots on leaves, leaf drop. Keep plants away from doors, single-pane windows in winter, and AC vents.
– Avoid Heat Sources: Radiators, heating vents, or fireplaces create hot, dry microclimates. Maintain 3+ feet distance. Signs of heat stress: crispy leaf edges, rapid soil drying, wilting despite moist soil.
– Nighttime Drops: A modest drop at night (around 10°F / 5°C) is natural and often beneficial (mimics habitat), especially for flowering plants like orchids.
– Sudden Changes: Moving a plant from a warm store (75°F) to a cold car (35°F) can cause shock. Acclimate gradually: leave in garage for 30 minutes before bringing indoors.
Real-World Insight: Bathroom steam from showers provides temporary humidity spikes but inconsistent temperatures. Only place humidity-loving plants here if light is adequate (e.g., north-facing window) and temperature remains stable.
Nutrition: Feeding with Finesse
Plants in pots rely on you for nutrients. Soil nutrients deplete over time, especially with frequent watering that leaches minerals. Fertilizing replenishes them—but “more” is rarely “better.” Over-fertilizing can cause salt buildup (brown leaf edges), stunted growth, and soil imbalance.
Understanding Fertilizer Labels (N-P-K):
– Nitrogen (N): Supports leaf and stem growth. Higher N ratios benefit foliage plants (e.g., 10-5-5).
– Phosphorus (P): Supports root development and flowering. Higher P ratios benefit bloomers (e.g., 5-10-5).
– Potassium (K): Supports overall vigor, stress resistance, and water regulation.
Fertilizing Best Practices:
– When to Feed: During active growth (spring and summer). Reduce frequency in early fall. Pause completely during winter dormancy (shorter days, lower light).
– Frequency & Strength: “Weakly, weekly” is a safer approach than heavy doses. Dilute liquid fertilizer to ¼ to ½ strength of package directions. Apply every 2–4 weeks. Example: If label says “1 tsp per gallon,” use ¼ tsp.
– Organic Options (Gentler, Sustainable):
– Worm Castings: Mix 1–2 tbsp into top inch of soil monthly. Slow-release, microbe-friendly.
– Fish Emulsion or Seaweed Extract: Dilute heavily (1 tsp per gallon). Provides trace minerals. Slight odor dissipates quickly.
– Compost Tea: Steep compost in water 24 hours; strain; use to water. Boosts soil microbes.
– Slow-Release Granules: Mix into soil at repotting (follow package rates). Releases nutrients over 2–3 months. Ideal for busy growers.
– Signs of Excess Fertilizer: White crust on soil, brown leaf tips, yellowing leaves, slowed growth. Response: Flush soil thoroughly with distilled or rainwater (pour slowly until excess drains out). Pause all fertilizer for 2–3 months.
– Signs of Insufficient Nutrients: Pale new growth, small leaves, slow growth despite good light/water. Response: Begin light feeding schedule with diluted solution.
Plant-Specific Notes:
– Heavy Feeders (Peace Lily, Gardenia, Citrus): Benefit from regular light feeding during growth season.
– Light Feeders (Snake Plant, ZZ Plant, Succulents): Fertilize sparingly—once in spring and once in early summer at ¼ strength. Overfeeding may encourage weak growth.
– Orchids: Use specialized orchid fertilizer at diluted strength during active growth periods.
Integrating the Full System: A Diagnostic Flowchart in Words
When a plant shows distress, follow this sequential checklist to avoid misdiagnosis:
1. Assess Light First: Has season changed? Was plant moved? Perform shadow test. Is light level appropriate for species?
2. Check Moisture: Use chopstick test at root depth. Is soil too wet or too dry relative to current light?
3. Evaluate Soil & Pot: Is drainage adequate? Is pot size appropriate? Any signs of compaction or salt buildup?
4. Review Environment: Humidity low? Temperature fluctuations? Recent fertilizer application?
5. Observe Symptoms Precisely:
– Brown crispy tips? → May indicate low humidity, inconsistent watering, or water chemistry sensitivity.
– Yellow lower leaves? → Often relates to moisture imbalance (in low light) or natural aging.
– Drooping with wet soil? → May indicate root stress; assess carefully.
– Drooping with dry soil? → Likely underwatering (peace lily exception: normal signaling).
– Webbing on leaves? → Possible spider mites (dry air + stress).
Why this works: A drooping peace lily is usually thirsty—but if soil is soggy, it’s not thirst. Context prevents errors. This systematic approach builds diagnostic confidence with every plant.
The 7 Common Challenges (and How to Navigate Them)
Even experienced caregivers encounter these situations. They persist because they feel intuitive—but they often overlook plant physiology. Recognize them to build resilience.
Challenge 1: Moisture Imbalance – The Most Frequent Hurdle
Why it happens: Misinterpreting drooping as thirst; rigid watering schedules; fear of underwatering; using pots without drainage.
The science: Roots require oxygen. Soggy soil fills air pockets with water, potentially suffocating roots. Anaerobic conditions may allow harmful microbes to proliferate.
How to navigate: Always check moisture before watering. Use well-draining soil and pots with drainage holes. When uncertain, wait 24–48 hours. Remember: underwatering is generally easier to correct than prolonged overwatering.
Recovery approach: Pause watering. Assess roots. Trim affected sections if needed. Repot into fresh, airy mix. Place in bright indirect light. Improve air circulation gently. Wait several days before light watering.
Challenge 2: Mismatched Light Placement
Why it happens: Placing plants based on room aesthetics, not biology; assuming “indirect light” is universal; not adjusting for seasons.
The science: Insufficient light slows photosynthesis, weakening the plant and reducing water uptake—creating a false signal of “thirst” that may lead to overwatering.
How to navigate: Research light needs before purchasing. Use shadow test monthly. Rotate plants weekly. Accept that some plants won’t thrive in your space—choose accordingly or supplement light.
Recovery: Move incrementally to appropriate light over 7–10 days (avoid shock). Prune leggy growth to encourage bushiness from base.
Challenge 3: Inappropriate Soil Composition
Why it happens: Using garden soil (too dense, may contain pests); relying on cheap potting mixes that compact; not customizing for plant type.
The science: Compacted soil retains excess water, blocks oxygen, and restricts root growth.
How to navigate: Never use garden soil. Customize mixes using the recipes in Step 3. Refresh soil periodically for heavy feeders.
Recovery: Repot into appropriate mix. Trim damaged roots. Water lightly after repotting.
Challenge 4: Overreliance on Misting for Humidity
Why it happens: Believing misting significantly raises ambient humidity; social media aesthetics.
The science: Misting raises humidity for minutes, not hours. Water sitting on leaves may create conditions favorable for fungal issues.
How to navigate: Use pebble trays, group plants, or humidifiers for true humidity needs. Wipe leaves with damp cloth for cleaning.
Exception: Misting is acceptable only for moistening aerial roots (monstera) or applying pest treatments—not for humidity.
Challenge 5: Over-Fertilizing (“More is Better” Fallacy)
Why it happens: Trying to force growth; misinterpreting slow growth as nutrient deficiency; following package directions without dilution.
The science: Excess salts may burn root tips, disrupt water uptake, and create imbalanced soil conditions.
How to navigate: Dilute to ¼–½ strength. Follow “weakly, weekly” during growth season. Skip entirely in winter. When in doubt, under-fertilize.
Recovery: Flush soil thoroughly with distilled or rainwater. Pause fertilizer for 2–3 months. Remove severely damaged leaves.
Challenge 6: Repotting Too Often or Into Oversized Pots
Why it happens: Thinking bigger pot = bigger plant; misinterpreting slow growth as needing more space.
The science: Excess soil stays wet longer, potentially promoting root issues. Some plants flower only when slightly root-bound.
How to navigate: Repot only when clear signs appear (see Soil section). Size up incrementally (1–2 inches max).
Recovery: If repotted too large and soil stays wet, monitor closely. Consider moving back to smaller pot if roots are healthy.
Challenge 7: Overlooking Pest Prevention & Early Detection
Why it happens: Assuming indoor plants are pest-free; not inspecting new plants; ignoring early signs.
The science: Pests (spider mites, mealybugs, scale) spread rapidly in stressed plants. Dry air and dust create favorable conditions.
How to navigate: Quarantine new plants for 2 weeks. Inspect leaves weekly (top and underside). Wipe leaves monthly with damp cloth. Apply preventative neem oil solution (1 tsp neem oil + 1 quart water + few drops dish soap) occasionally during dry months.
Recovery: Isolate affected plant immediately. Treat with insecticidal soap or neem oil. Repeat every 5–7 days for several weeks to break lifecycle. Prune heavily infested leaves.
Illustrative Transformation: A grower noticed brown spots on their fiddle leaf fig. They increased watering, then moved it to a darker corner. Spots spread. Using the diagnostic flowchart, they checked light (too low), moisture (soil soggy), and found spider mites underneath leaves. They moved it gradually to bright indirect light, adjusted watering, treated pests with neem oil, and repotted into airy soil. Within months, new growth emerged vibrant and spot-free. Awareness turns challenge into growth.
Plant-Specific Quick Reference Guide
Use this table to cross-reference care within the Triad Framework. Always observe your specific plant and environment—these are starting points, not absolutes.
| Plant Name | Light Needs (Shadow Test) | Water When… (Continuum) | Soil Mix Recommendation | Special Notes |
|---|---|---|---|---|
| Snake Plant | Low to Bright Indirect | Soil completely dry | Succulent mix or AP + extra perlite | Extremely drought-tolerant; thrives on neglect; tolerates low light but grows faster in medium light |
| ZZ Plant | Low to Medium | Top 1–2 inches dry | AP mix + perlite | Stores water in rhizomes; avoid overwatering; toxic to pets |
| Pothos | Medium to Bright Indirect | Top inch dry | AP tropical mix | Trailing growth; prune to encourage bushiness; very adaptable |
| Peace Lily | Low to Medium | Slightly dry; droops when thirsty | AP tropical mix | Blooms in higher humidity; sensitive to fluoride/chlorine; dramatic drooper (normal) |
| Monstera Deliciosa | Bright Indirect | Top 1–2 inches dry | Aroid mix (coir, perlite, bark) | Provide moss pole for climbing; wipe leaves monthly; fenestrations increase with light |
| Calathea | Medium, No Direct Sun | Keep evenly moist | Aroid mix + extra coir + charcoal | Prone to spider mites; requires higher humidity; leaves fold at night (“prayer plant”) |
| Fiddle Leaf Fig | Bright Indirect | Top 1–2 inches dry | AP mix + extra perlite | Sensitive to change; rotate weekly for symmetry; dust leaves regularly |
| Spider Plant | Medium to Bright | Top inch dry | AP tropical mix | Produces “pups”; loves to be slightly root-bound; non-toxic |
| Chinese Evergreen | Low to Medium | Top inch dry | AP tropical mix | Very adaptable; tolerates fluorescent office light; slow grower |
| Succulents (General) | Bright Direct | Soil completely dry | Succulent/cactus mix | Water deeply but infrequently; avoid misting; needs strong light to prevent stretching |
| Boston Fern | Medium, Indirect | Keep evenly moist | AP mix + extra coir | High humidity essential; sensitive to dry air; prune brown fronds at base |
| Cast Iron Plant | Very Low to Medium | Top 1–2 inches dry | AP mix + perlite | Extremely tolerant of neglect, low light, and irregular watering; slow grower |
Key: AP = All-Purpose Tropical Mix. “Bright Indirect” = no direct sunbeam hits leaves; filter southern light with sheer curtains. For low-light plants in dim spaces, supplement with grow lights for true growth (survival ≠ thriving).
Your Questions, Answered
Q: How do I definitively know if my plant is getting too much light versus too little?
A: Too much light often shows as bleached, yellow, or brown crispy patches on the side facing the window; leaves may feel papery. Too little light causes pale new growth, elongated stems with large gaps between leaves (“legginess”), smaller leaves, and slow/no growth. Use the shadow test to verify—adjust placement gradually over 7–10 days to avoid shock. Rotate plants weekly for even exposure.
Q: Is tap water truly unsafe for plants? What’s the simplest fix?
A: It depends on your water and plant sensitivity. If your tap water is softened (high sodium) or has high chlorine/fluoride levels, it may contribute to brown leaf tips over time. Simplest fix: Fill your watering can and let it sit uncovered for 24 hours before use—this allows chlorine to evaporate. For fluoride-sensitive plants (spider plants, peace lilies), use distilled water, rainwater, or a basic pitcher filter. Hard water users may see white crust on soil—flush soil thoroughly with distilled water occasionally.
Q: Why are the tips of my plant’s leaves turning brown, and how do I stop it?
A: Brown tips most commonly indicate inconsistent watering (soil drying too much between waterings), low humidity, or sensitivity to water chemistry (fluoride/chlorine). Less commonly, it can be fertilizer residue or natural aging. First, check your watering routine—aim for consistency relative to light. Increase humidity with pebble trays or grouping. If using tap water, consider filtered/distilled. Trim brown tips with clean scissors following the leaf’s natural shape; avoid cutting into healthy tissue.
Q: Can I ever use garden soil for indoor plants? What’s the risk?
A: Never use garden soil for indoor plants. It’s too dense, compacts severely in pots (blocking oxygen), drains poorly, and may contain pests, fungi, weed seeds, or pathogens. Always start with a sterile potting mix designed for containers, then customize it with perlite, bark, or coir as needed for your plant type. The small extra cost prevents major headaches.
Q: How often should I fertilize, and what strength is safe?
A: During active growth (spring and summer), fertilize every 2–4 weeks with a diluted liquid fertilizer at ¼ to ½ strength of the package directions. In fall, reduce frequency; pause completely in winter. Always water soil thoroughly before applying fertilizer to prevent root stress. When in doubt, under-fertilize—plants recover much easier from nutrient deficiency than excess. Organic options like worm castings are gentler for beginners.
Q: My plant is drooping. How do I tell if it’s overwatered or underwatered?
A: Check the soil moisture immediately using the chopstick test. If soil is soggy, heavy, and smells foul, moisture imbalance is likely. If soil is bone dry, crumbly, and the pot feels very light, it’s likely underwatered. Peace lilies droop dramatically when thirsty but recover within hours of watering—this is normal for them. For other plants, drooping with wet soil warrants careful assessment (see Step 2 recovery protocols).
Q: Do I really need to mist my plants daily?
A: No. Misting provides negligible humidity increase (evaporates in minutes) and may promote fungal issues if leaves stay wet. For humidity-loving plants, use pebble trays, group plants together, or run a humidifier. Misting is acceptable only for cleaning dust off smooth leaves (follow with gentle wipe) or moistening aerial roots on monstera/orchids—not for raising ambient humidity.
Q: What’s the safest way to clean dusty leaves?
A: Dust blocks light absorption and may attract pests. For smooth leaves (monstera, rubber plant), wipe gently with a damp microfiber cloth. For fuzzy leaves (African violets, calathea), use a soft makeup brush. For small-leaved plants (ferns, spider plants), rinse under lukewarm shower water (cover soil with plastic wrap first) and let drain thoroughly. Clean leaves monthly for optimal health and appearance.
Q: How can I tell if my plant truly needs repotting?
A: Clear signs include roots growing through drainage holes, soil drying out within 24 hours of watering, the plant becoming top-heavy or lifting easily from the pot, or slowed growth despite proper care. Gently remove the plant—if roots are densely circling the root ball like a mat, it’s time. Repot in early spring using a pot only 1–2 inches larger in diameter. Some plants (peace lily, spider plant) prefer being slightly root-bound—only repot if growth stalls or roots are severely congested.
Q: Are there plants that can truly survive in a windowless room?
A: No plant can thrive long-term without light. However, snake plants, ZZ plants, and cast iron plants can survive for many months in very low light (e.g., a room with only artificial office lighting). For true growth and health, supplement with a small LED grow light (run 12 hours daily). Without any light source, all plants will eventually decline—photosynthesis requires photons. Choose plants matching your space, or adapt the space to the plant.
Q: Why do some plants have scientific names on tags? Should I care?
A: Common names vary regionally (e.g., “ZZ plant” vs. “Zanzibar gem”), causing confusion. Scientific names (e.g., Zamioculcas zamiifolia) are universal and precise. Knowing the genus/species helps you research accurate care—Sansevieria trifasciata (snake plant) has different needs than Dracaena fragrans (corn plant), though both are sometimes called “snake plant” colloquially. When in doubt, search the scientific name for reliable information.
Q: How do I safely introduce a new plant to my existing collection?
A: Quarantine is essential. Place new plants in a separate room (or isolated corner) for 2–3 weeks. Inspect leaves (top and underside), stems, and soil daily for pests (webbing, sticky residue, tiny bugs). Wipe leaves with damp cloth. Avoid placing near drafts or direct sun initially. After quarantine period with no issues, integrate slowly. This prevents introducing spider mites, mealybugs, or scale to your entire collection—a single infested plant can spread rapidly.
Conclusion and Next Step
You now hold more than a collection of tips—you possess a framework for understanding. The Triad—light, water, soil—isn’t a rigid checklist but a dynamic lens for interpreting your plant’s language. When you see a yellow leaf, you’ll ask not “What’s wrong?” but “Which relationship is out of balance?” This shift from reaction to insight is where true confidence grows. Remember the core truth: plants respond to their environment; our role is to observe and adjust thoughtfully. Master the connections, and you master care.
Recap: The 3 Guiding Principles
- Light sets the pace. Assess it objectively with the shadow test. Match plants to your space—or adapt the space with supplemental lighting. Seasonal shifts demand attention.
- Water responsively. Let soil moisture (verified by chopstick test), not the calendar, guide you. Technique, water quality, and pot material are part of the equation.
- Soil is engineered. Customize mixes to create the ideal root environment. Well-structured soil makes watering predictable and supports root health.
The 24-Hour Rule: Your Tiny, Transformative Action
Within the next 24 hours, select one plant in your home. Perform the shadow test at its current location. Note the result: sharp shadow (bright), soft shadow (medium), or no shadow (low). Then, insert a wooden chopstick deep into the soil. Wait 10 seconds. Observe: dry, slightly damp, or wet? Does the light level match the plant’s typical needs? Does the moisture level align with that light? This 5-minute audit builds the habit of observation—the cornerstone of thoughtful care. No judgment, only awareness.
The Big Picture: Cultivating More Than Plants
Caring for indoor plants is a practice in patience, presence, and adaptability. Each leaf teaches resilience; each recovery builds intuition. You’re not just keeping plants alive—you’re creating a living ecosystem that reflects your growing expertise. Notice how observing soil moisture sharpens your attention to detail. How adjusting light deepens your understanding of natural rhythms. How nurturing life fosters compassion—for plants, and for yourself. Share cuttings with neighbors. Journal small victories. Celebrate the new leaf unfurling after weeks of careful care. This journey isn’t about perfection; it’s about connection. The most thriving jungles begin with a single, well-understood step.
Explore Our Complete Plant Care System:
[The Propagation Handbook: Rooting Cuttings with Confidence] | [DIY Soil Mixes Decoded: Recipes for Every Plant Type] | [Seasonal Plant Care Calendar: Month-by-Month Maintenance] | [Pest Patrol: Organic Solutions for Common Indoor Invaders] | [From Surviving to Thriving: Reviving Stressed Houseplants] | [The Mindful Gardener: Cultivating Calm Through Plant Care] | [Pet-Safe Plant Guide: Beautiful Foliage That’s Safe for Furry Friends]