Understand, Maintain, and Troubleshoot Your Entire Plumbing Ecosystem with Confidence
Your home’s plumbing operates as a silent symphony of engineered balance—pressurized supply lines delivering clean water on demand while a gravity-driven drain network safely removes wastewater. This definitive guide transforms confusion into clarity by revealing how these systems interconnect, function, and respond to change. You’ll gain actionable knowledge to maintain efficiency, prevent disruptions, and make informed decisions whether addressing simple concerns or evaluating professional support. No prior expertise required—just curiosity and a commitment to understanding one of your home’s most vital systems.
Introduction
Beneath drywall, under floorboards, and behind cabinet doors lies an intricate network responsible for one of modern life’s most fundamental necessities: reliable access to clean water and safe wastewater removal. For decades, this system has operated invisibly—until a drip escalates, a clog disrupts routines, or an unexplained odor raises concern. Understanding your home’s plumbing is not about memorizing pipe diameters or code sections; it’s about recognizing patterns, anticipating vulnerabilities, and developing a proactive relationship with the infrastructure that sustains daily life.
This guide is structured around widely recognized plumbing principles reflected in international building standards and engineering practice. Fragmented explanations that isolate “supply” from “drain” are intentionally avoided because real-world situations rarely respect those boundaries. Instead, plumbing is presented as a unified ecosystem where pressure dynamics, material science, and physics converge. Whether you purchased your first home recently, inherited an older property with mysterious pipes, or simply want to move beyond searching “why is my sink gurgling,” this resource provides foundational literacy to navigate with growing confidence. You’ll learn not just what each component does, but why it matters—and how consistent, thoughtful attention supports long-term reliability.
The Dual-Flow Framework: Seeing Plumbing as an Integrated Ecosystem
Traditional resources often treat water supply and drainage as separate topics. This creates a critical blind spot. When your shower drain gurgles as the toilet flushes, or water pressure fluctuates alongside slow drainage, the root cause frequently lies in the relationship between systems—not within either one alone. The Dual-Flow Framework corrects this by framing your plumbing as two interdependent networks:
- The Arterial System (Supply): A closed, pressurized loop delivering potable water from the street or well to every fixture. Pressure (typically 40–80 PSI in most residential settings) is its driving force. Components include mains, valves, regulators, water heaters, and branch lines.
- The Venous System (Drain-Waste-Vent or DWV): An open, gravity-dependent network removing wastewater while maintaining air pressure equilibrium. Slope (approximately ¼ inch per foot of run), venting, and trap seals are its essential requirements.
The Fundamental Principle: Plumbing functions reliably only when supply pressure and drain airflow exist in balanced harmony. Disrupt one, and the other may respond unexpectedly.
Why This Systems View Changes Everything: Real Scenarios Decoded
Consider these common situations through the Dual-Flow lens:
-
Scenario A: After installing a new high-flow showerhead, your kitchen sink gurgles when the shower runs.
Fragmented thinking: “The sink drain is clogged.”
Systems thinking: The increased water volume may overwhelm an undersized or partially obstructed vent pipe. Negative pressure forms in the drain line, pulling air through the sink’s P-trap. Solution path: Inspect roof vents for obstructions or evaluate vent sizing—not solely focus on the sink drain. -
Scenario B: Water pressure drops noticeably only when the washing machine fills.
Fragmented thinking: “The main line is failing.”
Systems thinking: Rapid valve cycling in the appliance can create transient pressure shifts. Simultaneously, drain discharge may encounter resistance if the standpipe lacks proper venting. Solution path: Consider water hammer mitigation and verify drain air gap/venting—not assume main line replacement is needed. -
Scenario C: A faint odor appears near the basement floor drain after heavy rain.
Fragmented thinking: “The drain is dirty.”
Systems thinking: Saturated soil may increase external pressure on the drain system. If the building’s vent stack is partially blocked, negative pressure could siphon water from the floor drain’s P-trap. Solution path: Clear roof vents and restore the trap seal with water—not rely solely on chemical cleaners.
This framework supports logical troubleshooting. Throughout this guide, interconnections are consistently highlighted—because recognizing that a “drain symptom” might relate to supply dynamics (or vice versa) builds meaningful plumbing literacy.
Part 1: The Supply System Deep Dive — From Street to Fixture
The supply system is a pressurized delivery network designed for efficiency, safety, and resilience. Every drop of water entering your home follows a path governed by physics and engineering practice. Understanding this journey reveals where attention matters most.
The Water’s Journey: A Molecule’s Path Through Your Home
Trace the route of water from municipal source to faucet:
-
Point of Entry: Water travels through the water main (typically ¾” to 1″ diameter) under municipal pressure. At your property line, it passes through the water meter (measuring usage) and immediately encounters the main shutoff valve—your primary control point for the entire house. Context note: In colder climates, this assembly is often housed below the frost line; in warmer zones, it may be visible near the foundation.
-
Pressure Regulation: If incoming pressure exceeds typical residential ranges (common in hilly areas or near pumping stations), water flows through a pressure-reducing valve (PRV). This device, usually installed near the main shutoff, regulates pressure to a safer range. Without it, sustained high pressure may stress joints and accelerate wear. How it works: A spring-loaded diaphragm restricts flow to maintain set pressure. An adjustment screw allows fine-tuning.
-
Backflow Prevention: Downstream of the PRV (where required by local regulation), a backflow preventer safeguards the public water supply. This device contains check valves allowing flow only toward your house. During pressure drops (e.g., nearby firefighting), it prevents potential contamination from irrigation or other systems. Note: Annual testing by a certified technician is often required for homes with irrigation or fire sprinklers.
-
Branching Paths: The main supply line splits:
- Cold Water Line: Continues directly to cold-water fixtures and the water heater inlet.
-
Hot Water Line: Enters the water heater, where water is heated (typically to 120°F/49°C for safety and efficiency) before circulating to hot-water fixtures. Key insight: In tankless systems, heating occurs instantly as water flows through a heat exchanger—no storage tank is involved.
-
Distribution Network: From the water heater and cold main, smaller branch lines (usually ½” diameter) extend through walls and floors. Two common layouts exist:
- Trunk-and-Branch: A central line runs through the house with smaller branches teeing off to fixtures. Cost-effective but may experience pressure fluctuations during simultaneous use.
-
Home-Run (Manifold) System: Individual lines (often PEX) run directly from a central manifold to each fixture. Allows isolated shutoffs, reduces pressure fluctuations, and minimizes wait time for hot water. Common in modern builds and renovations.
-
Fixture Interface: At each sink, toilet, or appliance, a stop valve (angle stop) provides localized shutoff. Finally, water exits through a faucet aerator, showerhead, or appliance connection.
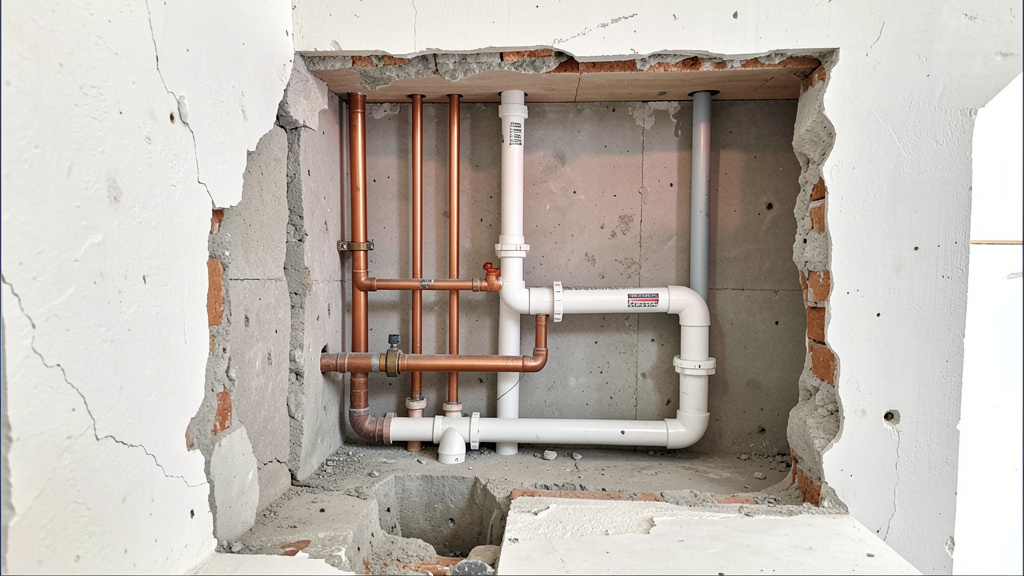
Core Components Decoded: Materials, Evolution, and Practical Implications
Pipes: The Arteries of Your Home
Pipe material influences longevity, repair considerations, and water quality. Historical context informs maintenance priorities.
| Material | Era of Common Use | Key Advantages | Critical Considerations | Lifespan & Action Steps |
|---|---|---|---|---|
| Copper | 1960s–Present | Durable, corrosion-resistant (in neutral pH water), antimicrobial properties, recyclable | Requires skilled joining; susceptible to pinhole leaks in acidic water (pH < 7.0); higher material cost | 50+ years. Check: Green corrosion at joints may indicate acidic water—consider pH testing and consultation with a water treatment professional. |
| PEX (Cross-Linked Polyethylene) | 1990s–Present | Flexible (fewer joints), freeze-resistant (expands without bursting), quick installation, noise-dampening, lower cost | Not UV-stable (degrades in sunlight); requires specific tools; use protective sleeves in crawlspaces where rodents are present | 40–50 years. Pro Tip: Color coding (red = hot, blue = cold) aids identification. Never use for outdoor exposed runs. |
| CPVC (Chlorinated Polyvinyl Chloride) | 1980s–Present | Corrosion-proof, handles hot water, lower cost than copper, quiet flow | Brittle below freezing temperatures; requires solvent cement joints (adequate ventilation needed); overtightening may crack fittings | 30–50 years. Caution: Use PTFE tape on threaded connections; avoid excessive force on plastic fittings. |
| Galvanized Steel | Pre-1960s | Strong, rigid, fire-resistant | Internal rust/corrosion narrows diameter (“scaling”), causing low pressure and discoloration; difficult/expensive to repair; obsolete | 20–50 years (often fails earlier). Action: If present, monitor closely. A whole-house filter may reduce sediment temporarily, but repiping is often the long-term solution. |
| Polybutylene (PB) | 1978–1995 | Flexible, inexpensive, easy to install | Documented failure risk: Chlorine in municipal water may degrade polymer over time, leading to leaks at fittings. Subject of historical class actions. | Variable. Recommendation: If gray/black pipes stamped “PB2110” are identified near the water heater or entry point, consult a licensed plumber for assessment. Proactive replacement is commonly advised. |
How to Identify Pipes in Your Home:
– Basement/Crawlspace: Look where pipes enter the foundation. Copper = reddish-brown metal. PEX = flexible plastic tubing. Galvanized = rigid gray pipes with threaded joints and visible corrosion.
– Under Sinks: Stop valves connect to supply lines. Braided stainless steel = modern replacement. Rubber hoses with wire mesh = older style.
– When Unsure: Take a clear photo to a plumbing supply store. Staff can often identify material and recommend compatible parts. Never guess when modifying pipes.
Valves: Control Points for Safety and Precision
Valves serve as critical control points.
- Main Shutoff Valve:
- Gate Valve (older): Turns multiple times to open/close. May seize or fail to seal fully after years of disuse.
-
Ball Valve (modern): Quarter-turn operation (handle parallel to pipe = open; perpendicular = closed). Generally more reliable.
Maintenance: Operate annually—turn fully off, confirm no flow at a faucet, then fully on. Ensure unobstructed access. Label clearly: “MAIN WATER SHUTOFF – TURN CLOCKWISE TO CLOSE.” -
Pressure-Reducing Valve (PRV):
Symptoms of concern: Banging pipes, dripping faucets, pressure fluctuations.
Testing: Attach an affordable pressure gauge to an outdoor spigot or laundry sink faucet with no water running elsewhere. Typical residential range: 40–80 PSI. Readings consistently outside this range warrant attention.
Adjustment: Turn the screw atop the PRV clockwise to increase pressure, counterclockwise to decrease. Make small adjustments, retest. If unresponsive or leaking, replacement may be needed—consult a professional if soldering is required. -
Thermal Expansion Tank:
Often required by code in “closed systems” (where a PRV or backflow preventer restricts backward water movement). Installed on the cold water inlet to the water heater.
Why it matters: Water expands when heated. Without this tank (a small chamber with an air bladder), pressure spikes may cause the water heater’s T&P valve to discharge or stress pipes.
Observation Signs: Tank feels solid when tapped; water leaks near the air valve; T&P valve discharges intermittently. Replacement intervals vary—consult manufacturer guidance.
Water Heater: The Heart of Hot Water Supply
Understanding types supports informed decisions about efficiency, capacity, and care.
| Type | How It Works | Common Applications | Maintenance Essentials | Typical Lifespan |
|---|---|---|---|---|
| Storage Tank (Gas) | Gas burner heats water in insulated tank; exhaust gases vent through flue | Homes with multiple simultaneous hot water needs | Annually flush sediment; test T&P valve; inspect anode rod periodically; check flue pipe | 8–12 years |
| Storage Tank (Electric) | Immersion heating elements warm water; no venting required | Homes without gas line; smaller households | Same as gas, plus: Test elements if water cools prematurely; ensure thermostats are calibrated | 10–15 years |
| Tankless (Gas) | Burner activates as water flows through heat exchanger; heats on demand | Households needing continuous hot water; space-constrained areas | Install water softener if hard water is present; descale heat exchanger periodically; ensure adequate gas supply | 15–20 years |
| Heat Pump (Hybrid) | Extracts ambient heat from air to warm water; uses compressor | Warmer climates; utility rooms with excess heat; efficiency-focused homes | Clean air filter regularly; ensure adequate clearance; verify drain pan slope | 12–15 years |
Critical Safety Practices for ALL Water Heaters:
– Temperature-Pressure (T&P) Relief Valve: Essential safety device. Must discharge via a dedicated pipe extending within 6 inches of the floor (never capped). Test every 6 months: Lift lever briefly—water should flow freely. Replace if leaking or unresponsive.
– Anode Rod: Sacrificial rod (magnesium/aluminum/zinc) inside tank that corrodes to protect the steel lining. Inspect periodically; replace when significantly depleted. This practice may extend tank life.
– Clearance: Maintain manufacturer-specified clearance around units, especially gas models. Never store flammables nearby.
Supply System Maintenance Protocol: Your Room-by-Room Action Plan
Preventative care is generally more manageable than emergency response. Follow this tiered schedule:
Daily/Weekly Awareness
– Listen for unusual sounds: Hissing (possible minor leak), dripping (fixture issue), or hammering (pressure concern).
– Note changes: Sudden pressure shifts, water discoloration, or unexplained warmth on floors/walls.
Monthly Tasks (Approx. 15 Minutes)
– Check under all sinks: Look for moisture, corrosion on supply lines, or loose connections. Tighten slip nuts hand-tight plus a slight turn with pliers—avoid overtightening plastic nuts.
– Test stop valves: Turn each off/on smoothly. Replace any that stick or leak.
– Inspect visible pipes: Note new corrosion (galvanized), green spots (copper), or bulges in supply lines.
Quarterly Tasks
– Clean faucet aerators: Unscrew, soak in vinegar to dissolve mineral deposits, rinse. Restores flow and protects internal components.
– Run water + enzymatic cleaner down infrequently used drains (guest bath, utility sink) to maintain P-trap seals.
– Check washing machine hoses: Look for bulges, cracks, or corrosion. Replace rubber hoses with braided stainless steel per manufacturer recommendation.
Annual Deep Maintenance
1. Water Pressure Check: Attach gauge to outdoor spigot. Adjust PRV if readings consistently fall outside typical residential range.
2. Water Heater Flush: Connect hose to drain valve, run to floor drain. Open valve until water runs clear (removes sediment that reduces efficiency).
3. Exercise Main Shutoff: Turn fully off, confirm no flow at faucets, then fully on. Lubricate if stiff.
4. Inspect Exposed Pipes: In basement/crawlspace, check for corrosion, insulation gaps (wrap pipes in unheated areas), or signs of rodent activity near PEX.
5. Backflow Preventer (if present): Schedule testing per local requirements—do not skip. Critical for public water safety.
Every Few Years
– Consider professional inspection of hidden pipes (via camera if accessible) in older homes.
– Replace supply lines under sinks proactively—rubber degrades over time.
– Evaluate water quality: Test for hardness, pH, or iron. Address with filtration if needed to protect pipes and appliances.
Why This Protocol Matters: A single overlooked item—a seized main shutoff during a leak, or sediment buildup in a water heater—can escalate into significant disruption. Conversely, consistent, simple actions support system longevity and efficiency. Small efforts compound meaningfully over time.
Part 2: The Drain-Waste-Vent (DWV) System Deep Dive — Gravity, Air, and Flow
While supply lines push water under pressure, the DWV system relies on fundamental physics: gravity for flow, atmospheric pressure for equilibrium, and water seals for safety. Misunderstanding vents or traps often leads to recurring issues. This section clarifies the “invisible” half of your plumbing.
The Physics of Drainage: Why Vents Matter
Pour water from a narrow-necked bottle. Tilt slowly: glugging occurs as air struggles to enter, disrupting flow. Tilt quickly: air enters smoothly, enabling steady drainage. Your drain system operates similarly. Without vents, wastewater flowing down a pipe creates negative pressure behind it. This vacuum:
– Slows drainage
– May siphon water from P-traps, compromising the seal that blocks sewer gases
– Causes gurgling sounds as air is pulled through traps
Vents solve this by allowing air to enter the system ahead of the wastewater column, equalizing pressure and enabling smooth, quiet flow. They are pressure-regulation conduits essential for function—not merely “exhaust pipes.”
Core Components Decoded
Drainpipes and Waste Pipes: Materials and Sizing
– PVC (Polyvinyl Chloride): White plastic. Standard for modern drain lines. Lightweight, corrosion-proof, joined with solvent cement. Resists root intrusion better than clay. Note: Use Schedule 40 for structural strength in critical sections.
– ABS (Acrylonitrile Butadiene Styrene): Black plastic. More impact-resistant than PVC (better for cold climates). Cannot be glued directly to PVC—requires transition cement or mechanical coupling.
– Cast Iron: Heavy, durable, excellent sound-dampening (common in pre-1980s multi-story homes). Prone to internal corrosion over decades, potentially leading to slow drains. Often rehabilitated with epoxy lining.
– Clay Tile: Orange-brown ceramic pipes. Found in very old homes or municipal laterals. Brittle; vulnerable to root intrusion at joints. Usually replaced with PVC during repairs.
Sizing Context: Drainpipes are sized based on expected flow volume. Undersized pipes clog frequently; oversized pipes lack velocity to carry solids effectively.
– Lavatory sink: 1¼”–1½”
– Shower/tub: 2″
– Kitchen sink: 1½”–2″
– Toilet: 3″ or 4″ (critical for solid waste removal—never reduce below 3″)
– Main building drain: 4″ minimum, sloping continuously toward exit point
Vent Pipes: Pressure Regulators
Vents are pipes extending from drain lines through the roof. Types include:
– True Vent: Vertical pipe attached directly to a drain line, extending through roof.
– Revent (Auxiliary Vent): Connects a fixture’s trap arm to a true vent. Required for island sinks or fixtures distant from main stack.
– Wet Vent: A drain pipe that also serves as a vent for another fixture (common in bathroom groups). Code-compliant but requires precise sizing.
– Air Admittance Valve (AAV): Mechanical one-way valve (e.g., Studor Mini-Vent). Allows air in during negative pressure but seals against sewer gases. Used where roof venting is impractical. Caveats: Has moving parts; not permitted everywhere; requires accessible installation. Traditional roof vents are often preferred for long-term reliability.
Venting Considerations:
– Trap arms (pipe from trap to vent) must slope continuously downward.
– Maximum distance from trap to vent varies by code and pipe size. Exceeding this may cause siphoning.
– Roof vents must extend above roof surface and maintain safe distance from windows/doors per local requirements.
Traps: The Defense Against Sewer Gases
Every fixture must have a trap—a curved section holding water to block methane, hydrogen sulfide, and pathogens.
– P-Trap: Standard under sinks. Horizontal outlet allows vent connection.
– S-Trap: Older configuration (vertical outlet). Prone to siphoning; not permitted by modern code. Common in older DIY installations—replace with P-trap.
– Drum Trap: Found in vintage bathtubs. Difficult to clean; often replaced during remodels.
– Toilet Trap: Integrated into bowl design—the visible curve at the base.
Trap Seal Maintenance: If a drain smells like sewage, the trap may be dry (common in guest bathrooms, floor drains, or utility sinks unused for months). Pour water down the drain to restore the seal. If odor persists, investigate further—cracked trap, blocked vent, or compromised toilet wax ring.
Navigating the Drain Maze: From Fixture to Sewer
Follow wastewater’s path:
1. Fixture Entry: Water exits sink/toilet into trap.
2. Branch Drain: Carries waste to main stack. Must slope continuously downward (no flat or uphill sections—”bellies” collect debris).
3. Soil Stack (Main Vent Stack): Large vertical pipe (3″–4″) collecting waste from multiple floors. Serves as primary vent. Extends through roof.
4. Building Drain: Horizontal pipe in basement/crawlspace collecting all branch drains. Flows toward exit point.
5. Cleanouts: Access points with removable plugs. Critical for clearing blockages. Locations:
– Where drain changes direction (e.g., basement floor near toilet)
– Outside foundation wall (sewer cleanout)
– Per code requirements along long runs
Action: Locate and mark all cleanouts. Keep area clear of landscaping/debris.
6. Exit Point: Building drain connects to sewer lateral (to municipal sewer) or septic tank. The lateral slopes continuously toward the street. Tree roots are a common cause of blockages here—especially near older pipe materials.
DWV Maintenance: Supporting Long-Term Flow
Monthly
– Run hot water + enzymatic drain cleaner down rarely used drains. Avoid harsh chemical cleaners: Caustic or acid-based formulas may damage pipes over time and offer only temporary relief. Enzymes digest organic buildup safely.
– Check roof vents visually (use binoculars): Look for bird nests, leaves, snow/ice buildup, or debris. Clear obstructions carefully—avoid tools that could damage flashing.
Quarterly
– Pour water down floor drains and infrequently used sinks/toilets to maintain trap seals.
– Inspect accessible cleanouts: Check for leaks, corrosion, or cracked plugs. Tighten if loose.
Annually
– Sewer Lateral Consideration: If mature trees are near the house, a camera inspection every few years may detect early root intrusion or pipe separation, potentially avoiding emergency situations.
– Floor Drain Trap Primer (if installed): Ensure automatic devices that add water to floor drain traps activate correctly.
– Backwater Valve Check (if present): In flood-prone areas, verify the valve operates freely. Debris can jam the flap. Clean per manufacturer guidance.
After Heavy Rain or Flooding
– If drains back up during storms, municipal system capacity may be exceeded. A backwater valve (if not present) could be discussed with a professional.
– If sewage backs up after rain stops, the lateral line may be compromised. Discontinue use and contact a plumber.
The Trap Seal Principle: A dry P-trap is a frequent cause of sewer odors in homes. Regular fixture use maintains the seal; for unused drains, pour water monthly or consider a trap seal primer. Persistent odors warrant investigation—they may indicate a breach in your home’s defense against gases.
Part 3: Where Supply Meets Drain — Fixtures, Connections, and Integration Points
Every faucet, toilet, and appliance is a convergence zone where supply pressure and drain flow interact. Attention here prevents many common household plumbing concerns.
Faucets and Valves: The Human Interface
Types, Mechanics, and Repair Pathways
– Compression Faucet (Two-Handle): Turning handle compresses rubber washer against valve seat to stop flow. Failure sign: Dripping from spout. Repair path: Replace washer and seat washer. May require seat wrench to smooth corroded valve seat. Common in older homes.
– Cartridge Faucet: Single-handle design. Cartridge (plastic/metal cylinder) controls flow/temperature. Failure sign: Leak around handle or spout. Repair path: Shut off stops, remove handle, extract cartridge with appropriate tool. Match old cartridge at store.
– Ceramic Disc Faucet: Modern standard. Two ceramic discs with precision channels align to allow flow. Failure sign: Hard to turn handle; intermittent dripping. Repair path: Replace entire disc cartridge. Highly durable when functioning.
– Ball Faucet: Found in some kitchen faucets. Rotating ball with chambers controls flow. Failure sign: Leaking under handle. Repair path: Replace springs, seats, and cam washer using kit.
Universal Faucet Replacement Considerations:
1. Turn off stop valves under sink. Open faucet to relieve pressure.
2. Photograph existing connections before disconnecting. Note hose types.
3. Disconnect supply lines. Remove mounting nuts under sink.
4. Clean old plumber’s putty/caulk from sink deck.
5. Install new faucet per instructions. Use fresh putty or silicone sealant.
6. Connect new braided stainless steel supply lines (avoid reusing old rubber hoses). Hand-tighten plus slight turn.
7. Turn water on slowly. Check for leaks at connections and under sink.
Insight: Quarter-turn ceramic disc valves under sinks often provide reliable shutoff and longevity.
Toilets: Hydraulic Engineering in Porcelain
A toilet is a self-contained micro-system:
– Flush Mechanism: Handle lifts flapper, releasing tank water into bowl. Surge creates siphon effect, pulling waste through trapway. Tank refills via fill valve.
– Critical Components:
– Flapper: Rubber seal. Degrades over time. Test: Add food coloring to tank; if color appears in bowl without flushing, flapper may leak.
– Fill Valve: Controls tank refill. Adjust float height to set water level (typically 1″ below overflow tube).
– Flush Valve: Large opening at tank bottom. Cracked valve seat may require tank replacement.
– Wax Ring: Seal between toilet base and closet flange. Failure may cause rocking, leaks, or odors.
Common Issues & Solution Paths:
– Running Toilet: Often related to flapper or fill valve. Jiggling handle is temporary—replace part if needed.
– Weak Flush: Clogged rim jets (clean gently), low tank water level (adjust fill valve), or partial blockage (snake carefully).
– Rocking Toilet: May indicate compromised wax ring. Critical: Shut off water, empty tank, remove toilet. Inspect flange—must be secure, level with floor, undamaged. Replace wax ring (or consider wax-free alternative). Reinstall carefully—misalignment risks damage.
Upgrade Considerations:
– WaterSense Labeled Toilets: Use ≤1.28 gallons per flush (gpf). Can lead to meaningful water savings versus older models. Look for independent performance ratings for reliable flushing.
– Pressure-Assisted vs. Gravity-Fed: Pressure-assisted offer powerful flushes but are louder; gravity-fed are quieter and simpler mechanically.
– Comfort Height: Bowl height 17–19″ (vs. standard 15″)—may improve accessibility.
Appliance Integration: Washing Machines, Dishwashers, and More
Washing Machine
– Supply: Hot/cold hoses to dedicated shutoff valves. Critical: Use stainless steel braided hoses per manufacturer recommendation. Replace periodically.
– Drain: Discharges into standpipe (vertical pipe, min. 30″ tall) connected to drain line. Standpipe must have an air gap (top above potential flood level) to prevent siphoning. Must be vented appropriately. Observation: Water backing up into standpipe during spin cycle may indicate drain or venting concern.
Dishwasher
– Supply: Typically connected to hot water line under sink. Avoid saddle valves (prone to leaks); use a tee fitting with dedicated shutoff.
– Drain: Hose connects to sink drain above P-trap. Must include a high-loop (hose routed up to underside of countertop before descending) to prevent backflow. Many areas require a visible air gap device mounted on countertop—a code-mandated barrier against contamination. Observation: Dirty water remaining after cycle may relate to missing high-loop or clogged air gap.
Garbage Disposal
– Supply: Cold water only.
– Drain: Connects between sink strainer and P-trap. Requires dedicated drain line. Critical: Avoid fibrous foods, grease, or coffee grounds. Run cold water while operating. Periodic maintenance: Grind ice cubes + citrus peels to clean and deodorize.
Integration Insight: The high-loop in a dishwasher drain hose serves a vital purpose. By routing the hose upward before descending to the drain, it creates a physical barrier that helps prevent dirty sink water from siphoning back into the dishwasher. This step supports hygiene and is often required by code.
Part 4: Maintenance Mastery — A Proactive, Room-by-Room Protocol
Shift from reactive responses to strategic stewardship. This protocol groups tasks by location for efficiency—integrate during routine cleaning.
The Kitchen: High-Use Zone
- Under Sink:
- Check supply lines for bulges/corrosion. Consider upgrading to braided stainless steel.
- Inspect P-trap: Tighten slip nuts if leaking (hand-tight + slight turn).
- Clean disposal splash guard periodically with vinegar soak.
- Faucet: Remove aerator quarterly. Soak in vinegar to dissolve mineral deposits. Rinse thoroughly.
- Drain Prevention: Install mesh strainer in sink. Never pour grease down drain—collect in container, discard in trash. Run hot water + enzymatic cleaner monthly.
The Bathroom: Moisture Management
- Sink/Shower:
- Clean pop-up stoppers: Remove hair/debris monthly.
- Re-caulk edges around tub/shower if cracked (prevents water intrusion behind walls).
- Test tub spout diverter: If water leaks from spout during shower, internal cartridge may need replacement.
- Toilet:
- Food coloring test for flapper leaks (monthly).
- Clean mineral deposits from flush holes under bowl rim with vinegar-soaked cloth.
- Check base for moisture or rocking (may indicate seal concern).
- Vent Fan: Run during and after showers. Clean grille periodically to maintain airflow.
Basement and Utility Areas: System Heartland
- Water Heater:
- Annual flush (as detailed in Part 1).
- Check anode rod periodically; replace if significantly corroded.
- Verify T&P discharge pipe extends within 6″ of floor, made of approved material.
- Main Shutoff Valve: Ensure clear access. Label prominently. Test operation annually.
- Cleanouts: Locate external sewer cleanout. Mark visibly. Keep area clear.
- Sump Pump (if present): Test periodically by adding water to pit. Ensure discharge line extends away from foundation.
Seasonal Adjustments
- Winter (Freeze-Prone Climates):
- Insulate exposed pipes in garage, crawlspace, or exterior walls with foam sleeves.
- Disconnect garden hoses; shut off and drain outdoor spigots (hose bibbs).
- Know how to shut off water and drain lines if leaving home during cold weather.
- Spring:
- Inspect outdoor faucets for cracks from freeze-thaw cycles.
- Check grading around foundation—water should slope away from house.
- Consider scheduling sewer inspection if trees are near lateral line.
The 15-Minute Monthly Sweep: Set a recurring reminder. Walk through home: listen for drips, check under sinks, note slow drains. This habit catches many issues early. Document observations in a home maintenance log.
Part 5: Troubleshooting Common Issues — A Diagnostic Flowchart Approach
Avoid misdiagnosis with this systematic method. Start simple, document symptoms precisely, and prioritize safety.
Symptom: Low Water Pressure
- Isolate the Scope:
- Whole-house: Check main shutoff (fully open?), PRV function, or municipal issue (ask neighbors). Test pressure at outdoor spigot if available.
- One fixture: Clean aerator/showerhead. Check stop valve under fixture.
- Hot water only: Sediment in water heater or dip tube concern. Flush heater.
- Cold water only: Kinked supply line (possible with PEX behind walls) or partially closed valve.
- Advanced Check: If pressure drops only when specific appliance runs, consider water hammer or piping constraints. Consult a professional for evaluation.
Symptom: Slow Drain or Clog
- Identify Affected Fixtures:
- Single fixture: Local clog. Start with plunger (create tight seal, pump vigorously). If fails, use hand-crank auger designed for fixture.
- Multiple fixtures on same floor: Clog in branch line. Locate nearest cleanout; snake carefully.
- All fixtures, especially after flushing toilet: Clog in main building drain or sewer lateral. Discontinue water use. Contact a plumber promptly—risk of backup exists.
- Prevention Protocol: Install drain strainers. Never pour grease down kitchen sink. Monthly enzymatic treatment. For recurring concerns, a camera inspection may identify underlying causes (e.g., pipe sag, root intrusion).
Symptom: Dripping Faucet or Running Toilet
- Faucet: Identify type (see Part 3). Turn off stops, disassemble, replace worn parts (washer, O-ring, cartridge). Take old parts to store for matching.
- Toilet: Lift tank lid. If water flows into overflow tube, adjust fill valve height. If water trickles into bowl, flapper may need replacement. Kits are affordable. Tip: Hold flapper closed—if dripping stops, flapper is likely the cause.
Symptom: Strange Noises
- Banging (Water Hammer): Caused by sudden shutoff of fast-flowing water. Install water hammer arrestors near appliance. Also check PRV—pressure outside typical range may contribute.
- Gurgling Drains: May indicate vent obstruction or partial drain blockage. Check roof vents for obstruction. If gurgling occurs when another fixture drains, shared vent may be blocked.
- Whistling: Often related to fill valve in toilet tank or worn washer in faucet. Replace component.
- Rumbling from Water Heater: Sediment buildup at tank bottom. Flush promptly. If persistent, anode rod may need attention.
Symptom: Sewer Odor
- Locate Source: Follow nose. Near floor drain? Sink? Toilet base?
- Check Traps: Pour water down suspect drains. If odor stops, trap was dry.
- Toilet Base: Smell at floor level? Wax ring seal may be compromised. Check for rocking or moisture.
- Persistent Odor: Could indicate cracked pipe, blocked vent, or dried trap in unused fixture. A professional smoke test can pinpoint leaks non-invasively.
Critical: Address persistent sewer odors promptly—gases pose health risks at elevated concentrations.
Diagnostic Wisdom: Document symptoms with precision: “Only upstairs shower has low pressure when kitchen sink runs” is actionable; “water pressure is bad” is not. Begin troubleshooting at the simplest, most accessible point—a clogged aerator is far more common than a main line break.
Part 6: DIY Boundaries and When to Call a Professional
True empowerment includes knowing your limits. Plumbing errors can lead to water damage, mold growth, or safety hazards. This boundary framework supports informed decisions.
Green Light DIY (With Preparation)
- Replacing faucet aerators, showerheads, or toilet flappers
- Unclogging drains with plunger or hand auger
- Installing new braided stainless steel supply lines
- Replacing washer in compression faucet
- Annual water heater flushing (if comfortable with valve operation)
Preparation: Shut off water at fixture stops (or main). Have towels, bucket, replacement parts, and flashlight ready. Review reputable tutorials for your specific fixture. Work deliberately—rushing increases risk of damage.
Yellow Light: Proceed with Caution
- Replacing cartridge in single-handle faucet (risk of damaging valve body)
- Snaking drain beyond P-trap (risk of pipe damage if auger kinks)
- Installing new toilet (requires lifting heavy porcelain; precise seal placement)
- Adjusting PRV (requires pressure gauge and understanding of adjustments)
Recommendation: Have a plumber’s contact saved. If you encounter resistance, unusual sounds, or uncertainty—STOP. A professional consultation prevents escalation. The service fee is often minor compared to potential repair costs.
Red Light: Contact a Licensed Professional
- Any work involving gas lines (e.g., gas water heater replacement)
- Replacing sections of supply or drain pipe inside walls/floors
- Sewer line repairs or replacements (requires excavation, permits, diagnostics)
- Installing new water heater (gas/electrical connections, venting, code compliance)
- Persistent leaks you cannot isolate
- Suspected slab leak (water pooling with no visible source)
- Backwater valve installation or repair
Why Professionals Matter: Licensed plumbers carry insurance for accidental damage. They possess diagnostic tools (video cameras, pressure testers) and knowledge of local codes. Many insurance policies have limitations regarding damage from unlicensed work. A diagnostic call provides clarity and peace of mind.
The Cost-Benefit Perspective: While DIY is appropriate for simple tasks, complex jobs require specialized tools and expertise. Factor in true cost: your time, potential mistakes, stress, and risk. For red-light issues, professional service is an investment in safety, compliance, and long-term value.
Your Questions, Answered
Q: How can I definitively identify polybutylene (PB) pipes in my home?
A: PB pipes are typically gray (sometimes blue, black, or white) and may be stamped with “PB2110” at intervals. Common locations: where pipes enter the house near the water heater, or running horizontally through basement ceilings. They often have copper or plastic crimp rings at connections (not soldered joints like copper). If suspected, consult a licensed plumber for assessment. Many professionals recommend proactive replacement due to documented performance concerns in certain water conditions.
Q: Why does my hot water smell like rotten eggs, but cold water is fine?
A: This often relates to hydrogen sulfide gas interacting with the magnesium anode rod inside the water heater, accelerated by sulfate-reducing bacteria. First, test cold water from an outdoor spigot—if it smells, contact your water provider (municipal issue) or consider whole-house filtration (well water). If only hot water smells: 1) Flush the water heater thoroughly. 2) Consult a professional about replacing the magnesium anode rod with an aluminum-zinc alternative. 3) For persistent cases, a chlorination treatment may be recommended. Never remove the anode rod entirely—it protects the tank lining.
Q: How often should I replace my water heater, and what are the failure warning signs?
A: Industry standards and manufacturer guidelines typically suggest replacement every 8–12 years for tank models, though local water chemistry (hardness, pH) significantly impacts lifespan. Warning signs include: rusty water from hot taps, persistent moisture around the base, rumbling/sediment noises, inconsistent hot water, or the T&P valve discharging intermittently. Proactive replacement before failure avoids potential water damage. Tankless units may last 15–20 years with periodic maintenance.
Q: Are chemical drain cleaners ever safe to use?
A: Enzyme-based cleaners (e.g., Bio-Clean) are generally safe for monthly maintenance—they digest organic buildup without damaging pipes. However, caustic (lye-based) or acid-based chemical cleaners should be avoided. They generate intense heat that may warp PVC pipes, corrode metal joints over time, and pose health risks. For clogs, mechanical methods (plunger, auger) are safer and more effective long-term. If chemicals are used as a temporary measure before professional help, choose one rated for your pipe material and follow instructions precisely—but view it as a short-term step only.
Q: What’s the practical difference between a building drain cleanout and a sewer lateral cleanout?
A: Terminology varies locally, but generally: a building drain cleanout provides access to the main drain line inside your home (often in the basement floor near the toilet). A sewer lateral cleanout is located outside, typically near the foundation wall where the building drain exits toward the street. During a backup, sewage appearing inside the house suggests a clog downstream of the building drain cleanout; sewage backing up outside near the foundation points to a lateral line blockage. Knowing both locations helps direct professional efforts efficiently.
Q: Why does my toilet tank “sweat” in humid summer months, and how do I stop it?
A: Condensation forms when cold water in the tank meets warm, humid bathroom air—similar to a cold drink “sweating” on a hot day. While primarily a nuisance, persistent moisture can damage flooring or promote mold. Solutions: 1) Install an anti-sweat valve (mixes a small amount of hot water with the cold supply). 2) Insulate the tank interior with a foam liner kit. 3) Improve bathroom ventilation (run exhaust fan longer, add dehumidifier). 4) Consider a pressure-assisted toilet (uses less cold water per flush). Address if pooling occurs.
Q: Can I safely install a water softener myself?
A: Installation complexity depends on your plumbing layout, softener type, and local code requirements. Bypass valves, drain line routing (must have air gap), electrical connections (for some models), and brine tank placement require precision. Incorrect installation may cause leaks, reduced efficiency, or void warranties. While skilled DIYers may succeed with detailed instructions, professional installation ensures optimal placement, code compliance, proper drain slope, and warranty validation. Consider your comfort level with plumbing tasks. For most homeowners, professional installation is a prudent investment.
Q: What immediate steps should I take if I discover a significant leak?
A: Follow this protocol: 1) Shut off water at the nearest stop valve. If unavailable or leak is major, shut off the main valve immediately. 2) Contain water with towels, buckets, or wet/dry vacuum. Move valuables away. 3) Document damage with photos/video for insurance claims. 4) Assess scope: Is it a dripping faucet (manageable) or a burst pipe spraying water (emergency)? For significant leaks, contact a plumber promptly—do not wait. 5) Prevent mold: Use fans/dehumidifier to dry area thoroughly after water is controlled. Never ignore even small leaks—they can cause hidden structural damage over time.
Q: How should I prepare my plumbing for an extended vacation (1 month+)?
A: For absences over 30 days: 1) Shut off the main water supply. 2) Flush all toilets to reduce stagnation. 3) Pour non-toxic RV antifreeze (propylene glycol type) into all P-traps—sinks, showers, floor drains—to prevent evaporation and sewer gas entry. 4) Set water heater to “vacation” mode or shut off power/gas per manufacturer guidance. 5) Ask a trusted neighbor to check periodically for leaks or storm damage. Upon return: Run cold water at all faucets for several minutes before using hot water or appliances. Test all fixtures for proper operation.
Q: Are PEX pipes safe for drinking water, and do they affect taste?
A: Yes, PEX tubing certified to NSF/ANSI Standard 61 is approved for potable water use globally. Reputable brands (Uponor, Rehau, Viega) undergo rigorous testing. Some users report a temporary taste after installation—this typically dissipates within weeks. To minimize: 1) Use tubing clearly labeled for potable water. 2) Flush new lines thoroughly before use. 3) Store PEX away from direct sunlight before installation (UV degrades material). Always purchase from reputable suppliers.
Conclusion and Next Step
You now hold a comprehensive understanding of your home’s plumbing ecosystem—not as isolated parts, but as an integrated system where supply pressure and drain airflow must remain in balance. This knowledge empowers you to spot early signs, perform meaningful maintenance, troubleshoot logically, and engage professionals with clarity. Plumbing literacy isn’t about memorizing every detail; it’s about cultivating awareness and respect for the engineering that sustains daily life.
Recap: The Three Pillars of Lasting Plumbing Health
- Systems Thinking: Consider interactions. A drain symptom may relate to supply dynamics (and vice versa). Ask “how” and “why,” not just “what.”
- Proactive Maintenance: The 15-minute monthly sweep and annual protocols prevent many disruptions. Consistency compounds—small actions today support reliability tomorrow.
- Respectful Boundaries: Knowing when to DIY and when to call a pro protects your home, health, and peace of mind. True confidence includes recognizing limits.
The 24-Hour Rule: Your Immediate Action
Within the next 24 hours, locate your home’s main water shutoff valve. Verify it operates smoothly: turn it fully clockwise to close, confirm water stops at a faucet, then turn fully counterclockwise to reopen. If it is stiff, leaking, inaccessible, or you cannot find it, add “evaluate and potentially replace with a quarter-turn ball valve” to your maintenance list. This single action could mitigate water damage during an unexpected event. Share its location with all household members.
The Big Picture
Plumbing is more than pipes and fixtures—it is the circulatory system of your home, directly impacting health, comfort, sustainability, and property value. As you apply this knowledge, you join a community of homeowners who steward their spaces with intention. Share insights with neighbors, discuss findings with family, and approach your next plumbing decision with clarity. Your home’s lifelines deserve this attention. They have silently served you; now you can serve them with informed care.
Explore Our Complete Home Systems Mastery Series:
Understanding Your Home’s Electrical Panel: A Safety-First Guide | HVAC Maintenance Calendar for Every Season | Roof and Gutter Care: A Visual Inspection Protocol | Foundation and Drainage: Protecting Your Home’s Structural Base | Smart Home Water Monitoring: Leak Detection Technology Guide | Sustainable Water Practices: Conservation Without Sacrifice