Create a Dynamic, Multi-Functional Space Through Thoughtful Light Layering, Intuitive Controls, and Human-Centered Design Principles
Move beyond the limitations of a single overhead fixture that leaves your living room feeling flat or uninviting. Thoughtful lighting design is less about selecting decorative fixtures and more about cultivating an environment that gracefully adapts to daily rhythms, supports well-being, and shapes atmosphere with intention. This guide offers a practical, six-part framework inspired by established lighting principles to help you transform any living space—whether newly built, long-inhabited, rented, or owned—into a responsive sanctuary. You’ll learn how to layer light sources purposefully, choose controls aligned with your lifestyle, and avoid subtle missteps that diminish warmth, dimension, and comfort.
Introduction: Why Your Living Room Lighting Feels “Off” (And How to Shift It)
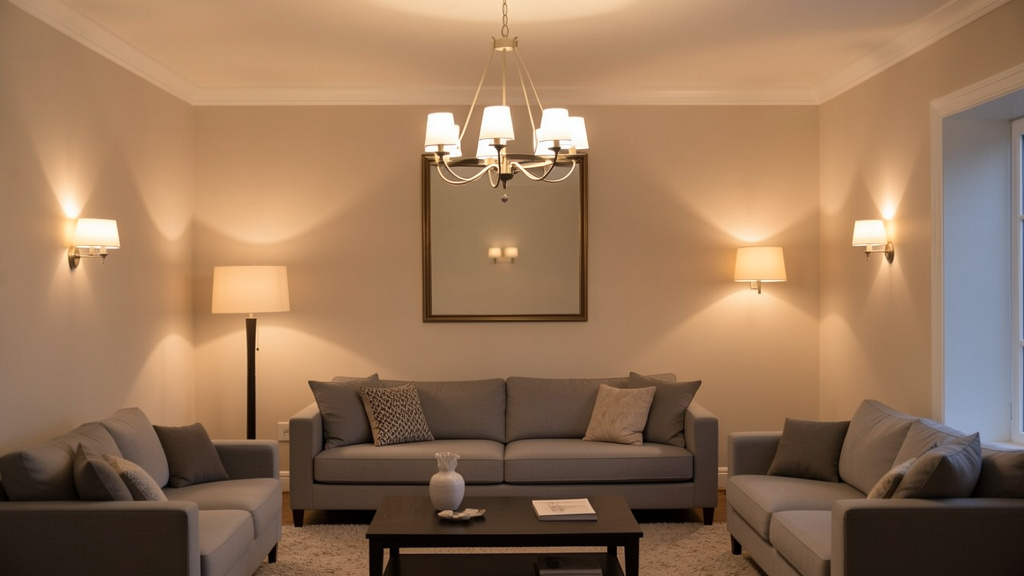
Step into a thoughtfully lit living room in a design publication, and you’ll rarely see a single ceiling light blazing downward like a spotlight. Instead, you’ll notice gentle gradients, pockets of warmth, shadows that add depth, and surfaces that feel inviting. This effect is intentional—not accidental. It stems from layered lighting strategies grounded in decades of architectural and human-centered design practice, including guidelines from organizations like the Illuminating Engineering Society (IES). Yet most homes inherit lighting plans optimized for construction efficiency, not lived experience: one central switch controlling a harsh overhead source, leaving the room either glaringly bright or plunged into shadow. The result? A space that feels sterile during movie nights, strains the eyes during evening reading, or lacks connection during quiet moments.
The path forward lies not in accumulating more lamps, but in adopting a mindful approach. Lighting flexibility emerges from understanding how light interacts with architecture, furniture, human biology, and daily rituals. Consider two similar rectangular living rooms: Room A relies on a single ceiling fixture controlled by one switch. Room B thoughtfully combines indirect ambient sources, targeted task lights for seating areas, and subtle accent lighting on architectural features or artwork. Both may use comparable total light output, yet Room B feels expansive, adaptable, and emotionally resonant. Why? Because light is distributed across vertical and horizontal planes, creating visual interest and functional zones. This guide translates foundational methodology into accessible, actionable steps—whether you’re starting fresh or refining what you have. We begin not with products, but with observation.
The Adaptive Layer Framework: Sculpting Light for Life
Move beyond the oversimplified “ambient, task, accent” model often shared online. While useful as a starting point, it rarely addresses the nuances of modern living: open layouts, multi-generational use, evolving routines, and the emotional role of light. The Adaptive Layer Framework integrates physical layers with human patterns and intuitive control—a holistic system designed to address common lighting challenges with flexibility. Each layer serves a distinct purpose, yet harmonizes to enable smooth transitions between activities and moods. Implement them sequentially for cumulative impact.
Step 1: Conduct a Lifestyle and Space Audit (The Foundational Step)
Before selecting any fixture or bulb, pause. Spend three days observing your living room with fresh eyes. This audit ensures your lighting serves your reality—not an idealized version. Use a simple notebook or digital note with two columns: “Space Realities” and “Human Rituals.”
Space Realities Checklist:
– Dimensions & Architecture: Note room size, ceiling height, and architectural features (crown molding, beams, fireplace, built-ins). Observe how natural light moves through the space: photograph each wall mid-morning, midday, and late afternoon. A south-facing window may flood the room with warm light by afternoon but create glare; a north-facing window offers consistent cool daylight but feels dimmer by evening. These patterns reveal where supplemental light is most needed.
– Furniture Layout & Flow: Sketch a basic floor plan. Mark permanent elements (TV location, large sofa, fireplace). Trace common walking paths. Identify “shadow zones” (behind deep sectionals, corners near chairs) and surfaces needing illumination (reading nooks, console tables, artwork, musical instruments). Note distances between potential light sources and activity areas.
– Existing Infrastructure: Locate all switches, outlets (note switched vs. always-on), and ceiling boxes. Test each switch to confirm what it controls. Photograph switch boxes if considering future updates. Note constraints: radiators blocking outlets, furniture covering floor sockets, thick rugs concealing cord paths.
Human Rituals Checklist:
– Daily Patterns: Track activities hour by hour. Example: “6:30–8:00 AM: Morning coffee on the sofa (needs soft, glare-free ambient light). 4:00–6:00 PM: Remote work at the coffee table (requires even, shadow-minimized task light). 8:00–10:00 PM: TV/movie time (benefits from very low ambient light to reduce screen glare). 10:00 PM: Reading in armchair (needs focused, warm task light).”
– Weekly/Monthly Events: “Friday evenings: Hosting friends (desires layered ambient light that feels energetic yet welcoming). Sunday afternoons: Family board games (needs even illumination over the table without harsh shadows). Monthly: Displaying children’s artwork on the mantel (calls for subtle accent light).”
– Sensory Preferences: Note personal sensitivities: glare tolerance, warmth vs. coolness preference, dislike of visible bulbs, need for near-darkness during rest. Acknowledge emotional responses: “Harsh overhead light feels unsettling,” or “Soft lamp glow supports unwinding after work.”
Why this step matters: Skipping observation often leads to mismatched solutions. Installing bright downlights over a TV area creates screen glare. Positioning a single floor lamp in a corner leaves central seating dim. Choosing cool-toned bulbs for a “modern” look may clash with warm wood finishes. A household that hosts weekly gatherings but audits only for solo relaxation will design a space that feels cavernous during social moments. This step transforms lighting from decoration into behavioral design.
Common pitfalls to avoid:
– Assuming “more light = better.” Over-illumination flattens texture, creates harsh contrasts, and may disrupt natural wind-down cues.
– Ignoring vertical surfaces. Light grazing walls adds perceived depth and spaciousness; focusing only on floors or ceilings can make rooms feel confined.
– Overlooking transition zones. Subtle guidance lighting along pathways between living room and kitchen supports safe movement in low-light conditions.
– Neglecting the exterior view. At night, a dark window acts like a mirror; thoughtful interior lighting makes the space feel welcoming from outside.
Illustrative example: Sarah and Mark felt their 12×15 ft living room lacked warmth despite neutral walls. Their audit revealed: weak afternoon light from a north-facing window, frequent TV viewing hindered by ceiling glare, Mark straining to read in his armchair, and monthly book club gatherings feeling dim. Their solution required no new fixtures—only repositioning existing lamps based on insights: moving a floor lamp behind the sofa to graze the wall (adding warmth), adding a clip-on directional light to Mark’s chair, and using smart bulbs to create a “Gathering” scene with balanced ambient light. With minimal investment, the space felt intentionally curated and deeply functional.
Step 2: Establish Your Ambient Foundation (The Canvas of Comfort)
Ambient lighting provides gentle, overall illumination that enables safe movement and sets the room’s emotional baseline. Critically, it should rarely rely on a single overhead source. True ambient light is diffuse, minimizes harsh shadows, and feels layered across multiple points—like the soft glow of daylight filtering through a window. Indirect ambient strategies, such as light reflected off ceilings or walls, are frequently recommended by lighting professionals for enhancing visual comfort and reducing eye strain. This layer’s purpose is to eliminate “pools of darkness” while avoiding glare hotspots.
Approaches to Quality Ambient Light:
Method A: Indirect Cove or Valance Lighting (Ideal for Renovations/New Builds)
Install LED tape within a ceiling cove or behind a valance so light reflects upward onto the ceiling, then diffuses softly downward. Benefits include zero direct glare, even illumination, and an elevated sense of space. Guidance: Use high-CRI (>90) LEDs in 2700K–3000K; a common guideline suggests 15–20 lumens per square foot of floor area for ambient contribution. Tip: Angle the cove slightly upward to maximize ceiling wash. Avoid placing sources directly above seating areas where reflected light could cause screen glare.
Method B: Uplighting with Floor or Table Lamps (Excellent for Existing Homes & Renters)
Choose lamps with opaque shades (fabric, paper, ceramic) that direct light upward. Torchiere styles or modern uplighting floor lamps work well. Position two symmetrically near the main seating area. For table lamps, select styles where the shade opening faces upward (e.g., drum shades with wide tops). Nuance: Lamp height matters. The bottom of the shade should sit near or slightly above seated eye level (approx. 40–48 inches from floor) to prevent direct bulb visibility. Frosted bulbs further soften the light source.
Method C: Wall-Washing Sconces (Architectural Enhancement)
Install plug-in or hardwired sconces mounted 60–72 inches high, aimed to gently graze the wall surface. This technique adds dimensional depth, especially effective on textured walls or to highlight features. Renters can explore adhesive-mounted plug-in sconces requiring no wiring. Space sconces 6–8 feet apart along longer walls. Adjustable heads allow precise beam control.
Method D: Recessed Light Refinement (Use Thoughtfully)
If existing recessed fixtures are present:
1. Install baffled trims (matte black interiors reduce glare)
2. Add reflector trims to widen beam spread
3. Use dimmable, warm-color LEDs (2700K)
4. Crucially: Control them separately from other layers via dimmer
Relying solely on recessed lights for ambient illumination often creates uneven “pools” of light with harsh shadows. Limit their role to supplemental fill in larger rooms.
Why ambient foundation matters: A poorly balanced base layer forces other lights to overcompensate. If ambient light is too dim, task lights become glaring spotlights. If too bright and direct, accent lights lose contrast and intention. The goal is a soft, even glow where the room’s outline is visible without discerning individual sources. Test your ambient layer alone at dusk: Can you comfortably navigate to any corner? Do walls feel evenly lit? Is there visible glare when looking toward light sources? Adjust until comfort is achieved and glare is minimized.
Common pitfalls to avoid:
– Using cool-white bulbs (4000K+) for ambient light. This often creates a clinical feel that clashes with residential warmth. 2700K–3000K is generally preferred for living areas.
– Concentrating sources only in the room’s center. This creates a “spotlight” effect. Distribute sources around the perimeter for balanced illumination.
– Skipping dimming capability. Ambient light should adjust from daytime supplement to nighttime mood setter. Non-dimmable ambient limits flexibility.
– Overlooking shade material. Thin white fabric can create harsh halos; lined shades in cream, oat, or taupe promote warmer diffusion.
Illustrative example: David found his apartment’s four recessed lights made the space feel unwelcoming despite quality furniture. He added two plug-in uplighting floor lamps in opposite corners, installed adhesive wall sconces flanking the sofa, and replaced recessed bulbs with dimmable 2700K LEDs on a separate dimmer. He now uses recessed lights only for cleaning; evenings rely on the layered ambient glow from lamps and sconces. The room feels more spacious and inviting, achieved through strategic reconfiguration rather than major renovation.
Step 3: Weave in Purposeful Task Lighting (Clarity Without Compromise)
Task lighting delivers focused illumination for specific activities: reading, gaming, crafting, playing instruments, or preparing drinks. Unlike ambient light, it should be directional, adequately bright for the task (without glare), and positioned to minimize shadows on the work surface. A helpful guideline: position light to fall onto the task area from the side opposite your dominant hand. A right-handed reader benefits from light coming from the left to prevent hand shadows. Thoughtfully placed task lighting reduces visual fatigue and supports sustained engagement.
Strategic Task Lighting Zones & Solutions:
Reading Nooks & Seating Areas:
– Adjustable Floor Lamp: Seek styles with 360° swivel heads and height adjustment (“architect” or “gooseneck” types). Position so light directs downward onto the lap or book area, not into eyes. Target 300–500 lumens per reading spot. Tip: Lamps with integrated USB ports reduce cord clutter.
– Swing-Arm Wall Lamp: Mounts directly to wall or furniture. Ideal for tight spaces beside sofas or armchairs. Ensure mounting height allows the shade to sit 12–18 inches above seated shoulder height.
– Directional Table Lamp: Choose lamps with opaque interiors and downward-angled shades (e.g., “empire” shape). Avoid open-top shades that spill unnecessary upward light. Place within easy reach of seating.
Entertainment & Media Zones:
– Bias Lighting Behind TV: Soft, low-intensity light mounted behind the screen frame reduces contrast between the bright display and dark room—a technique often recommended to support visual comfort during extended viewing. Use warm white (2700K) at minimal brightness, just enough to eliminate the “black hole” effect. Some smart strips offer subtle color-syncing for immersion.
– Console Table Light: For TVs on consoles, a small, dimmable lamp on the surface provides soft fill light during movies without reflecting on-screen. Select a shade that directs light downward, away from the screen.
Multi-Functional Surfaces (Coffee Tables, Desks, Game Areas):
– Adjustable Desk-Style Lamp: Compact lamps with flexible arms allow precise positioning over game boards, laptops, or craft projects. Models offering multiple brightness levels and adjustable color temperature (e.g., 2700K–4000K) provide versatility—warmer for relaxation, slightly cooler for concentration.
– Pendant Over Table (For Dedicated Setups): If a coffee table consistently serves activity-focused roles, a low-hanging pendant (30–36 inches above surface) with dimming capability can work well. Note: Best suited when the table isn’t used for tall-standing activities.
Why intentional task lighting matters: Task lights solve specific visual needs. Reading under ambient light alone forces constant pupil adjustment between page and surroundings—a contributor to eye strain. Gaming in a dark room with only screen light creates high contrast that may lead to fatigue. Proper task lighting creates visual anchors that reduce cognitive load. Additionally, well-placed task lights allow ambient levels to remain lower overall, enhancing mood and supporting natural wind-down.
Common pitfalls to avoid:
– Positioning lights behind the user. This casts shadows of hands or head onto the work surface. Position to the side or front-left (for right-handers).
– Using bare bulbs or clear glass shades. Creates harsh glare points. Always use diffused shades or frosted bulbs.
– Overlooking color rendering (CRI). For color-sensitive tasks (sewing, art), bulbs with CRI >90 reveal truer colors. Standard LEDs (CRI 80) may distort subtle hues.
– Ignoring switch accessibility. Task lights should have intuitive controls—touch sensors, pull chains, or nearby switches. Reaching across the room defeats the purpose.
Illustrative example: Maria, an illustrator who sometimes works at her living room coffee table, experienced eye fatigue due to hand shadows under ambient light. She added an adjustable desk lamp with high CRI and variable color temperature, clamped to the table edge on her left side (she’s right-handed). Positioned to eliminate shadows, it provides crisp illumination for detailed work at 4000K and shifts to warm, soft light for evening sketching. This small addition transformed the table into a functional creative zone without disrupting the room’s overall ambiance.
Step 4: Accentuate with Intentional Highlights (Depth, Focus, and Character)
Accent lighting draws attention, reveals texture, creates focal points, and adds emotional resonance. Unlike task lighting (functional) or ambient (foundational), accent lighting is atmospheric—yet its psychological impact is significant. Well-placed accent light can enhance the perception of space by highlighting architectural details or cherished objects, making environments feel more intentional. A useful guideline: accent light on a surface is often noticeably brighter than the surrounding ambient level to create gentle contrast and visual hierarchy.
Meaningful Accent Lighting Applications:
Artwork Illumination:
– Picture Lights: Mount above frames with adjustable arms to aim light precisely. For light-sensitive art, LEDs with minimal UV emission are preferred. Position so the beam covers the artwork without spilling widely onto the wall. Distance from top of frame: 6–12 inches.
– Track or Monorail Spots: Ideal for multiple pieces. Install tracks parallel to the wall; position spots 12–24 inches from the wall, aimed at a gentle angle toward the art. Narrow spots (15° beam) suit small pieces; wider floods (36°) suit large canvases.
– Plug-In Wall Washers: Renters can use adhesive-mounted fixtures that graze the wall around art, creating a “floating” effect. Ensure beam width aligns with the artwork’s dimensions.
Architectural Feature Highlighting:
– Fireplace Mantel: Small LED puck lights inside the mantel shelf facing downward can graze the brick or stone below. Alternatively, mini spots mounted on the ceiling aimed at the mantel front. Avoid lighting the firebox itself—it competes with flames.
– Built-In Shelving: LED tape mounted along the front underside of each shelf creates a “floating” illusion and illuminates displayed objects. Diffuser channels help eliminate visible LED dots. Warm white complements wood tones.
– Textured Walls (Brick, Stone, Shiplap): Wall-grazing technique. Mount fixtures close to the wall (6–12 inches), aimed downward. Light skims the surface, emphasizing texture through subtle shadow play. Space fixtures 3–4 feet apart.
Decorative Object Spotlighting:
– Console Table Vignettes: Small directional spots mounted on a high shelf or ceiling, aimed at sculptures, vases, or curated books.
– Indoor Plants: Clip-on lights with a warm-white spectrum highlight leaf texture without casting distracting shadows. Avoid harsh blue-heavy spectra.
– Room Dividers or Screens: Backlight translucent screens (rice paper, etched glass) for a soft glowing effect using low-lumen LED strips hidden behind the structure.
Why accent lighting transforms perception: In a room with only ambient and task light, surfaces can appear flat. Accent lighting reintroduces dimension through controlled light and shadow. A blank wall feels empty; the same wall with subtly lit texture feels rich and tactile. A dark corner feels unused; the same corner with grazed architectural detail becomes a point of interest. This layer guides the eye, tells a story about what you value, and creates moments of discovery as you move through the space.
Common pitfalls to avoid:
– Over-accenting. More than 3–4 focal points can create visual competition. Prioritize 1–2 primary accents (e.g., main artwork + fireplace) and 1–2 secondary.
– Using cool-white light for accents. Warm light (2700K–3000K) generally enhances wood, fabric, and skin tones; cool light may feel sterile in relaxation spaces.
– Ignoring beam spread. Too narrow creates a hotspot; too wide washes out detail. Match beam angle to the target’s size and distance.
– Creating glare on reflective surfaces. Test angles to avoid reflections on glass-framed art or glossy finishes.
Illustrative example: Ben felt his living room lacked character despite quality furnishings. His audit revealed a striking reclaimed wood beam across the ceiling, buried in shadow. He installed two small, adjustable spots aimed to gently graze the beam’s texture. At night, the warm light dancing across the wood grain became the room’s soulful centerpiece. Guests frequently comment on the ceiling’s warmth. He added a second accent: LED tape under the floating media console, creating a soft glow that makes the unit appear to hover. This focused enhancement transformed the space’s narrative with minimal intervention.
Step 5: Design Your Control Ecosystem (The Key to Flexibility)
Layers alone cannot deliver flexibility without intuitive control. A room with perfect fixtures but only one wall switch remains static. The control ecosystem determines how effortlessly you shift between moods and activities. Effective control ranges from elegantly simple (multiple dimmers) to thoughtfully automated (scenes). The goal: minimize friction. Adjusting the room’s lighting should feel as natural as changing a TV channel.
Control Strategy Spectrum: From Simple to Streamlined
Level 1: Manual Dimming (Accessible Foundation)
Install separate dimmer controls for distinct lighting groups:
– Dimmer A: Ambient sources (uplights, cove)
– Dimmer B: Task lights (reading lamps, TV bias light)
– Dimmer C: Accent lights (art, shelves)
Implementation: For hardwired lights, replace standard switches with compatible dimmers. For plug-in lamps, use dimmable smart plugs or in-line dimmers. Tip: During setup, label controls discreetly (“Ambient,” “Task”). Experiment with combinations: “Movie Mode” = Ambient dimmed low, bias light on softly, accent off. “Reading Mode” = Ambient moderate, task light bright, accent subtle.
Level 2: Scene-Based Control (Highly Practical for Daily Use)
Program preset scenes that adjust multiple lights simultaneously with one action. Achieved via:
– Smart Bulbs + App: Create scenes like “Sunset Relax” (all lights warm, low brightness), “Game Night” (ambient moderate, task lights bright, shelf accents on).
– Smart Switches + Scenes: Systems allowing one button press to trigger multiple actions. Advantage: Control remains functional even if bulbs are replaced later.
– Voice Control: “Set Living Room to Relax Mode.” Valuable for hands-free use during cooking, caregiving, or mobility considerations.
Critical nuance: Place scene controls where needed—not just by the main entrance. Add a secondary button by the sofa for “Relax,” or a bedside remote for “Goodnight” (gradually dims all lights before off).
Level 3: Adaptive Automation (Supporting Well-Being)
Lights respond thoughtfully to time, presence, or daylight:
– Circadian Support: Systems that gradually shift color temperature throughout the day (cooler morning light for alertness, warmer evening light for relaxation). Budget-friendly alternative: Schedule smart bulbs to shift from 3500K midday to 2200K by evening.
– Occupancy/Vacancy Sensors: Automatically turn lights on when entering (occupancy) or off when empty (vacancy). Ideal for pathways. Note: Choose sensors with pet immunity if applicable.
– Daylight Responsiveness: Photocells dim electric lights when ample natural light is present. Best for rooms with large south/west windows. May require professional installation.
Why control strategy matters: Without layered control, people often default to the easiest option—frequently the overhead light at full brightness. Limited control can lead to over-illumination during relaxation times. Conversely, intuitive scene controls empower effortless adaptation to changing needs. Control removes decision fatigue. Instead of adjusting multiple lamps and switches, a single command transforms the space. This ease is what makes lighting feel responsive and personal.
Common pitfalls to avoid:
– Over-complicating scenes. Start with 3–4 essential scenes: Relax, Focus, Gather, Nightlight. Expand only if needed.
– Ignoring physical control placement. A scene buried deep in an app is impractical when hands are full. Prioritize accessible buttons in key locations.
– Mixing incompatible technologies. Research compatibility before purchasing to avoid connectivity issues.
– Overlooking the transition to darkness. A “Goodnight” scene that gradually dims lights over 60 seconds feels gentler than abrupt shutdown.
Illustrative example: The Chen household (two parents, two teens) experienced frequent lighting disagreements. Dad preferred bright light for reading; teens wanted dim for gaming; Mom sought ambiance for guests. They implemented a system with four clearly labeled scenes controlled by wall-mounted remotes in key locations:
– “Family” button (entrance): Balanced ambient, task lights on, accent off
– “Movie” button (by sofa): Ambient low, bias light on, accent off
– “Focus” button (near desk area): Ambient moderate, task lights bright, shelf accents on
– “Goodnight” button (hallway): All lights fade to off gradually
This solution brought harmony. Each person independently sets the room to their need with one press. The system adapted to their evolving routines without complexity.
Step 6: Harmonize with Natural Light Cycles (Supporting Well-Being)
Beyond aesthetics and function, light interacts with human biology. Specialized cells in our eyes detect light intensity and color, influencing our internal clock—which regulates sleep, mood, and alertness. Research from institutions like Harvard Medical School indicates that exposure to cooler, blue-rich light (above 3000K) in the evening may suppress melatonin production and delay sleep onset for some individuals. Conversely, warmer, amber-rich light (under 3000K) in the evening aligns with natural wind-down cues. Integrating this awareness transforms your living room into a space that actively supports restoration.
Practical Integration Strategies:
Evening Wind-Down (Approx. 7 PM–Bedtime):
– Shift light sources warmer. Replace any remaining cool-white bulbs. Use smart bulbs to schedule an automatic shift toward warmer tones at sunset.
– Gradually reduce brightness. Aim for ambient light at lower levels by late evening. Task lights for reading should be warm-toned and shielded to avoid direct eye exposure.
– Minimize blue-light sources: Enable device night modes. Be mindful of cool-toned light spilling from adjacent rooms (like kitchens).
– Consider candlelight simulation: Flame-effect LED candles or bulbs that shift warmer as dimmed can provide a gentle psychological cue for relaxation.
Daytime Support (Sunrise–Evening):
– Maximize natural daylight. Keep window treatments open during daytime when possible. Position seating to benefit from daylight (without glare).
– Supplement thoughtfully on cloudy days. If using tunable-white bulbs, a slightly cooler (3500K–4000K), moderate-brightness setting may help combat afternoon fatigue. Note: Avoid cooler tones after late afternoon.
– Task lighting for focus: Slightly cooler, brighter task lights can support concentration for detailed work like reading mail or crafting—localized to the task area without flooding the whole room.
Special Considerations:
– Shift Workers: Consult health professionals. Some find bright, cooler light helpful before and during night shifts to support alertness, followed by darkness and warm, dim light after shift for sleep preparation.
– Seasonal Light Changes: During shorter winter days, ambient light may be needed earlier in the afternoon. Adjustable controls allow easy adaptation to changing daylight patterns.
– Individual Sensitivity: Children’s eyes may transmit more blue light. Prioritize warm, dimmable lighting in family spaces used for evening routines. Observe personal responses and adjust accordingly.
Why this layer matters: Ignoring light’s biological role can have subtle consequences: disrupted sleep patterns, next-day fatigue, or mood fluctuations. A living room designed with circadian awareness becomes a sanctuary that supports restoration. It’s not about eliminating all cooler light—it’s about timing. Using slightly cooler light intentionally during daytime hours may boost alertness; reserving warm light for evenings signals safety and rest to the nervous system. This alignment reduces physiological stress, making the space feel not just beautiful, but deeply nurturing.
Common pitfalls to avoid:
– Using very cool bulbs (5000K+) in living areas. These are typically suited for task-oriented spaces like garages or workshops, not relaxation zones.
– Overlooking light direction. Even warm light shining directly into eyes at night may be disruptive. Shield sources below seated eye level.
– Assuming dimming alone suffices. Dimming a cool-toned bulb still emits wavelengths that may interfere with wind-down for sensitive individuals. Color temperature shift is equally relevant.
– Ignoring personal variation. Sensitivity varies. Pay attention to your own sleep quality and adjust lighting habits accordingly.
Illustrative example: Lena, a healthcare worker on rotating shifts, struggled with inconsistent sleep. Her living room featured bright, cool-toned recessed lights used until bedtime. After learning about light’s role in circadian rhythms, she:
1. Replaced bulbs with dimmable 2700K LEDs
2. Programmed smart bulbs to shift progressively warmer after sunset
3. Added a dedicated warm-dimmable lamp for pre-sleep reading
4. Used blackout curtains during daytime rest periods
Over several weeks, she noticed improved ease falling asleep and feeling more rested. Her living room became an active participant in her well-being routine—not just a place to unwind.
The Guiding Principle: Lighting is not about fixtures alone; it’s about shaping space and time through intentional contrast and control. Every light source, color temperature, and beam angle contributes to an environment designed not to impress, but to serve the people within it with care and responsiveness.
Navigating Real-World Constraints: Adaptable Solutions for Every Home
Theory meets practice in the beautiful complexity of actual homes. Low ceilings, open layouts, rental restrictions, and budget considerations aren’t obstacles—they’re design parameters. True adaptability shines in tailoring the framework to your specific context. Below are practical, field-tested approaches for common scenarios.
Low Ceilings (Under 8 Feet): Creating Perceived Height
Challenge: Overhead fixtures can emphasize crampedness; uplighting may feel oppressive.
Solutions:
– Minimize downward-facing ceiling lights. Replace bulky flush mounts with ultra-slim profiles that recede visually.
– Focus light horizontally and downward. Use wall sconces aimed downward (not up), floor lamps with wide drum shades casting light outward, and subtle under-sofa LED strips to create a “floating” effect that draws eyes downward, making ceilings feel higher by contrast.
– Strategic mirror placement: Position a large mirror opposite a window or light source. Reflections enhance perceived depth. Angle slightly upward to visually “lift” the space.
– Vertical accent lighting: Install narrow LED strips inside tall bookshelf units, illuminating contents from within. Draws eyes upward along vertical lines.
Tip: Painting the ceiling and upper wall section in a slightly lighter shade than lower walls, enhanced by gentle wall grazing, can create an optical lift.
Open Floor Plans: Defining Zones Without Walls
Challenge: Light spills into adjacent areas; unclear boundaries; single-switch control limits flexibility.
Solutions:
– Zone-based control is essential. Create separate dimmer circuits or smart groups for Living Zone, Dining Zone, Kitchen Zone—even if wiring is shared, smart plugs on lamps establish virtual zones.
– Anchor each zone with distinct ambient sources: Living area = uplighting floor lamps; Dining area = dimmable pendant over table; Kitchen peninsula = under-cabinet strips. Different fixture styles reinforce zone identity.
– Use area rugs as visual anchors. Position ambient and task lights within rug boundaries. Light feels “contained” to the zone.
– Directional accent lighting: Aim wall sconces or spots into the living zone, away from adjacent areas. Creates a subtle “light curtain” defining space.
Tip: For TV zones near kitchens, bias lighting behind the TV plus a narrow LED strip along the top edge of a room divider (shelf, half-wall) creates a visual buffer reducing kitchen light spill during movies.
Renter-Friendly Solutions (Zero Permanent Changes)
Challenge: Cannot install hardwired fixtures, change switches, or drill holes.
Solutions:
– Plug-in everything: Floor lamps, table lamps, adhesive-mounted plug-in sconces, plug-in picture lights. Use cord covers (paintable raceways) to neatly route wires along baseboards.
– Smart plugs as dimmers: Dimmable smart plugs control lamp brightness via app or voice. Group multiple plugs into “scenes.”
– Temporary adhesive solutions: High-bond removable strips (tested on inconspicuous areas first) can hold lightweight sconces, LED strips with mounting channels, or picture lights. Remove slowly with gentle heat if needed.
– Furniture-integrated lighting: Select sofas with built-in USB ports for clip-on reading lights; choose media consoles with pre-installed LED strips.
Tip: Create a portable “lighting kit” in a decorative basket: dimmable lamp, clip-on art light, LED strip roll. Your lighting system travels with you between homes.
Budget-Conscious Upgrades: High-Impact, Accessible Steps
Challenge: Limited funds but desire meaningful improvement.
Solutions (Prioritized by Impact):
1. Replace bulbs with dimmable 2700K LEDs (CRI >90). Impact: Significant improvement in light quality and flexibility.
2. Add one strategic floor lamp with adjustable arm for a primary reading nook. Impact: Solves a core task lighting need.
3. Install dimmable smart plugs on existing lamps. Impact: Enables brightness control and scene creation without rewiring.
4. Add LED tape under media console for ambient depth. Impact: Instant modernity and dimension.
5. Explore dimmer switch overlays for existing switches (where compatible). Impact: Adds dimming to hardwired lights affordably.
Tip: Thrift stores and online marketplaces often have quality lamp bases. Pair with a new shade and bulb for a custom look at low cost.
Working With Existing Wiring
Challenge: Only one ceiling junction box; switched outlets in inconvenient locations.
Solutions:
– Convert a switched outlet: Plug a floor lamp into the switched outlet. The wall switch now controls the lamp—effectively adding a controllable “ceiling light” without new wiring. Choose a lamp with a wide shade for ambient effect.
– Plug-in track lighting: Adhesive-mounted track near the ceiling, plugged into a nearby outlet, adds directional spots for art or task lighting.
– Strategic lamp placement: Position two floor lamps symmetrically where recessed lights might go. Control via smart plugs grouped under one scene button.
– Consult an electrician for minimal upgrades: Sometimes adding one additional junction box unlocks significant flexibility. Evaluate based on long-term plans.
Tip: Map your circuits. Turn off breakers one by one to identify what shares a circuit. You may discover an unused outlet ideal for a new lamp location.
Understanding Light Sources: A Practical Guide to Bulbs and Specifications
Bulbs are the “paint” of lighting design. Thoughtful selection ensures your fixture strategy achieves its intended effect. Packaging terminology can be confusing—this section translates technical terms into practical outcomes for your living room.
Lumens: Measuring Useful Brightness (Beyond Watts)
Watts indicate energy use; lumens measure visible light output. Use these room-focused guidelines:
– Ambient Layer: Target approximately 10–20 lumens per sq ft of floor area, distributed across multiple sources. For a 200 sq ft room: 2,000–4,000 total lumens from combined ambient sources.
Example: Two floor uplights (800 lumens each) + two wall sconces (400 lumens each) = 2,400 lumens ambient.
– Task Layer: 300–800 lumens focused on the work surface. Reading lamp: 450 lumens minimum. Desk lamp: 600–800 lumens.
– Accent Layer: 100–300 lumens per target. Art light: ~200 lumens. Shelf puck light: ~150 lumens.
Important nuance: Perceived brightness depends on beam angle and surface reflectivity. A 400-lumen narrow spot appears more intense on a small painting than a 400-lumen flood washing a large wall. Always consider where the light lands.
Color Temperature (Kelvin): The Emotional Quality of Light
Measured in Kelvin (K), this defines light “warmth” (yellow/red tones) or “coolness” (blue tones). Lower numbers = warmer; higher = cooler.
– 2200K–2700K (Warm White/Candlelight): Cozy, intimate, relaxing. Ideal for: Evening ambient light, bedside lamps, accent lighting. Mimics sunset or firelight. Supports wind-down.
– 3000K (Soft White): Neutral warmth. Crisp but not clinical. Ideal for: General ambient light in most living rooms. A versatile, residential-friendly default.
– 3500K–4000K (Bright White): Alert, focused. Use selectively: Daytime task lighting for detailed work. Generally avoid in living rooms after late afternoon.
– 5000K+ (Daylight): Stark, blue-rich. Best reserved for: Garages, workshops, or art studios requiring true color matching. Not recommended for relaxation spaces.
Tip: “Warm dim” capable bulbs shift from 2700K to 2200K as dimmed—mimicking traditional incandescent behavior. A worthwhile consideration for lamps used during evening relaxation.
CRI (Color Rendering Index): Faithfulness of Color
CRI measures how accurately a light source reveals colors compared to natural light (CRI 100).
– CRI <80: Colors may appear dull or muted. Common in budget bulbs; best avoided in main living areas.
– CRI 80–89: Acceptable for utility spaces like hallways or closets.
– CRI 90+: Recommended for living rooms—colors appear vibrant, skin tones look natural. Notice the difference on rich textiles or artwork.
Where to prioritize: Task lights for reading or crafts, art accent lights, areas where people gather. Where flexibility exists: Utility closet interiors, under-cabinet task strips in kitchens.
Bulb Shapes and Bases: Quick Reference
- A19: Standard “light bulb” shape. Fits most table/floor lamps.
- BR30/BR40: Floodlights for recessed cans. BR30 for standard 5–6″ cans; BR40 for larger housings.
- PAR38: Narrow spot for track lighting or outdoor use.
- E26: Standard medium screw base (common in North America).
- E12: Candelabra base (chandeliers, decorative lamps).
- GU10: Twist-lock base (common in track spots; verify fixture compatibility).
Tip: Before shopping, note the shape and base of the bulb you’re replacing. A quick photo with your phone prevents mismatches.
Dimmability: Ensuring Smooth Performance
Not all LEDs dim well. Poor compatibility causes flickering, buzzing, or limited range. Ensure harmony:
1. Bulb must be labeled “Dimmable”.
2. Check the bulb manufacturer’s dimmer compatibility list.
3. Match dimmer type:
– Leading-edge (TRIAC) dimmers: Older standard; may buzz with low-wattage LEDs.
– Trailing-edge (ELV) dimmers: Newer standard; smoother dimming for LEDs. Many modern dimmers specify LED compatibility.
4. Test before committing: Buy one bulb, test across the full dimming range with your existing dimmer. Listen for noise; check for flicker at low settings.
Note: If bulbs flicker below 30% brightness, you may need a trailing-edge dimmer or bulbs with a lower minimum dimming threshold.
Common Challenges and Thoughtful Solutions
Even well-considered lighting plans encounter predictable nuances. Addressing these proactively enhances comfort and function.
Managing Glare: Comfortable Light
Glare occurs when light sources are too bright relative to surroundings or positioned in direct line of sight.
– Disability Glare: Light scatters in the eye, reducing visibility (e.g., window reflection on TV screen). Solution: Bias lighting behind TV; adjust lamp positions to avoid screen reflections; use window treatments during bright hours.
– Discomfort Glare: Causes squinting or headaches without blocking vision (e.g., visible bare bulb from seating). Solution: Use shades with opaque interiors; position lamps so bulbs aren’t visible when seated; choose baffled trims for recessed fixtures.
Simple test: Sit in your primary seating position. Look toward each light source. Can you see the bare bulb or LED array? If yes, add diffusion (frosted bulb, fabric shade) or reposition the source.
Taming Unwanted Shadows
Harsh shadows under eyes (from overhead lights) or across work surfaces disrupt comfort. Solutions:
– For ambient light: Use multiple lower-intensity sources instead of few bright ones.
– For task light: Position to the side of your dominant hand; use diffused shades.
– For TV viewing: Eliminate light sources reflecting on screen—reposition lamps, adjust window coverings.
Harmonizing Color Temperatures
Mixing 2700K and 4000K bulbs in the same visual field creates visual dissonance. Solution: Audit bulbs in connected spaces visible from your living room (hallway, kitchen). Standardize to 2700K or 3000K throughout main living areas. Use tunable-white smart bulbs to shift temperatures intentionally over time rather than mixing fixed-color sources.
Simplifying Control
If adjusting lighting requires unplugging lamps, climbing on furniture, or navigating complex app menus—people won’t use it. Solution: Prioritize physical controls in key locations. A small remote by the sofa is more valuable than a buried app scene. Make the right lighting choice the easy choice.
Embracing Shadow and Dimension
More lumens don’t equal better lighting. Over-illumination flattens texture, creates harsh contrasts, and may disrupt relaxation cues. Solution: Start dim. Install dimmers on every circuit. Begin evenings at lower brightness levels; increase only if needed. Recognize shadow as a design element—it creates depth, mystery, and visual interest.
Your Questions, Answered
Q: How many light sources are recommended for a standard 12×15 ft living room?
A: Aim for 6–10 distinct sources distributed across layers. Example: 2 ambient uplights, 2 task lamps for seating areas, 1 TV bias light, 2 accent lights (art/shelves), 1 console lamp. This creates dimensional light without clutter. Fewer than 5 sources may feel flat; more than 12 requires careful curation to avoid visual noise.
Q: Is it acceptable to mix different lamp and fixture styles in one room?
A: Yes—and often recommended. Uniform matching fixtures can feel staged. Instead, curate lamps with complementary elements: same shade color but different bases; same metal finish but varied silhouettes. This creates an authentic, collected-over-time feel. Key: Maintain consistency in light quality (all 2700K–3000K, high CRI) so the light feels cohesive even if fixtures differ.
Q: My living room has only one ceiling light controlled by a switch at the door. I can’t rewire. What’s a practical first step?
A: Three accessible actions: 1) Replace the bulb with a dimmable 2700K LED. 2) Plug a floor uplight lamp into a switched outlet (if available) or a nearby outlet controlled by a dimmable smart plug. 3) Add a second floor lamp in the opposite corner on another smart plug. Group both plugs into an “Ambient” scene controlled by voice or a simple button. This creates layered, dimmable ambient light without electrical work.
Q: How do smart bulbs compare to smart switches for living room lighting?
A: Consider your priorities. Smart bulbs offer per-bulb control and color options; ideal for renters or accent lights needing individual adjustment. Downsides: bulbs remain powered at the switch; replacing bulbs means replacing smart functionality. Smart switches control entire circuits reliably; ideal for ambient or task groups, adding resale value. Downsides: may require a neutral wire; all bulbs on the circuit change together. For primary living room lighting, smart switches controlling dimmable LEDs often provide the most seamless experience. Use smart bulbs selectively for accent zones.
Q: How should I light a living room with a large sectional sofa?
A: Sectionals create deep seating zones. Strategy: 1) Place floor lamps behind the sofa (not just in corners) to uplight the wall and provide ambient fill over the seating area. 2) Add clamp-on or swing-arm lamps mounted on the sofa’s side panels for personal task lighting. 3) Use subtle LED tape under the front edge of the sectional to create a soft glow that defines the zone and aids nighttime navigation. Avoid relying solely on corner lamps—they may not reach the sectional’s center.
Q: What is the most frequent lighting oversight in homes?
A: Relying solely on a central overhead light as the primary source. This creates unflattering shadows, eliminates visual depth, and offers minimal flexibility. It’s a construction default, not a design choice. The solution isn’t always removal—it’s strategic supplementation with layered sources and ensuring the overhead is dimmable and used intentionally (e.g., for cleaning). True lighting design happens at the periphery, not the center.
Q: How do I choose between 2700K and 3000K for my living room?
A: Consider your finishes and primary use. Choose 2700K if: walls are warm-toned (beige, cream), wood furniture is medium to dark, and the room is primarily used for relaxation after sunset. Choose 3000K if: walls are cool-toned (gray, white), finishes are modern (chrome, glass), the room receives limited natural light, or it’s used for daytime activities like remote work. When uncertain, 2700K is widely flattering for skin tones and creates a cozier ambiance. Test samples in your space at dusk before finalizing.
Q: Can evening lighting choices impact sleep quality?
A: Research indicates that exposure to cooler, blue-rich light (above 3000K) in the 1–2 hours before bedtime may suppress melatonin production and delay sleep onset for many people. Conversely, warmer, dimmer light (under 2700K) aligns with natural wind-down cues. A simple practice: shift living room lights to warmer tones after sunset and reduce overall brightness in the evening. This adjustment supports the body’s natural transition toward rest for many individuals.
Q: How can I light a living room with vaulted ceilings effectively?
A: Vaulted ceilings absorb light. Strategy: 1) Install cove lighting at the peak to wash the entire ceiling surface—this enhances perceived spaciousness. 2) Use wall sconces aimed upward to graze the sloped walls, emphasizing height. 3) Place floor lamps with wide drum shades that cast light outward horizontally. 4) Avoid recessed downlights—they can create dark pools on the floor. If using track spots, aim them at walls or artwork, not downward. Goal: Illuminate the architecture itself.
Q: What is a “warm dim” bulb, and is it beneficial?
A: Warm dim bulbs shift from 2700K to 2200K (candlelight warmth) as they dim—mimicking traditional incandescent behavior. Standard dimmable LEDs maintain a fixed color temperature while dimming. Beneficial? Yes for ambient sources used during evening relaxation in living rooms and bedrooms. The psychological cue of warmer light as brightness decreases can support wind-down. For task lights used briefly, standard dimmable LEDs are often sufficient. Prioritize warm dim capability for primary ambient layer sources.
Q: How do I light a living room that also functions as a home office?
A: Create distinct but overlapping zones. Office zone: Dedicated task lamp (adjustable arm) on the desk, bias lighting behind the monitor. Living zone: Ambient uplights, sofa task lamps. Control strategy: Program two scenes—”Work Mode” (desk task light bright, ambient moderate, living zone dim) and “Relax Mode” (office light off, living zone ambient warm). A room divider (bookshelf, screen) with integrated lighting can visually separate zones. Ensure office task light doesn’t cast glare on the TV or create shadows in the living area.
Q: Are LED strip lights reliable for permanent-looking installation?
A: High-quality LED strips with aluminum mounting channels and diffusers offer reliable, even illumination when installed correctly. Key considerations: 1) Choose strips with an IP65 rating (dust/moisture resistant) for better heat management, even indoors. 2) Always use a diffuser channel to eliminate “dotting” (visible individual LEDs). 3) Size the power supply appropriately (add 20% headroom to strip wattage). 4) Select reputable brands known for color consistency and longevity. For under-cabinet or cove applications, quality LED strips often provide smoother light than discrete puck lights.
Conclusion: Cultivating a Living Room That Grows With You
Lighting is the silent choreographer of home life. It doesn’t command attention like furniture or art, yet it shapes every moment within four walls—how colors are perceived, how energy flows, how deeply we rest. The Adaptive Layer Framework offers a pathway to transform lighting from an afterthought into an intentional practice. You’ve moved beyond selecting “pretty lamps” toward engineering environments that honor human patterns, support daily rituals, and evolve with changing needs. This journey isn’t about achieving perfection on day one. It’s about progressive, mindful refinement.
Recap: Three Guiding Pillars
1. Layer with Purpose: Ambient foundation + intentional task + thoughtful accent + intuitive control + circadian awareness. No single source carries the entire burden.
2. Control with Compassion: Make the right lighting choice effortless. Physical buttons in key locations > buried digital menus. Dimming capability is foundational to flexibility.
3. Center the Human Experience: Prioritize warm-toned light after sunset. Shield glare. Position task lights to eliminate shadows. Remember: light serves the person in the room, not the room itself.
The 24-Hour Invitation: One Small Step
Before tomorrow ends, try this: At dusk, turn off your main overhead light. Sit in your living room with only existing lamps illuminated. Notice: Where are the shadow zones? Where does light cause discomfort? What feels missing? Then, move one lamp. Shift a floor lamp from the corner to behind the sofa. Angle a table lamp away from the TV. This single act of observation and gentle adjustment begins the shift from passive inhabitant to active steward of your light. No purchase required. Just awareness.
The Evolving Perspective: Lighting as a Living System
Your living room lighting will naturally evolve as your life does. A new family member introduces needs for nightlights and safe pathways. Retirement shifts evening routines toward deeper relaxation. Seasons change daylight patterns. The framework adapts because it’s built on principles, not rigid prescriptions. Revisit your Lifestyle Audit seasonally. Tweak a scene. Add a plug-in sconce. Replace a bulb with higher CRI. This ongoing dialogue between space and self is where true home-making unfolds. You’re not merely installing lights—you’re cultivating atmosphere, supporting well-being, and crafting moments of quiet connection in ordinary evenings. The room that once felt “flat” now breathes with you: energizing at dawn, comforting at dusk, and always, unmistakably, yours.
Explore Our Complete Lighting Design System:
Mastering Kitchen Task Lighting: Glare-Free Countertops & Smart Zones | Bedroom Lighting for Restful Sleep: Circadian Strategies That Support Well-Being | Entryway Lighting Psychology: Creating Instant Welcome & Safety | Dining Room Lighting Mastery: Flattering Light for Every Gathering | Outdoor Living Lighting: Extending Your Home After Dark | The Renter’s Lighting Toolkit: 10 No-Damage Upgrades Under $100 | Lighting for Changing Vision: Enhancing Clarity and Comfort at Every Age